![]()
The Supply Store
Back to YouCanDraw .Com
Shapes
and Masses of the Head |
Preparing
to build Mr. Johnny Average Head's
Miter Box: going 3-d
Quick review. Up to this point in the masses of the head section, you've taken a quick look at the bony structure of the head, the front view, and the side views. You saw something of the structure of what's behind the surface of a persons face. You have a pretty good feel for the two dimensional ways of looking at the head: both front and side views.
Now, we're going to take a quantum step up and combine those two views. There's quite a few steps over the next 6 sections but I think if you read and understand each section and do the assignments, you'll do just fine.

2. Entering the 3-d realm
In drawing the side and front views, we filled a rectangle - you set up rectangular formats and drew your faces inside of them. We were looking eye to eye at our subjects.
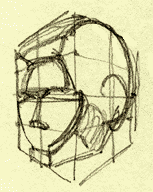
Both views you've done so far are contained in two dimensions. In illustration 2 above, and in the picture at the top, we've taken the leap into three dimensions. Both are constructions of the head in "3/4" or "three-quarter" views. In those illustrations, both the side and front views (the ones you've already drawn) are there - they're just contorted a little by perspective. "Oh my gosh" I hear you saying, that perspective word. Ugh."
But don't worry, it's not that big of a deal. By approaching it in small manageable pieces, you'll master it too! (You touched on it in the foundation lessons, we'll revisit it here in just enough depth that all the work you've done so far - and about to step into - will make sense.)
Reviewing
Perspective
Click here if you need to review
the lesson on perspective
"Closer" means "bigger" in perspective. "Farther" means "smaller". For example, when you look at the front view of the face, you're looking at it straight on - both eyes in the drawing are the same distance from your eyes, both ears are the same distance, etc. The net effect: the features on either half of the face or head look like they're the same size. But rotate or tip the object (picture of a face in this case) and all those relationships change - suddenly one of the ears is closer and so it appears relatively larger; the other is farther away and so it appears smaller.
I'm going to give you quick review in perspective, vanishing points and foreshortening in this section. We'll start with a simple railroad track example.
A trip down the tracks
Look at this birds aye view of a short section of railroad tracks:

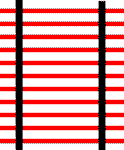
3. Railroad tracks
What do we know about this picture? For starters it's two dimensional, that is, it has height and width. You don't get any feeling that it's either coming towards you or going away from you - it's a bird's eye view and you're looking straight down on it. It could just as easily be venetian blinds on your kitchen window or a washboard. It's parallel to your "plane of vision" or "picture plane" (a little on both in a second). Now look at the same tracks after I tipped them over in CorelDraw:

4. Adding "depth" or perspective to the tracks.
Do you get the feeling you're there, that there's depth, that the tracks are really going away from you? (please say yes.) Lets make a few other observations about both sets of tracks.
When you look at the tracks in illustration 3, (one picture up), each section, each red rail road tie is the same width,
the tracks (the black sections) are parallel;
and the tracks are longer than they are wide.
But when we add perspective like we did in illustration 4, what happens? Several things:
the red ties appear to be shrinking;
the tracks (the black lines) are no longer parallel - in fact they appear to be getting closer and closer together. (they appear to come together at the "vanishing point");
The same short section of track now appears to be wider than it is long.
Foreshortening
This is called "foreshortening", (even though it could as easily be called "forewidening") It's the distorting or shrinking effect distance or viewing angle has on the appearance of an object.
The birds eye view, (illustration 3), is from right over the center of the tracks. The "foreshortened" view in illustration 4, was the view you would have if you stood on one end of the tracks.
The same thing is going on in this gif animation of the rotating paper but instead of the foreshortening occurring in the horizontal plane like the rail road tracks, the "gif" is rotating on a vertical plane - that is, its being foreshortened along it's vertical axis. It looks like it shrinks. (Compare the vertical edge of the format closest to you, to the farther, shrinking vertical edge.)
Another little experiment. Hold up an envelope, hold it in the middle and twist it slow. Close your left eye. Hold it at eye-level at your right eye. Watch the right edge of the envelope grow and shrink. Then focus on the left edge (the far away edge). Now try watching simultaneously both edges one shrinks and one grows. Kind of getting the idea? What's happening when you turn the paper away? Just remember this axiom about perspective: "when something gets closer, it gets larger. When something moves away, it gets smaller". The front edge doesn't move in the gif, so it stays the same. But everything else on the paper moves away from your eye - so it gets smaller. If your hand doesn't move when you rotate the paper in this little experiment, the front edge of the paper gets closer to your eye and it shrinks. The far away edge shrinks. That's all perspective is. (Of course convincing your brain of that, and specifically the Left side or "L-mode, well that's a different story.) |
Introducing the Picture Plane
Here's a very short explanation of the picture plane. Pretend again you're standing at the close end of the railroad tracks. You're looking down the tracks - watching them disappear into the horizon.
Now we're going to zoom out and look at you looking at the whole scene (i.e. at you looking down the tracks). From the side, it looks like this:
5. You looking down the tracks
Now drop a big sheet - a pane - of glass between you and your view of the railroad tracks. Drop it in there vertically and guess what? Voila, you have a "picture plane". The glass pane forms your picture plane. It's a picture plane because it's flat and it's 2 dimensional. (Imagine the glass pane is as wide as the tracks are - we're just looking at it along it's edge in this picture.)

6. Add the glass pane
If you drew the view you saw through the glass, (i.e. the tracks disappearing into the distance), and you took a magic marker and drew those tracks right on the glass - and you drew them just like you'd trace an image on tracing paper - the glass would act as your tracing paper. It's between the three dimensional object or scene you're drawing and your pencil, thus it becomes your picture plane.
And here's the really fascinating part: the whole three dimensional world collapses onto the two dimensional world of the glass pane, (or the paper), you're drawing on. And when you look at your drawing - which is in two dimensions - your brain interprets the drawing as three dimensional! Is that cool or what? That's the power of foreshortening and perspective.
Lets look at Foreshortening just a second longer
If you were drawing the 20 foot stretch of tracks on to the glass:

7. 20
foot stretch of rail road tracks
notice where you'd see those 20 feet of tracks on the glass pane. And "Where's that?" you ask? It'll be right where those light rays pass through the glass. In the illustration above, it's right where those dotted lines cut through it.
You can see in the next picture those 20 feet of tracks will be drawn on to just a fraction of the glass pane (those dotted lines again):

8. 20
feet of track collapses
a bunch!
This collapsing of space and dimension is called what again? It's called "foreshortening", (and we went into it and related issues in the foundation lessons in some detail. Click here if you want to go back to that section.)
Let me repeat that
Said a little differently, the illusion of those 20 feet of tracks collapsing onto just a few inches of the glass pane is what the illusion of foreshortening causes. Those are very real light rays that are passing through the glass pane, and you're marking with a pencil where those light rays are as they pass through the glass on the picture plane.
If the glass pane was closer to you, the light rays would be even closer together and so your image on the glass pane (the picture pane) that much smaller.
And now that you've captured (by drawing) those light rays on the picture plane, (the pane of glass) they're very real lines.
And what are these hand drawn lines again? They're a hand made record of what those light rays were doing at the exact point they crossed through that pane of glass. That's what an artist grid does for you, and that's what one aspect of "sighting" does for you: both can act as a way of introducing a picture plane. Does this make sense?

9.
Back to "sighting" in the Picture Plane
So when you see Leonardo aiming down his arm (sighting down his arm) what he's really doing is judging how big something is as it hit's his own picture plane. It's as if his hand and pencil stop right at an imaginary window. The pencil represents just a small part of that glass plane. Just like the guy on the rail road tracks above has the glass pane to act as his picture pane, Leonardo marks off and looks through his own imaginary glass pane at the end of his arm length*.
*Note. Using the length of the arm as the measure for finding a picture plane is arbitrary. You could rest your elbow on your hip and use your thumb three inches from your nose as marking off the plane. What's important is that you consistently use that same 3 inch interval (between nose and thumb) for making measurements and comparisons throughout the picture you were drawing.
Now let's get back to faces
Now when we get to drawing a three dimensional view of the head, we start by looking through our imaginary glass pane at the three dimensional cube - as if we dropped a pane of glass between us and the cube. In fact, your computer screen acts as the picture plane right now.
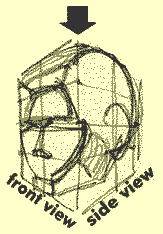
I only bring this up so you don't get confused by this: we're aiming towards drawing a 3-d cube that has it's own front and side planes. (It also has top and bottom planes as well.) Both the front view and the side views represent their own planes. In illustration 10 below we're viewing both front and side views at the same time.

10. Bringing 2 planes together
The cube is rotated so we can do that - i.e. see parts of the front and side views simultaneously. The arrow shows you the edge of the cube that's closest to us and it also marks the center of this picture. The rectangle containing the cube (the format) is a rectangular section of the picture plane the same way the pane of glass was in the railroad track example was above.
Making some additions to our front view
All drawings are still two-dimensional. It's the addition of perspective and foreshortening that makes them look three-dimensional. In this section you've seen foreshortening in the horizontal axis (the railroad tracks) and foreshortening in the vertical axis (the gif animation). Both were examples of perspective. We're going to join those two and figure out how you can use them for drawing either portraits or caricatures.
In the section 2 (the next section) we're going to add a few more masses to the front view you've already drawn in order to make the step from two-dimensional, flat-appearing front and side views, to truly 3-d appearing heads. In section three and on, you'll learn the finishing touches in building your foundation for caricatures and portraits.
Click here to continue with Part V, section 2
Kasbohm & Company's
YouCanDraw.com
© Copyright, All rights reserved 1997
e-mail: jeffkaz@YouCanDraw