
The Supply Store
Back to YouCanDraw .Com
Shapes
and Masses of the Head |
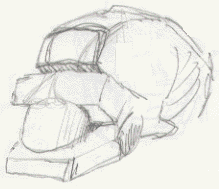
Making the head fit the cube
This is where we left off in the previous lesson. Take a second and re-read the short section below because you're going to reproduce your own cube for Mr. Average in just a few minutes! And not to worry we'll take the first drawing in teeny tiny steps so you know exactly the steps you're taking and you'll be able to reproduce your own "miter box" for drawing heads. (A "miter box", if you didn't already know is something carpenters use to cut darn near perfect angles and corners.)
Take a moment and
re-read the following
paragraph and diagram from section
3
Joining front and side. Let's fit a head inside of the cube right now. I'd like you to take second and point out the lines we've been talking about - the ones you've been placing in the formats you've been drawing. And if you don't see them in the drawing, where would they go? Here's a list of the guidelines you've seen and drawn:
- the horizontal center line - i.e. the eye line,
- the vertical center line of both the front and side views,
- the base of the nose line, which becomes the...
- base of the ear line in the side view,
- the lip line,
- the chin line, then last but not least,
- the middle of the top half of the front view line.
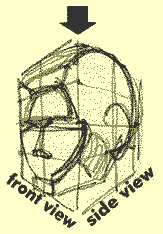
Find the guide lines
Whew, that's a lot of lines! But you've if you've gone through the exercises step by step and you've done the assignments, then these lines will pop right out at you!
Time to draw: constructing the miter box
Now we're going to go about constructing this box, the Mr. Johnny Average Head miter box if you will. And how will this help your caricatures? Well not only will it help you do caricatures but it will help you with portraits, your technical drawing, or any kind of visualizing. You're learning techniques that are transferable to many other things.
First thing to realize is the miter box is built out of lines that arise from vanishing points, (we already talked about those). We'll be constructing this box from one vanishing point on the left and one from the right (two-point perspective). This box will be at eye-level, so we only need to worry about those two points. Our box captures just a section of those lines.
The next illustration is of the completed "miter box" with all it's trajectory lines. (Trajectory lines are any of the lines that come off the vanishing points and intersect the center vertical line - pretty much all the lines you see in this picture):

Vanishing points and lines of trajectory
In the rest of this section, we'll be adding line by line all those lines you pointed out at the top of this section. When we're done with that, it'll be your turn to build your own miter box. In section 5, the very next section, you'll be building your own 3-d models inside the miter boxes you just constructed. .
In the beginning...dive on in!
The horizon line cuts through the center of our format. It's also at the same level as your eye - and functions as the eye line in the format. I've added the center vertical line, which functions as both highest and lowest point of the format - which incidentally must also fall within trajectory lines from the vanishing points or more accurately, the trajectory lines must reach each end of the vertical line. That vertical line and the vanishing points set up the whole cube.

1.
Building around the horizon line
and vanishing points
Next we'll add the outer vertical lines of the format. (Reminder: when you start drawing your own 3-d formats, remember to always sight, i.e. compare the angles all lines make in relation to vertical and horizontal. It's good practice.)

2. Adding
the outer vertical
borders of the format
We're going to draw the front view on the left side of the cube first. The side view will be on the right. The next line is the base of the nose line complete with it's trajectory from the vanishing point:

3. Adding the base of the nose line
The next line: the "middle of the upper the upper half of the front view line" (i.e. the line that runs through the center of the forehead. Is that a ridiculously long name or what? Let's just call it the forehead line from now on):

4. Adding the forehead line
Next we' ll add the lip line (remember it's a third the way down the distance between the base of the nose and the bottom of the jaw - or from bottom of the chin in our illustrations).

5. Adding the lip line
In the side view, the horizontal center line - the horizon line - is also the starting point for the top of the ear. So knowing that, we'll now just add the side view's counterpart to the front view's base of the nose line, which is the base of the ear line:

6. Adding the bottom of the ear line
And just for funsies, I'm going to extend the side view's counter part of the front view's forehead line into the side view face of the cube - this is there to help you utilize negative space relationships and and help break up cube into sections:

7. Adding
an upper half dividing
line to the side view
And lastly, we'll add center lines to each section. An interesting point about adding these lines. When you add center lines to a foreshortened picture, they aren't going to be in the exact center. Why? Because the the front half of the cube in this example is closer to you than the back half. And by the first rule of perspective, ("if it 's closer it;'s bigger") it's going to take up more space. This is true for any foreshortened object:

8. Adding
the vertical center
lines to both sides
Now we'll take away the "trajectory lines" from the vanishing points:

9. Getting rid of "trajectory lines"
The Mr. Johnny Average Head Miter Box
And lastly, we'll get rid of the horizon line. And what we have is our completed "Mr. Johnny Average face 3-d Miter Box" - which is not quite the same as Mr. Johnny Average face. But in the very next, very brief mini-section, we'll unveil the completed "Mr. Johnny Average Head"...

10. The finished miter box
...and you'll know how we arrived at every line and every proportion on his face and head. After you've drawn several dozen of these, and seen some of the finer points of the masses of the head it'll be time for...."da da daDA" (that was supposed to be a trumpet), add a drum roll too: Caricatures!! Yee HAA!!
(For those of you down under, or not familiar with American cowboy talk, "yee haa" is a sound you make when you're very happy, like the joy you feel after you've been on the trail for 48 hours with nothing to eat and yer pulling up to the ranch and the cook comes out and says "Cooked up your all time favorite baked beans and biscuit dish and boss says you get an extra 2days off". Yeehaa!)
But back to our finished product, the pretty much proportionately lined "Mr. Johnny Average Head" cube narrowed down just a little - the cube above got a little wide which was fine for our demonstration but would make for funny looking faces. (But I guess that's what we're after isn't it?) .

11. Narrowing it down
Your Assignment: make your very own miter box |
Follow each step above. Make your cubes 3-4 inches wide and 3-4 inches tall (about twice the size of the cubes here). You might want to grab a ruler or something with a flat, straight edge to use as a guide. Also, I recommend using a pencil - you'll be erasing some of the lines at the end of this assignment.
Here are the instructions:
Draw a horizontal line 6-7 inches long
Near the end of each line place an "x"
Now sight where the approximate center of the horizontal line is and draw a vertical line about 3 and 1/2 inches tall that evenly straddles the horizontal line (i.e. half the line above it, half below).
From each "x" draw a line to both the top and bottom ends of the center vertical line. (Look at picture #1 above. Your box should be looking like that after this step.)
Now add two more vertical lines about half way between the two vanishing points. Make sure these two lines are vertical and touch the two trajectory lines (Look at picture 2 above).
Starting with picture number 3 above, add all the feature designating lines we've been talking about in this section, you know, the eye line ,the nose line, the bottom of the ear line, etc. - just go right down the pictures above and the lines just like they're added in those.
(Hint: make a little mark on the the central vertical line where each line should intersect it. Then line up the ruler between the vanishing point and each mark you've made on the central vertical line. Now draw your line.)
Erase all extra trajectory lines so your cube looks just like picture's 10 and/or 11. Experiment with the distance between the vanishing points to make almost flat looking cubes to extreme-angle cubes.
Just a stepping stone
The miter box is only a stepping stone - it'll help you get the feel for adding perspective to your faces. We'll use it for awhile, then we'll toss it aside. Once you internalize it, you'll have yet another tool to make your pictures more realistic, more accurate and it'll even multiply your ability to exaggerate. However, once you do feel comfortable with it, it'll be time to build faces without it. A musician friend of mine says many music students get so stuck on reading music, they can't ever improvise - they're stuck, they're overly dependant on written music. And I don't want that to happen to you.
There's a primer
of books on
perspective in the Library
if you'd like to pursue it more: The Bookstore
Now
let's fill the miter box.
Go to section
5
of Part V
Kasbohm & Company's
YouCanDraw.com
© Copyright, All rights reserved 1997
e-mail: jeffkaz@YouCanDraw