![]()
The Supply Store
Back to YouCanDraw .Com
Shapes
and Masses of the Head, |
In this section, we're going to look a little closer at the side view of the head. Like in the previous 3 lessons, we're still leading up towards "Johnny Average Head". You're going to arrive at "Mr. Average" by building him piece by bite-sized piece. I don't think there's anymore complicated part of the body that's got more parts and relations to it than the head and face. But you will get there! (You're so close right now.)
Front View Review
In this part, part IV, we're going to build on what you already learned in part III of this section. And what was the big message there? It was this: the face could be fit into a rectangle. The overall dimensions of Mr. Average's home rectangle (front view) was this:
8 inches tall and 6.5 inches wide:

1. Front view of Mr. Average's dimensions
Side View Dimensions
In the side view, those dimensions change a little:
8.0 inches tall, and 7.5 inches deep.
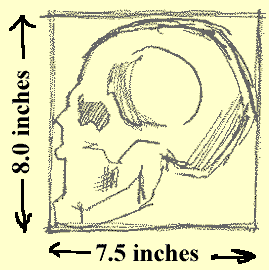
2. Side View dimensions
You also saw the front view rectangle could be divided by 4 lines:
one vertical center line (line 1 below), and
three parallel horizontal lines (the eye line, the base of the nose line, and the lip line - lines 2,3,and 4 below).
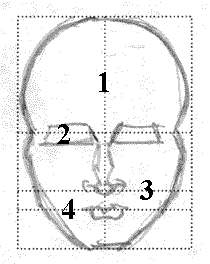
3. The four dividing lines
of
the front view
Two of the three horizontal lines we used to divide up Mr. Averages' front view above can be extended into the side view, just like we've done to the base of the nose line here:

4. "Base of Nose"
line extended to side rectangle
The two lines we're going to extend from the front view into the side view are 1) the eye line and 2) the base of the nose line (these are lines 2 and 3 in the illustration above).
In this next illustration, I've made a real quick three dimensional sketch of the front view and the the side view rectangles linked together. Again, I want you to see the two lines here are continuations of the same line. These are valuable landmarks and I think important enough to commit to memory - eventually. (It won't be too much to remember, I promise.)
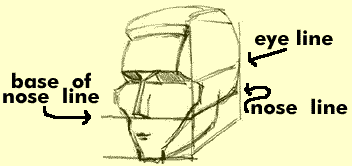
5. Lines that landmark both
front and sides of head
What's important to observe here is that the eye-line runs right across the middle of both rectangles (both front and side view rectangles). In the front view, the base-of-the-nose line divides the lower half of the rectangle in half again, and it does the exact same thing in the side view.
Here's a side view rectangle, without any perspective, showing how the eye line and nose line continue:
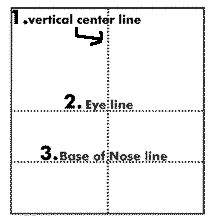
6. Three lines to learn
in the
side view
Funny thing happens when we extend these lines: they set us up perfectly for placing other parts of the anatomy.
Finding the center of the rectangle
How do you find the center of the rectangle - any rectangle? It's so simple: just draw an "x" from diagonally from corner to corner.
When you do that you'll see the center of this rectangle is exactly where the 2 lines meet. Which two lines? Well, the eye line and and the vertical center line. Makes total sense, doesn't it? I mean they both divide the rectangle in half: one vertically, the other horizontally.
Here's a side view rectangle with the center "x'd" out:
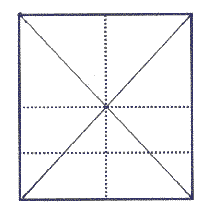
7. Finding the center of the
side view with an "X"
Putting all these lines to work for us
So how can we use this to our advantage? Well it just so happens the ear has planted itself right in the middle of the side of the skull. Why? Evolutionists say it's so we can hear things equally whether they're in front of us or behind us. Makes sense I guess. I think it's so we can draw pictures of the head with less trouble.
Adding an ear
The next question to answer is "How's the ear oriented around the center of the side view"? Good question. Here's a pretty sloppy ear, but it serves the point.

8. The ear starts at the center
The ear starts at the center of the side view. When I say "starts", I mean if you were going to draw the ear with one line, a great place to start would be right at the center. So you start at the center.
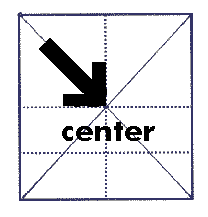
9. Start
the ear at
the center point
Here's how it progresses. Moving from the center, you move up a little in a kind of nautilus shape crossing the center line:

9a
then it takes a turn south, towards the bottom of the paper. In doing so it crosses the eye line - ie the horizontal middle of the rectangle:

9b
then it curves a little sharper as we draw the ear lobe - but it doesn't cross the base of nose line. It does however, cross back over the vertical center line:

9c
(Remember the question-mark shape of the helix, don't you? See Lesson 10: Drawing Ears if you want to review.)
Here's the biggee though: the ear lobe rests on the base of the nose line. Now isn't that neat? (See illus. #4 above again.) This isn't by some artists wishful thinking. This is anatomical fact. Look at any body close to you. Look at them eye to eye from 3-4 feet away. Note the base of the nose. Look around there on the sides - what sits right there at the same level? The earlobe! Right there. Exact same level. (If not, then you have a deviation from Mr. Average - whom you've only met in bits and pieces - and you've found a caricaturable feature)
Filling in the rest of the side view: 4 points
Now lets start filling in the side view rectangle. Here's a rough fill-in of the side view.
 ......
10. Four points of interest
Notice 4 things:
the center of the side view (where you'd start the ear);
the eye at the left, and the eye line;
the base of the nose, and the nose line;
the point where the base of the nose line and the vertical center line intersect.
I point out number 4 here because it's not only the point where the ear lobe terminates, but it's also the point where the jaw bone (the mandible) converges with the back of the head (the occipital portion of the skull).
I'll repeat: there's a lot going on at this point - it's the lower border of the ear lobe, and it marks the intersection of lines that represent the jaw and the back of the head.
Do you know what you could do with these 4 points of interest? You could pretty much draw a well-proportioned profile of the human head! And guess what? You'll be doing this momentarily.
A fifth point
But before that, here's a fifth point I want to point out: the line of the lips. This line doesn't course around the side view, but it does show up here, and it makes placing the lips very simple. As in the front view it's one-third the way down the distance between the base of the nose and the lowest margin of the chin:
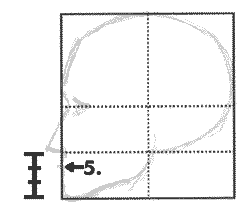
11. Marking the lip line: a reminder
In this next illustration, I've just added the outline of the ear to illustration 11:
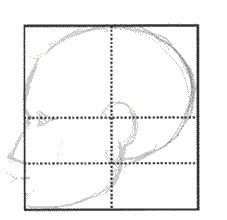
12. Adding the ear outline
This is what you'll be drawing: 20 to 25 side views. They're explained step-by-step in the very next section complete with a "gif-animation" to drive the point home. But on last thing:
Pop-quiz
Q: What does the base-of-nose line divide?
A: It divides the lower half of the face in half again.
Q: What does the base of the nose line turn into in the side view?
A: It becomes the marker, the line the lowest part of the ear - the ear lobe - rests on.
Q: What else does it mark?
A: It also becomes, roughly, the place where the back of the head and the jaw converge.
Q: How does the eye-line divide the face up (i.e. the front view)?
A: It divides the rectangle of the face in half horizontally)
Q: And when you extend it into the side view, what does it help you place?
A: It helps you place the origin of the ear - i.e., as it intersects the the vertical center line, we have a great starting point.
You got them all right, right? Aw right! Good work.
Kasbohm & Company's
YouCanDraw.com
© Copyright, All rights reserved 1997
e-mail: jeffkaz@YouCanDraw