
The Supply Store
Back to YouCanDraw .Com
|
Lesson
14 Extra: Approaching the |
Drawing the three-quarter view of the head and face presents a whole new dimension - literally - to your drawing. Perspective and foreshortening aren't significant considerations when you draw most two dimensional profiles and front views. Sure they can be, but in most they're not. However, in the three quarter view these things - perspective and foreshortening - become much more considerable.
In this lesson you're
going to get a goodly amount of practice identifying and manipulating
block shapes and block heads. You might not master all the subtleties, but you
will have a head start drawing in three dimensions.
Your mission
Your mission in this section: to understand and "see" vanishing
points, horizon lines, the x-y-z axiis, and learn to draw face symbols with
volume. These are the elements you need to keep in mind when
constructing three-quarter views. Of course you can achieve volume in a
front view or profile with your highlight, shadows, and shading, but the
three-quarter view presents challenges uniquely it's own.
More building blocks
This section builds on the previous sections and parts of lesson 14. Let's do a little review. (Again, words to keep in mind: vanishing point, perspective, proportion, horizon lines, "x-y-z" axiis.) The Flash Intro below uses head, neck, and shoulder shapes, but on most of this page, we're going to use just the head. (Don't want to over complicate the material, and you can extend everything you learn here to all shapes regardless of the context - perspective is at work in EVERY scene of the real world.) Get an internalized feel for these ideas now and you'll start seeing, even sensing in your body, perspective's subtle effect and power in the real world and in your drawings.
Take a look at the "Flash" primer. Don't worry if you don't understand everything in it. It'll all be clearer by the end of this exercise when you draw your own 3-d blockheads.
|
Click for Flash stuff |
Back? You've gone through the
Flash "spinning head", right? I hope so. This will make more sense if you
have. First we're going to get familiar with the planes of a cube, then
the different vanishing points,
and then you're going to start looking for them yourself. Then, at the same time we'll
build our sense of volume. After a good running through of this, it'll be
time for you to try constructing your own three-d heads (just like you saw
in the section before this.)
Capturing volume
[Note: what you're about to do isn't going to be directly concerned here with all the vertical and horizontal landmarks - they're implied but the goal here is to be able to capture volume in three dimensions. And specifically capture the subtle perspective of the face.]
Cubic planes
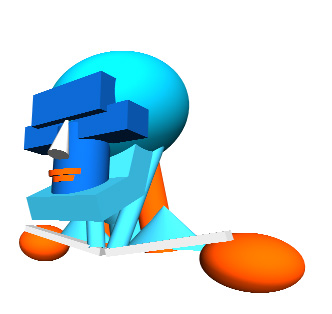
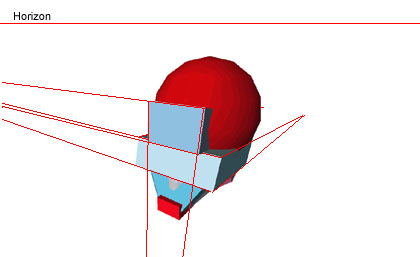
Ok. let's go. I'm going to start you off with an involved question: can you envision the vanishing point(s) of the blocks that make up the forehead shape, the cheekbones, and the chin in the head shape you see just below? However, there's more than just horizontal vanishing points. What are horizontal vanishing points? They're, well, the vanishing points that land on the horizon. (Note the italicized horizon.) Confused? That's OK. But there's more going on than just those. Just for now try to leapfrog on the information you picked up in the Flash Intro.
Hint: mentally draw lines off the edges of these different blocks just like you saw in the spinning head review above. Give it a whirl. Just remember that when working with vanishing points and foreshortening, the part of the object closest to you is made larger. That means any part of the block that's farther away will be perceived as smaller. And if you go far enough away, these lines - drawn off the edges of the blocks - shrink to nothing: they vanish. Thus "vanishing points". This is especially true and most easily demonstrated when working with blocks, or Blockheads. :-) Which is why we're using these simple shapes in this exercise.
So, warm-up exercise number one: envision the implied vanishing points (vp) by extending lines from the forehead block, cheekbone block and the chin block to their corresponding vanishing point on the head shape above in as many planes as possible. Did you come up with something like this:
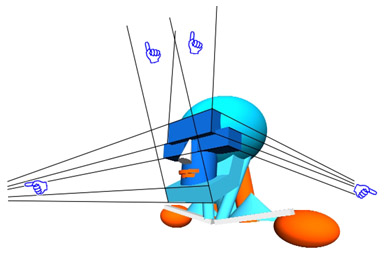
Each face of each block has it's own vanishing point on it's own plane, (the arrows point in the direction of the vanishing points)
Ok,
I bombed you. That's a lot of stuff going on there in that picture. Of course
you know I won't leave you hanging. Let's
break it down from the very beginning.
From the top
A cube has six faces. Since all the corners are at right angles to each other a cube has six faces in six different planes - each face is in a plane of it's own. But since all the corners are at right angles, you end up with three pairs of planes: front/back, left side/right side, and top/bottom. These are "plane pairs". They come in pairs because a cube has six sides: three pairs of two complementary sides ( the front/back, left side/right side and top/bottom) make up a pair.
Each plane pair is in a parallel plane with it's partner and if you collapse the two planes of any plane pair, they converge into the same plane. (E.g. collapse the left side into the right side, or collapse the top into the bottom, or collapse the front on to the back. They're all in their own planes until you collapse them down just like the different pages of a book. Each pair in it's own distinct plane but in a similar parallel plane as it's plane pair partner.
Here's a cube that's been turned a little and you can see the effect of both perspective and foreshortening. (Foreshortening in this example accounts for the apparent narrowing of the cube from front plane to back plane.)
Look at a corner, any corner. If you concentrate on any one corner, you can decipher the
three different axiis that form the backbone of the three different planes within any cube.
(Note: in
a cube, you can have an infinite number of planes parallel to the
front/back, top/bottom, or left/right sides - you can slice them up
like the pages of book - but all of them will fall within one of the
three planes formed by the x, y, z axiis.)

The
three plane faces correspond to the x, y, and z axis
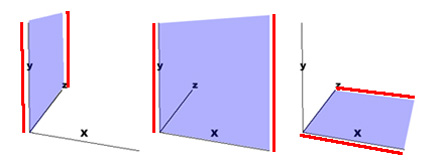
An actual plane is marked off by any two axiis. For instance, you can imagine the plane of the left side of the cube formed by intersecting the y and z axiis. Pretend there's a saran wrap, or better yet, a table cloth pulled tight over the plane formed by any two axiis. Look at the mini-picture at the left in the picture just below as an illustration - it'll be the plane formed by the intersection of the y and z axiis:
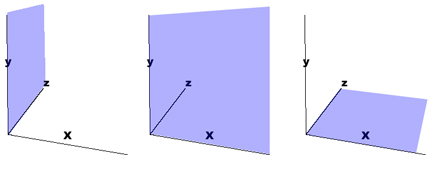
Stretch a table cloth between between the x and y axiis and you have the front plane (the middle illustration); stretch a cloth between x and z axiis and you have the floor of our cube (the illustration on the left above). If anything, you can now picture the planes of a cube.
Getting
to vanishing points
The cubes above are in a three-quarter (3/4) view. Each edge of each plane in the 3/4 view has it's implied vanishing point. How do you know that? Since we're not viewing any cube straight on, perspective distorts each face of the cube: the edge closest to our eye is the largest. Every other part of the cube then is going to be farther away. Notice how the back edge of the blue planes in all the picture looks smaller? If you did a sighting of the cube as it's drawn on this page you'd quickly see those more distant edges are smaller than the edge of the plane closest to you.
(I say "as it's drawn on this page" because that's the trick of drawing: reducing three dimensions down to two. In the physical world, you still know the cube is equal in size along all it's edges. )
So again, you know if you inspected the cube in your hand, it'd be plain that all the edges and faces are the same size: "hmm, the front does looks bigger than back...I'll spin the cube then all the edges will take their turn being the apparently biggest edge when it's closest to my eye".
That's introducing distance - the third dimension - when you have the perceived changes in size. About the only place this doesn't happen is on flat paper when you're drawing just two dimensional shapes. Check out this illustration - the edges closest to your viewing eye appear the broadest (the eye automatically perceives the biggest edge as the closest):
 |
|
We know that because
we're viewing the x,y,z axis at an angle, |
If we now extend lines off each edge into space you can see how each line
would converge at the vanishing point for it's plane:
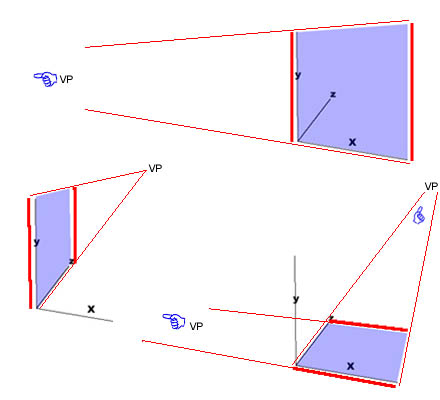
Extending lines off each edge of each plane
that "home in" on a vanishing point
Have
you got that down? Repeat after me: "So finding the
vanishing point Jeff, or at least imagining the vanishing point, is a simple
task of asking "where might these lines drawn off the
edges come together if I drew them off any one of these planes, right?"
Right! You've got it. :-)
What happens in a front view?
If you view a cube or a face straight on, you may not perceive a vanishing point. That's only because over small distances you can't see the effect of distance on the rest of the cube (or face) that projects backward into the z-axis. The front plane dominates the entire view. So, where might you guess the vanishing points are in this front view of a blockhead?
Right, they're shooting straight back in space behind the picture. Just as if it was skewered by the third uninvolved axis, kind of like this:
This is called "single point perspective". (I know, this is review); rotate the object a little on the "y" axis - the axis that goes straight up and straight down - and you get two-point perspective:
Two
point perspective: one vanishing point off to the
left and one off to the right - both on the horizon
(That tiny "x" you see off on the right is pretty much the same vanishing point you see every line converging on in the one-point perspective blockhead view above.)
Move the object (a cube again in this case), above or below the horizon line and you get three point perspective:
There are vanishing points above, to the left, and to the right. (Of course, you can look this up again in Part V, section 3 . )
Question:
are you looking up to, down at, or
straight-on at this picture? Right: you're looking up. So where's the horizon
line? Correct - it'd beneath the object. Now as you look at the
next set of pictures, ask yourself the same thing.
|
Take home message and clue: look for more than just |
Just remember, the horizontal vanishing points are always placed in relation to you the viewer - and at your eye level - on the horizon. This is so because as you approach a distance "out there" on the horizon, in effect at an "infinite" distance away, your height compared to that distance is negligible. Being a little above or below your subject, taller or shorter than it, becomes immaterial as you travel thousands of miles off into space.
| Side note: If you want to get really
accurate, vanishing points are not just on the horizon nor are they
just at your eye level,
it's actually in relation to the central axis of vision of your eye.
The central axis of vision of your eye runs straight through the center of your
pupil and right straight back to your retina. That's the true
vanishing point 'point-of-reference' of all points of reference.
Draw a line from the center of your retina [actually called the "macula"] out through the center point of the pupil straight out into space on into infinity and that will be your most central reference. All things eventually refer to that most central reference point. And yes, to confuse things more, it moves every time you move your head. But don't worry about it, just observe what you see and it'll all be right there. Your job is just be observant. |
![]() or the crux of perspective,
sort of :-)
or the crux of perspective,
sort of :-)
And why
are we worried about what's out there on the horizon thousands of miles
away? Truth is, we're really not that interested in what's "out
there", but rather in how things change in the way they're perceived
when they're at a distance from us. The idea's pretty simple actually,
and it's the crux of perspective. It's all been said before: an object in your
hand looks bigger than the same object 20 feet away.
|
Review Lesson 8 for more: |
But there's even more to it than that. In fact, there's a mathematical relationship: how fast something "shrinks" is inversely proportional to the distance it's a way from you. That's why New York City streets look like narrowing canyons - and why people use city scenes, or big building scenes all the time to demonstrate perspective:
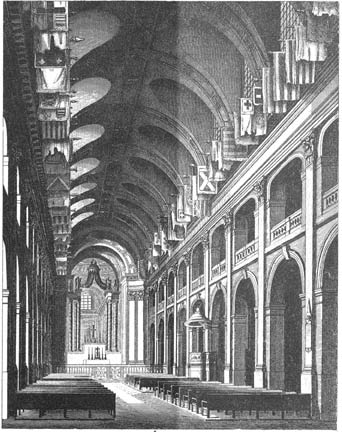
Look at how all the lines converge on the implied vanishing point (you have to use a little imagination); notice how straight those lines are
See how the all the lines in this picture seem to converge on a single point somewhere beyond the far end of cathedral? What is most important, note how straight all these lines run. For example, note how straight these lines are: the line just under the flags on the top right, the lines above and below the railing under each archway at the upper right. Here, see what I mean:
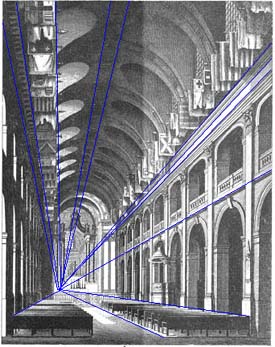 |
We perceive the pillars that support the right wall as all being the same height - but just at different distances away. It's the fact that it's all such straight lines that converge on the vanishing point that I find so amazing. That that's just nature "out there" doing it's thing. Maybe I'm making a bigger deal out of it than is needed, but it boggles my brain a little when I think about it. |
(Einstein too - that's how he discovered relativity. And not to worry, I'm not putting my "mind boggled-ness" at the same level as Einstein's :-)
More than one vanishing point
Now I'm going to throw a curve ball at you. That doesn't mean that all objects in a given scene will be pointing at the same vanishing point on the horizon. Only if they're cuboid and only if they're resting on the same plane as the horizon will they have vanishing points on the horizon. All such objects will have different horizontal vanishing points - but all the horizontal vanishing points will be on the horizon line. Make sense?
Let me illustrate: if you're looking at two blocks stacked on top of each other and one of the blocks is rotated a little in relation to the other, it'll have a different vanishing point, but both vanishing points will be on the same horizon line. Here's two blocks stacked on each other, one rotated a little:
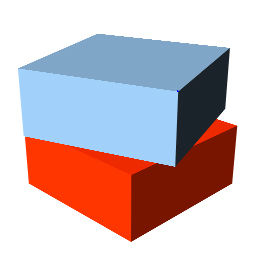
Two blocks that share distinct
vanishing
points on the same horizon line
Now we'll run lines off the right side of each cube to their respective vanishing points. They're distinct vanishing points, but they're on the same horizon line. (The fact both blocks are sitting on mother earth and therefore share a plane parallel to the earth, pretty much assures the lines will converge on the horizon line.)
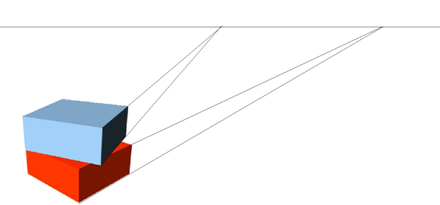
Cuboid
shapes resting on the earth will always
have vanishing points on the horizon line
You can run lines off the top surface of each block or off the face of each block closest to us and all these will run to different vanishing points on the same horizon line. But again, here's the qualifier: both have to be cuboid (with all right angles) and both must be flat on mother earth. If they're tilted up or around, then you have to tilt your head or move your eye to accommodate and find it's vanishing point.
Getting more complicated
Why go into all of this? Because vanishing points can be confusing at first. I'm only going into this because if you understand the simple version of vanishing points, it's a very small (though sometimes seemingly complicated) leap to finding vanishing points for converging lines off rectangular or cube-like objects that won't intersect on the "normal" horizon line or straight up in space or down into the middle of the earth.
So what happens to vanishing points that aren't cuboid and aren't resting flat on Mother Earth? And what kind of objects might have those kinds of characteristics? And when might that happen? Well, it happens on the face, (but the good news is you really don't have to worry about all that - just understand that perspective will run those pesky lines together), and it happens any time you spin those little cubes around into an orientation that's not resting flat on good old earth, like these:
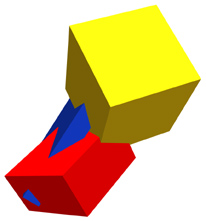 |
 |
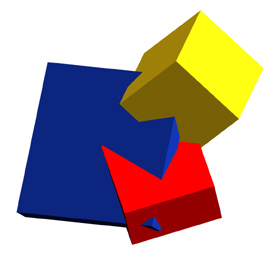
Modern art? Maybe :-) But this confused appearing conundrum of shapes and angles is just three rectangular cuboid shapes colliding at random angles. All of these shapes by themselves are cuboid: that is they have proportionate surfaces all meeting at right angles. The effect of distance impose what seem like distortions: right angles don't look like right angles, proportion seems to fly out the window, etc. That's the phenomenon of foreshortening at work.
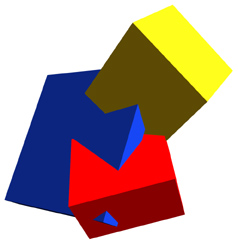
Here's the point: all of these planar surfaces have their own vanishing point (vp). You can draw converging lines and vanishing points for every single plane within in this shape. Try it! You'll see. However, if you try to make them align with a horizon line, it won't work. None of these shapes lay in the same plane as the floor under your feet.
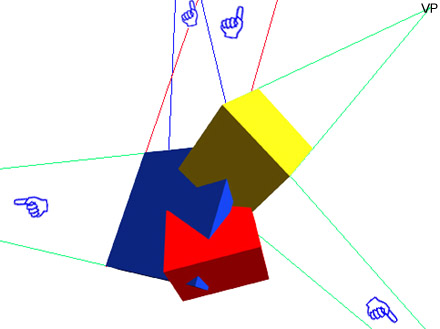
Running
lines off a whole bunch of surfaces to seek
out their Vanishing Points (VP)
So now, when you look again at this next picture, (the one you saw at the top of this page), it makes more sense. Here's all we're doing: we're just drawing converging lines that the edge of each individual block suggests - some whose vanishing points will rest on the horizon line (like those going off to the left or right), and some that won't. Can you guess which will and which won't?:
Right, those parts of the blocks that aren't on the same 3-d plane as as the forehead and cheekbone blocks (and more specifically whose "y" axis is not perpendicular to the flat surface of the earth).
Thanks for sticking through this so far :-)
All that just to convince you that objects don't have to have vanishing points that lie on the horizon line. Hopefully you've got some idea now that all vanishing points don't have to point to the same horizon line. Only if the object itself (like a building), lies firmly on terra firma (the ground), and it's cuboid will it have vanishing points on the horizon.
Now, if you have a row of objects in space like this:
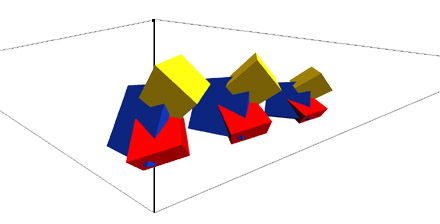
then by perceiving them as group you can envision lines converging on a vanishing point on the horizon. These are lying on the same earth plane you and I are on, and when viewed as a series of distinct sculptures lined up in some sort of order, each occupying it's own place in space, two and three point perspective make sense again.
Said a little differently, when you're looking at a complex shape made up of sub-shapes that can also be construed as cuboid, like you can do on a face (though you might need to inject a little imagination to see them that way) - you can see each cuboid sub-shape will have its own planes and vanishing points. Then, when you have groups of these same objects, (like when you're looking at groups of sculptures or groups of people), two and three point perspective make sense again. Well, sort of make sense? It'll come to you. It's not necessary for the next two parts here...
Quiz
time
Let's start applying this to faces and heads - because you'll be drawing these yourself here very soon. (A simplified version that I hope will instill you a real sense of volume.)
We're now going to look at a series of pictures, all of them blockheads. "Blockheads" are faces and heads made of mostly cuboid shapes - not stupid people. You get to do the same thing you've been doing: envision the vanishing points wherever in space they may be. Draw lines off the two edges of any plane and you'll get a feel for where the vanishing point is.
Above
and below the horizon line
If you're looking up or down on an object, I want you to ask "where is this object in relation to the horizon line (and thus in relation to me)?"
Remember, the horizon line, when you're standing on the ground is at your eye level. If you're looking down on something, it's automatically below the horizon? If you're looking up at it, it's above the horizon line, Right?
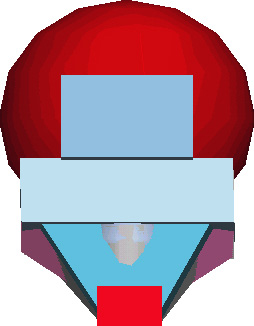
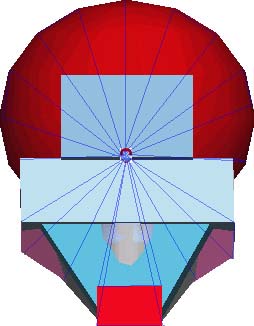
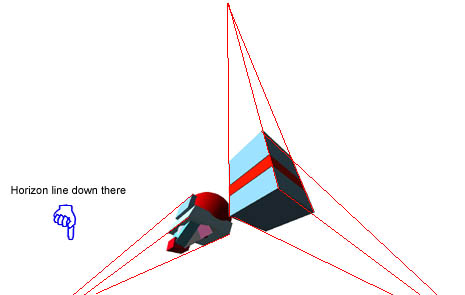
Let's look at some blockheads. In this picture, can you find the vanishing points for the the main cube shapes? (Don't worry about the spherical part of the head and don't worry if your vanishing points don't line up on the horizon line. Just draw lines off these edges to their logical ends - they'll go up, down, left and right):
How is the cheekbone in this above picture foreshortened in regards to the straight-on shot just below? - hint: the part closest to you is always largest, compare to this shot:
So how is the cheekbone in this above picture foreshortened in regards to the straight-on shot? Right - it's foreshortened horizontally, that is, it appears as if it's taller in it's y-axis and squished in it's x-axis. So it's therefore foreshortened width wise. Sort of getting it?
So back to this picture. If you're
looking down at it, where do those lines go as they home their way back to
their vanishing points? Are they're going up? Not necessarily. They seek
their own respective points.
Projecting
lines off separate block shapes in the
direction of their respective vanishing points
[not always on the horizon line]
Spheres and circles
What about when you're dealing with spheres and circles? Yes that gets a little more difficult. But let's at least get a conceptual idea about what happens.
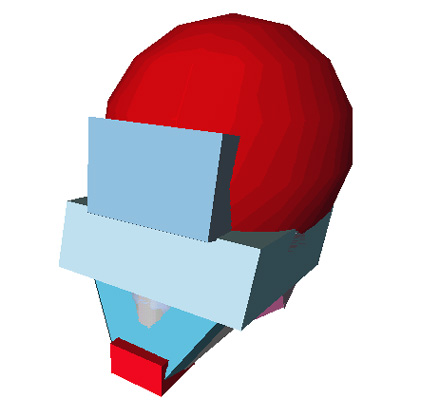
Since much of the head is sphere-like, it's harder to visualize the different planes within these shapes. If we put planes through them, it may make more sense. So check out this next picture - it's got flat little planes "haloed" around it.
Look at the edge where sphere meets plane in each plane. Note especially the top plane and the way the curve of the sphere starts curving tighter and tighter as you go farther and farther from your eye (nearing the edges of the sphere)

Running planes through Mr. Blockhead's head
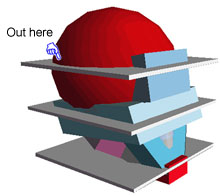 |
Run your pencil right over the screen along that line formed between the flat plate and the sphere. See how it curves faster as it gets farther away from you? That's the effect of foreshortening on a sphere. See the pointer finger (While we're at it, where's the horizon line?) |
Next...
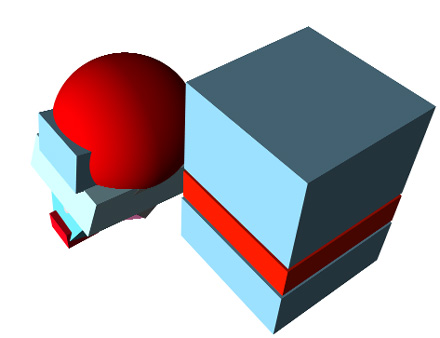
Look at this next picture. Note again how the curve of the sphere "accelerates" as it nears the farther out edges. Also ask yourself these questions:
- Where's the horizon line in this picture?
- Where will you find the vanishing points of each plane?
- Can you envision lines drawn off each rectangular plane and find their vanishing points?
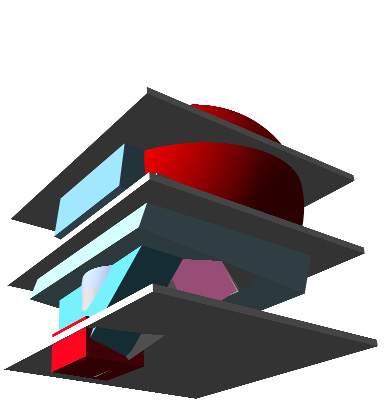
Answer to number one: The horizon line is below the
blockhead.
Answer to number two: in this case they will come down to
the actual horizon line.
Three: you get to do this on your own :-)
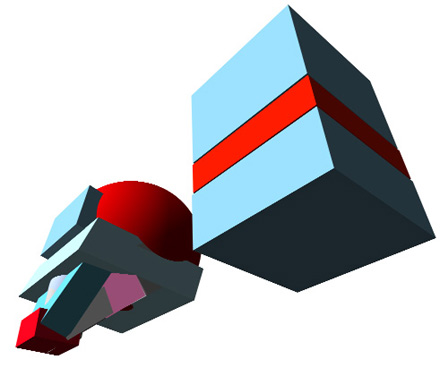
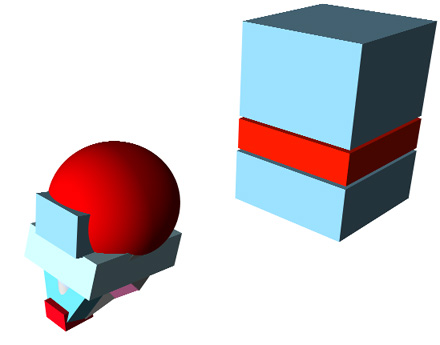
Next - fitting the blockhead shape in side of a big cube
Here's
the blockhead shape along side a big cube - a cube big enough to fit the
entire blockhead within it. Picture
the head shapes to be contained within the cube shape - that way it'll
be easier to get a
bead on the vanishing point and the perspective of the overall head shape.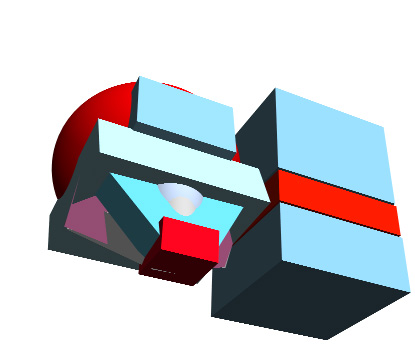
Now why are we going through all this? For this reason: To draw the head's overall shape, as you saw in earlier sections of Lesson 14, we whittled down from a cube-like block of wood and whittled away until we had the basic block shapes of each section of the face.
By getting everything molded into cube shapes it was easier to understand the head in terms of volumes. You can extract from there, chisel and chop, apply detail until you have realistic head shapes and features. That's' really all we're doing.
The two-tone cube shape is getting us closer and closer to the "mitre box" idea you saw in earlier lessons.
Onward
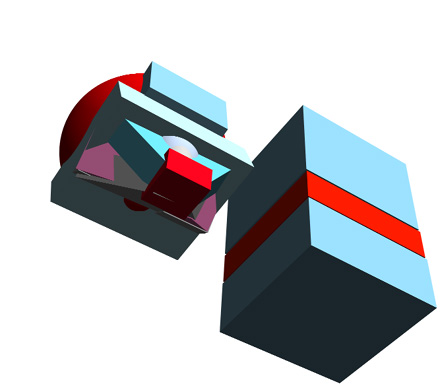
So, if you were to view the head as fitting within the cuboid shape on the right, you can easily see three point perspective at work. Then as you look at the different shapes within the blockhead shape on the left, that's when you see the different vanishing points suggested by the planar surfaces of each sub shape contained within the blockhead. (That was mouthful.)
Let's look at a few more of these side by side two-tone cubes and blockheads at several different angles.
- Your job: to imagine all the different vanishing points implied by
each separate sub shape within the blockhead and then compare and
contrast that view with that of the big block.
- Ask yourself "where's the horizon line, and where am I, the viewer, in relation to each object?".
1) Here's the first:
2) Do the same - find the horizon lines and the vanishing
points:
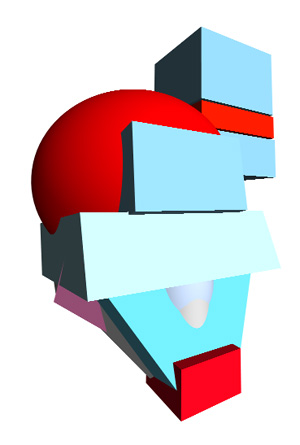
3)
The Same...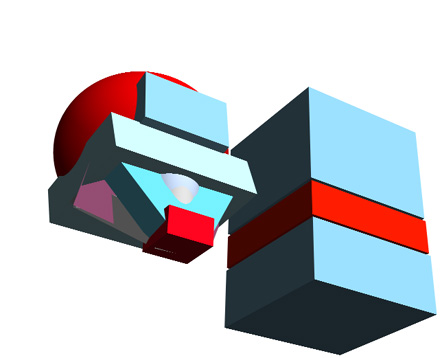
4)...And the same. Note how when you're viewing an object at more and more extreme angles the foreshortening - and thus the apparent distortion - becomes more and more pronounced:
5) Q: What happens to the vanishing points when we move the two object apart? Answer: vanishing points remain the same - but the lines we'd extend off any planar edge will change.
6) Lastly, compare this configuration with the one just above. and draw your own conclusions about vanishing points and horizon lines:
Time to draw
So the point in all of this is two fold: learn to see the perspective even in subtle pictures. Secondly, I want you to be able to reproduce volume in your drawings by modeling and by actually drawing the George Bridgeman-like pictures you're about to see.
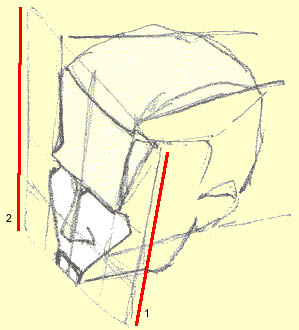
Q: Draw them in the grids that are supplied. Now that you've gone through all that, can you tell me what might be wrong with this shot?:
There's
an inaccuracy in this picture - can you
find it? Hint: it's in the front plane
A: If what's closer to you, the viewer, means that object will appear bigger than the same object a distance away, then the rectangle framing the blockhead above ought to have as it's longest edge the one closest to you.
Compare the two vertical edges of the plane's paralleled in red here in this picture (line 1 should be longer than line 2 since it's closer to you; viewed straight on, the side of this face closest to line 1 would be unnaturally small):
OK! It's the moment you've been waiting for: time to draw. Your job is to draw some blockheads into the different "mitre boxes" pre-drawn for you. You can print these out as many times as you wish and draw to your heart's content. Before you start drawing, it might be worth your while to view this quick animation to get more of an idea what to do:
Here's some models for you to duplicate within each mitre box:
 |
 |
 |
 |
 |
 |
Now go ahead and draw these shapes into a whole gang of these grids - there's chin markers left in most all of theme so you have some point of reference. Now go for it! Here's your mitre boxes:
| 5 | 9 | |
| 6 | 10 | |
| 7 | 11 | |
| 4 | 8 | 12 |
Review section 5 , section 6, and section 7 if it isn't clear what you're supposed to do within the mitre boxes.
e-mail: jeffkaz@YouCanDraw |