
The Supply Store
Back to YouCanDraw .Com
Shapes
and Masses of the Head |
Making the head fit the cube
Just previous to this section, you constructed the "miter box" for Mr. Johnny Average head. Now we're going to fill it. What we're going to fill it with is a partial face - a faceless head if you will. After you've filled this box a few dozen times, it'll be time to add the nose, and few extra features. Then you'll look at the head from a few different angles - I'm going to let you fill those in on your own. (Or you can just study them - you'll know what I'm talking about when we get there.).
If you've been good about doing all the assignments, you've now built the necessary foundations to start stretching yourself - and you're more than ready to dive into portraits and caricatures. Congratulations! If you've played hooky a few times, then just recognize those areas you feel weak at and go tackle 'em - you will get them if you work at them.
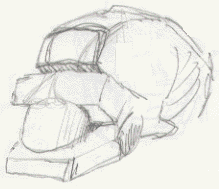
Filling the miter box: click here for gif animation

The finished head
So now that you understand what's behind these pictures, you have enough reserve to make pictures like these make sense. You'll understand why the nose is placed where it's place, where horizontal guidelines are placed the lines go, why the mouth has a round shape to it. Look these pictures over. Look at the different ways of rendering the masses of the head. In the next phase, we'll go into deeper and deeper detail - all of which will make your pictures more real, more believable - even though they're caricatures.
Start with the forehead

Start with the forehead
Start with the forehead. What's notable here? Why it's the fact that the top and bottom lines of the forehead also follow - exactly - trajectories off the vanishing point. Also, look at the bottom far left hand corner of the forehead. Measure (sight) with a pencil how far it's above the eye line. Now measure the far right hand, bottom corner. Notice anything? Sure! it's significantly farther above the eye line. In a front view, the bottom line of the forehead would be parallel with the eye line. Why? Because in a front view, the two sides of the forehead are the same distance from your eyes.
Add the chin

Add the chin
Second step: add the chin. Again, as you move left to right across the page, the lines of the chin seem to open up, the chin's right edge is wider than it's left edge. They're following what? their trajectories off the vanishing point.
Adding cheekbones and cheek lines
 |
 |
Adding cheekbones and cheek
lines
In these two pictures the cheekbones and a makeshift cheek line are added. Pay very careful attention to where the contours of the cheek and cheek bone lines cross the different lines of the miter box. Your first impression or the intrusion of the left brain will want to tell you to do differently. Use what you've been learning and try to look at the shapes made between the different lines.
A quick digression
Do you want a "for instance"? Ok, here's a quick example to get you started. (Also note, when I'm talking about the left and right of a face or head, I'm approaching it as if the face were yours or mine: the left cheek of the picture is our real left cheek. This how you talk about in left and right anatomy or in medicine - it's a convention so nobody gets confused. Except now we're all confused.)
 A. crossing the nose line |
 B. Crossing the right vertical edge |
The finger in illustration A points out where the left cheek line crosses the base of the nose line. Pretty straight ahead, right? Illustration B shows where the the cheek line crosses the vertical edge or margin of the cube.
In the next illustration, I want you to look at the area formed by the intersecting lines as shapes, that is, distinct, unique, up-until-now- unseen shapes. (Remember, I'm not just teaching you caricatures, I'm teaching you to access your own in-born artist skills.)
|


In picture C, the shape we isolated above in A and B is shaded blue. In picture D, I've isolated another shape (by observing the shapes formed by the intersecting lines) and colored it yellow. This is similar to the grid exercise you used in the foundation lessons - a grid helps break down a complex picture into smaller, easily managed sub-shapes.
Now, like you've seen above and a whole gang of times before, mentally observe the shapes formed by all the different combinations of intersecting lines. (That'll get you into your "right brain".) You'll see a colored-in version of this at the beginning of section 6. (I'm not going to link it - you can see it right after you do your assignment. I know, I'm so mean.)
Back to the exercise

Both cheekbones and cheek lines added
Here (above) both of the cheek bones/cheek lines have been added. You followed each line down as it crossed the different guidelines right? Just like you did in the pure-contour drawings, follow each section of each line with your eye first - slowly map it's course out, then envision it in your own drawing.
Adding the ear

Add the ear
What I like about this illustration, (above), with the ear just dangling out in space, is the way picture exudes depth. Do you get that feeling? Note that just like in the side view drawings you did in Part IV, the ear starts at the intersection of the side's vertical and horizontal center lines. It still comes to rest on the line that's both the bottom of the ear line in the side view, and the base of the nose line in the front view.
Starting the curve over the forehead

Start the curve/crown over
the
forehead
In this illustration, (above), we've added the curve of the crown of the head - the transition of forehead into the top curve of the skull.
Finishing the arc of the skull

Extend it to the back of the ear
In the illustration just above, the curve of the skull comes to rest just behind the middle of the ear (or just a tad under the middle). This will change depending on the angle the head is rotated or on the size of the ears. Be aware that this isn't a rule - you must still rely on what you observe out there in the world as "the word". Still watch carefully where all contours cross guidelines and the angle each section of changing line makes with that guideline.
Add the jaw

Add the jaw line
And lastly, you add the jaw line. And there it is: the Mr. Johnny Average Head. And now if you haven't, draw this as you see it and fill all the "miter boxes" you made in the previous section (section 4) with faces like this.
Second assignment: Draw the head within the format with the front view on the right, (this makes me a little dizzy after staring at the other view for so long), like this:

Draw the reverse angle view
In section 6 you'll add the nose, and see a bunch of different ways to render the masses of the face and head. I'm not going to walk through each one like this - you've got the tools to draw them on your own. And more than that, I know you're anxious to get drawing caricatures! See you in the next lesson.
If you'd like to, view the gif animation again:
*go to section 6
Kasbohm & Company's
YouCanDraw.com
© Copyright, All rights reserved 1997
e-mail: jeffkaz@YouCanDraw