
The Supply Store
Back to YouCanDraw .Com
Shapes and Masses of the Head, Part III |
Time to draw
Now how will you make sense of all I've just said? Stop thinking about it. That's right. No more left brain stuff. I've overburdened you with words. Now it's time to draw. After you do the next two assignments, come back and re-read parts one and two. They'll make more sense.
Assignment
#1: |
Just like you pour concrete into forms, I want you to construct a face grid to pour four faces into. A rectangle (the format) with four other lines - three horizontal and one vertical - lightly drawn in is pretty much it. The rectangle will be a scaled down version of the 8" tall by 6.5" wide "Johnny Average" version (whom you still haven't been properly introduced to yet...but you will, I promise). Here's what I want you to draw right now:

Format and
divisions
So all you got to worry about is this: a rectangle and 4 lines -
one vertical centerline - line 1
one horizontal centerline (the eye line)- line 2
one "base of nose" line - line 3
one "center of lips" line - line 4
At this point don't worry about getting the dimensions perfect. As long as the rectangle you're drawing is taller than it is wide, you're doing fine. We'll tighten it up later - and if you trace the print out below a few times you'll start getting a feel for the right scale. (There's a way to infinitely grow or shrink a rectangular shape without losing it's proportion. Remember it? )
Click here to print out grid one - (grid one is a single scaled down version of the three main horizontal lines of the face, the centerline, and it's bounding format.) Check it out, print it out - in either case,
Draw at least 15 to 20 of them
Yes, 15 to 29 of them. Try to draw the first couple fast and bad! This'll loosen you up. They don't have to be perfect. Then drop into r-mode and take your time. This will help you judge the dimensions. You'll get a feel for them.
Remember, in any art, quantity yields quality. So dive on in: it's a piece of cake if you think about it: a rectangle divided up by one vertical line and just three horizontal lines.
Assignment #2: |
Now that you've built the formats, you're going to fill them.
Click here and print out grid # 2 - this one has the face you're to draw drawn into the grid.
Click on the "Gif animations" to see piece by piece what you'll be drawing.
Just below is a piece-by-piece explanation of this whole assignment.
As you'll be reminded of below, always incorporate what you've learned so far about negative space, contours, edges, and "objects".
After you've filled all your hand drawn formats, draw some more! (More hand-drawn formats that is.) If you feel comfortable with drawing the dimensions by "sight", print out this next page and make 5 to 10 photo copies of it and draw the same face you've been drawing here. This print out (the one just above) has 5 formats drawn on it. Fill all the formats - that'll be like 25 to 50 faces. You're gonna be so good at these when you you do all those!
An Explanation of what you're doing:
1) Start top and center. Start on whichever side feels comfortable.

1. Starting the drawing
2) Notice the arc of the skull touches the format two thirds or so the way down to the horizontal midline - the line that divides the face in half (the eyeline). Pay special attention to the shape between the penciled line and the outside dotted line of the format:

2. Arc of the skull
Re-employing
what you know about Objects,
Contours, and Negative Space
 |
2a) Using Negative Space... The blue designates the "negative space" between the format and the first segment of the skull. (The skull would be the object.) You could also view the shape on the inside of the line as the negative space - even though "technically" it's the object (i.e. the skull). Anything that helps you appreciate the shape you're trying to draw is helpful. |
2b) More Negative Space Here the shape on the other side of the skull contour has been made into a separate shape: it's really the mass of the skull partitioned off by the dotted lines of our grid. What's an object and what's negative space can become confusing when you're drawing from pictures like this. And that's ok - you're getting flexible and fluent using you're right brain. |
 |
Try and jump between these two views (2a and 2b) in your imagination. Think of them like this: you're viewing the blue shaded areas as you're coming at the same contour (the curved line of the skull) from two different directions. Both are shapes built around around the same line or edge, i.e. they're sharing edges. They just use different boundaries.
As you go through each step here, try to imagine similar variations formed between the surrounding boundaries and edges in each section of the grid.
Why go through all this again? Because making leaps like this, viewing each line as the edge of a different shape does two thing: 1) it draws you deeper into r-mode, and 2) it makes you that much more adept at viewing the same thing more than one way.
3) Step three: completing the top half of the grid (the dome of the skull):

3. Dome of the Skull
4) In this next step I've made two little marks at the very bottom of the grid. See them there? They both ought to be an equal distance from the center line. (Ok, I know the one on the right is a little closer to the line, but who's keeping track?)

4. Two dots to mark off the chin
5) Now connect those two dots with a line:

5. Drawing a line for the chin
6) Next begin on the contour of the cheek bone to the chin. Remember to use the border of the format and the actual contour of the cheek to imagine a whole separate shape - as negative space. (I know, I get repetitious.):

6. The first cheek contour
Negative Space versus Objects
Applying the "negative space" technique to the cheek contour. These are steps I want you to get used to making. (Which is why I repeat myself so often.) You can juxtapose a "negative space" around any object. In the following windows, the parts of the face I've drawn so far have been divided up using the grid and the format as boundaries.
 A. Here I've highlighted the shape (the negative space) between the cheek contour (the penciled line) and the format. |
B. Here I've highlighted the shape (an object: the cheek) between the contour (the penciled line) and both vertical and horizontal midlines of the grid. |

Again, quiz yourself by jumping back and forth between the two views of the cheek contour above - i.e., seeing the the penciled line as an edge of the negative space between the cheek and the dotted format/grid lines(as in A), and as the edge of the cheek itself (the cheek as the object this time - as in B).
7) Finishing the other cheek and thus finishing the main outline of the face in front view at eye level:

7. Finishing the outline
of the
face
8) Here's the first mark for the right eye. It's a place marker. Note it's relationship to the vertical midline of the grid. How far is it away? Note also it's angle in relation to vertical and horizontal. Where does the horizontal center of the this line lie?
Correct - right on the horizontal center line. And where do the eyes go? Right again! In the horizontal center of the face.

8. First outline of right eye
Now, envision a mirror image of this line on the opposite side of the middle vertical dotted line...like you'll see in illustration 9...
9) Draw the next short angled line for the other side of the face. This will marker the inner border of the left eye. (Recall, I'm using left and right as the subject's left and right. The subject here is the illustration.)

9. Mirror image of line
marking
the left eye
Vase or Face? |
| Use your
imagination: Don't the two little lines
in illustration 9 above look like they could just
as easily be the the root of the nose too? Well,
you're right-on in thinking so. Again, using a shift in your imagination, picture these two short angled lines as the borders of eyes or as the first part of the nose. Do you feel the shift going back and forth just like you felt it looking at the vase-face? |
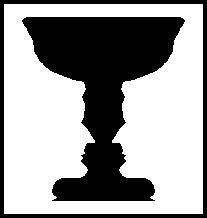 Vase - face: Feel the shift? |
10) Here I've lined off a polygon marking the left eye and started doing the same on the right eye.
 "Boxing" off the eyes. |
 More "boxing" off the eyes |
Illustration 10
11) In this next picture I've started on the right side of the nose. Do you recall the nose can be viewed as made of three wedges? This is just the beginning of the second wedge. If you don't recall the construction of the nose and want to review the whole thing, click here . (At the bottom I've included the "Wedge" illustration of the nose for your reference too.)

11a. "Wedging" the
right
part of the nose

11b. Now the left half...
In 11c, I've added the tip of the nose...

11c. Adding the tip of the nose
12) In 12 I've added two lines that mark the margins of the nares (the nostrils). Draw these so they directly contact the tip of the nose. I also added two curves around these that mark base of the nostrils where they contact the cheeks.

12. Adding the nares
In total, you've added 4 lines here, i.e. there are four lines more in this picture in comparison to 11c just above.
12a) Quick exercise. Drop into r-mode and imagine the space between the lines representing middle wedges of the nose as shaded blue, then...
12b) imagine everything else outside these two lines and under the eyes (but still within the dotted off area) as shaded blue.
 12a. Treating the nose as "object" by shading |
 12b. Treating the rest of the bordered area as "object" |
As you draw, you'll be making all sorts of reckonings and visual measurements - shifting emphasis on different ways of looking at the same picture. This will build your r-mode muscles and I think that's as important to learning to draw as is drawing! Ironically, you can't learn to draw until you drop into this "room" inside your head.
Lastly...
13) And lastly, in illustration 13 a and b, the lips are added. Remember both top and bottom lips are broken up into middle and side lobes.
While viewing the gif animation of the the front view, watch for the additions of these lobes. It's fairly subtle, but if you watch for it, you'll see it.
 13a. Adding the upper lip |
 13b. Adding the lower lip |
OK. There it is. Go back and view the gif animation over. And then view it over again. Then over and over again until you know each additional section. Practice visualizing the different shapes made between the contour lines (in this case the penciled lines) and the dotted grid. View them as both object and as negative space. Mentally switch between all the different combinations described here. Make up your own. Color your own drawings if it helps you see all the different shapes that can be made.
This isn't so much a a part of drawing faces as it is in maintaining a strong link to r-mode. And this kind of practice can only improve your drawing.
Go do your Assignment |
Reference: wedges of the nose:

Kasbohm & Company's
YouCanDraw.com
© Copyright, All rights reserved 1997
e-mail: jeffkaz@YouCanDraw