
The Supply Store
Back to YouCanDraw .Com
Shapes
and Masses of the Head |
So far in Part V, you've seen foreshortening in the horizontal axis (the railroad tracks example in section 1) and foreshortening in the vertical axis (the gif animation of the rotating format, also section 1), and you've added 4 more shapes to the face (section 2). All are either examples of perspective or add detail and depth to your drawings. Now we're going to join all these ideas and figure out how you can use them for drawing either portraits or caricatures. In fact, we're going to build a "miter box" for heads! Once you get a feel for this, you'll be looking at, into, and right through your subjects with an insight you probably never had before. We'll revisit perspective in this section (section three) and you'll be drawing "Mr. Average's Miter Box" in section 4.
|
|

Entering the 3-d realm
Remember this square from Part II? (That's where we started looking at the frontal plane of the face):

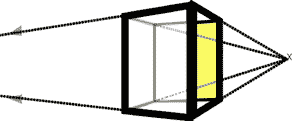
1. Square "A" - it's really a cube
Remember I said it was really a cube that looked like a square? Why was that? It only looked like a square because you were looking straight at it and at eye level. Since the white face is closest to your eyes, the rest of the cube has to be farther away. That's perspective (and it's pretty much common sense). And what are the first two rules of perspective?
Rule number one:
The closer an object is, the bigger it looks.
Rule number two:
the farther away something is, the smaller it gets.
So all the rest of the cube is there - we just can't see it. It's all hid behind the face, the front of the cube, even thought the back of the cube is the same size as the front.
The "trajectory" of the cube's edges still converge on the vanishing point. Vanishing points are just where all the lines come together. "Lines of what come together?" you ask. The "trajectory" lines. Those are lines you see coming off the cube's edges and heading off towards the horizon in the next illustration.
They're called lines of "trajectory" because if the edges of the cube extended infinitely, they'd "traject" or "project" forever. Where they'd criss-cross or connect is called the vanishing point. In an object at eye-level, the vanishing point is directly behind the object when you look at it in a front view. Rotate it a little, and all that changes. If we rotate cube "A" just a little, all those lines and edges of the cube come into view - and then you can imagine them shrinking off to the vanishing point. You can them see in this illustration:
2 .Cube "A" after rotating it on it's vertical axis
Horizontal vanishing points rest on the horizon - the horizon here is at eye level. Vertical vanishing points (which you'll see in the "three point perspective" in just a second), are out in space directly above you, or in the direction of the middle of the earth below you. In either case, you are the reference center of your visual universe. Everything you see relates to where YOU see it from. (How can it be any other way?)
In the illustration above you can see one vanishing point to the right, (where those lines take off to the right and converge on the tiny "x" over there on the horizon line). And you can imagine the two lines running off to the left converging at a second vantage point. In fact, that vanishing point is far enough off that the picture got too big for this page - the gray arrows point off to the vanishing point they converge at.
(In this picture, where the object's center is at your eye level the horizon line will run right through the center of the cube. And it runs through both vanishing points as well )
*
So by rotating the white cube masquerading as a square above, you can see it's really a cube. And when you rotate a cube, (or our masquerading square or any object for that matter - it's just easier to demonstrate with a cube) you introduce a second vanishing point.
In fact, if you look in a book devoted to perspective, it'll be called - guess what? - "two-point perspective". Amazing. And that just means the object has two vanishing points. (Don't worry about memorizing this - there are a couple excellent books listed in the Bookstore if you want to pursue this.)
The rail road tracks were an example of one-point perspective: the lines of the track converged on to one vanishing point.
Adding still another vanishing point
If we drop or raise the rotated cube above or below eye level guess what happens? You introduce a third vantage point! Why? Because now instead of the top and bottom of the cube being an equal distance from your eye, what happens? One edge will be closer and one will be farther away. (The first rule of perspective: if something is close to your eye, it looks relatively large! Take that same object, move it away, and it shrinks.)
Here's a picture of a cube that's been raised above the horizon. Doing so adds yet another consideration: it now has three different vanishing points:
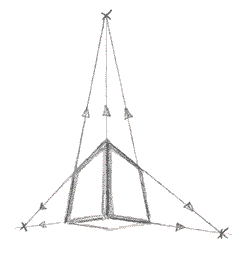
3. Moving the cube above eye level
In the next illustration below, we've dropped the cube below the horizon, and what happens? I'll quickly list them: You can now see the top of the cube. The top of the cube is closer to your eye than the bottom of the cube, so what happens? The bottom of the cube appears smaller than the top. It shrinks vertically along the lines that course to the vanishing point at the bottom of the illustration, (the two horizontal vanishing points are still on the horizon at eye-level):

4. Moving the cube below eye level.
Now let's get back to faces
Now you've gone through all this hassle, you've suffered along with me to get to this point: the same effect works on faces. When one ear is farther away, it's smaller. When one eye is farther away than the other, it's smaller (but since we're not talking large distances between the eyes, the degree sized change isn't a whole lot - unless you're at an extreme angle or extreme close-up). One part of the head will block out another part. When we turn the head to a 3/4 view, you get the effect of at least two vanishing points. (I say "at least two" since you might have raised it above or below the horizon line - and so adding the third vanishing point - like we just finished talking about.)
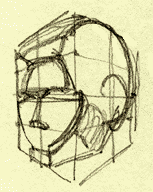
And here's the pearl you've all been waiting for: if you can construct a cube (like I'm about to show you) and plaster on the different lines I've been showing you (the eye-line, the base-of-the-nose-line, etc), you'll be constructing a head with a full 3 dimensional effect and you'll literally feel where depth is - and belongs - in your drawings and caricatures. That's why you're going through all this trouble!
Making the head fit the cube
Let's fit a head inside of a cube right now. I 'd like you to take second and point out the lines we've been talking about - the ones you've been placing in the formats you've been drawing. And if you don't see them in the drawing, where would they go? Here's a list of the guidelines you've seen and drawn:
- the horizontal center line - i.e. the eye line,
- the vertical center line of both the front and side views,
- the base of the nose line, which becomes the...
- base of the ear line in the side view,
- the lip line,
- the chin line, then last but not least,
- the middle of the top half of the front view line.
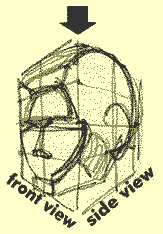
Find the guide lines
Whew, that's a lot of lines! But if you've gone through the exercises step by step and you've done the assignments, then these lines will pop right out at you!
In Section 4 you'll be building your very own cube - the "Mr. Johnny Average Head Miter box" and in section 5 you'll be filling it. This is getting pretty exciting! (Well I think so anyway.)
Kasbohm & Company's
YouCanDraw.com
© Copyright, All rights reserved 1997
e-mail: jeffkaz@YouCanDraw