
Part VII: Extra - the 3/4 view
The Supply Store
Back to YouCanDraw .Com
Lesson
14: Shapes and Masses |
Folks if you've stuck with me so far, then you've now arrived at a big day! Do you feel fairly confident you can recognize and draw the major shapes of all the features? If not, that's ok, you can always review. Repetition is what will make an artist out of you.
Click
here for: |
Let's recap some of the things you've learned so far: you've learned about the different ways of dropping into "r-mode" - the artistic modality of your brain. You saw that drawing upside-down pulled you into it, that pure contour was a method that lulled you deep into the here and now, the present moment of observation. You learned about negative space, angles and proportion. You saw the three drawable parts of the ear, the breakdown of the nose, how to capture the shapes and texture of lips, learned about the complexity of the eye. You got an introduction to understanding the underlying masses of the head in the lesson on lips and teeth.
And all this brings us to this lesson: Shapes and Masses of the Head. In this section you're going to find a home for all those features you've been so busy drawing. And you know what? It'll be easier than you think because you've been absorbing this part of the anatomy piecemeal as you've been going. It's in this section I think you'll begin to experiment with caricature: you'll be getting a chance to play with proportions - and not run the risk of having to make perfect likenesses. (You can always do that if you wish.)
It's at this stage some people may discover it's not portraits, or caricatures, or cartoons they want to master, it's developing their own characters (cartoon or altogether other arts like sculpture...you've been developing your own character all along through discipline, patience and dedication). The architecture of the head is truly amazing and you'll be getting some depth here, enough I think to carry you into doing likenesses. But still, we'll literally only be scratching the surface. You'll have the rest of your lives to add-to, or build even more artistic depth.
What you'll be able to do by the end of this chapter:
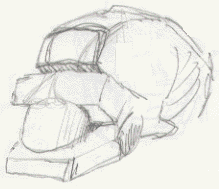
By the end of this section, you should be able to draw a "cubed-out" masses-of-the-head picture just like the one above. Not only that, if you do all the assignments in this section (and there's a lot of them), you'll have a template just about memorized in your head - not to draw "rotely" whenever you draw a head, but rather as an embedded (as in "embedded in your brain") template of comparison that helps you see into and through the model or subject you're drawing - anywhere or anytime. And I think that's a pretty powerful tool to have packed in your arsenal.
Here's the game plan
1) Part I: Describe the skull - light overview of the bony anatomy
2) Part II: Front view, formats, and a "four line" approach.
3) Part III: Assignment one (Complete with gif animation)
4) Part IV: Side View
5) Part V: Working in three dimensions
A quick "Masses-of-Head" sketch
A word about "Johnny Average Head"
This will also be a great time to start introducing "Johnny Average Head". In time you'll understand the why it's great to have an implanted standard in your own mind: it gives you basic units to compare the caricature or portrait you're drawing. With something to compare to, you'll have a head start deciding what and why a persons' features seem caricaturable or best left alone.
The Bony Anatomy: a quick overview
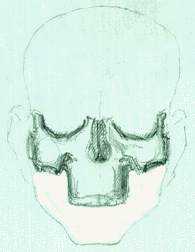
Here's' the skull in a front view:
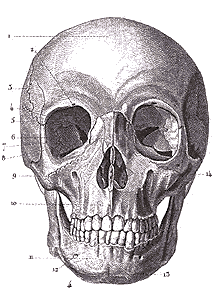
Front view of the skull
I'm not going to get into detailed naming of all the bones of the face and skull in this lesson. It's just too overwhelming. And besides your observation skills will get you all the detail you need. I do want you to learn to recognize some of the major landmarks though. And these I've listed. I'll add more detail as needed in coming lessons.
| 1) the frontal bone | 5) The Mandible |
| 2) the orbital bones | 6) the Temporal lobe of the skull |
| 3) Nasal bones | 7) the cheek bone / zygoma - just to the right and |
| 4) The maxilla | above the 7 |
Here it is in a side view:
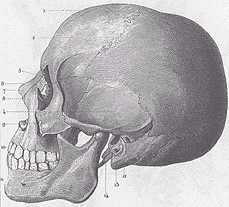
Side view of the skull
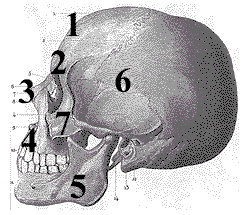
Side view of the skull with
bones numbered
| 1) the frontal bone | 5) The Mandible |
| 2) the orbital bones | 6) the Temporal lobe of the skull |
| 3) Nasal bones | 7) the cheek bone / zygoma |
| 4) The maxilla |
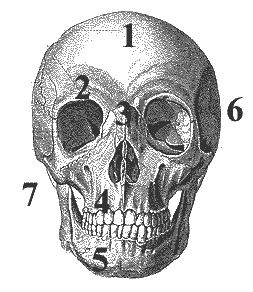
Here's a drawing (an abstraction) of the major bones as seen in a front view. Quiz yourself and try to name them.
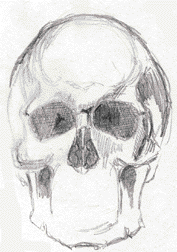
Name the major bones
In a side view, you can see all the same bones you see in the front view plus a few more. Here again are the major bones seen in a side view. Try to name them without going back and forth more than three times to the labeled pictures above.
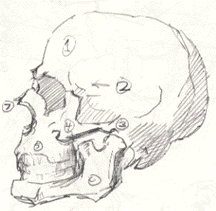
Name the bones (ignore the numbers)
Here's a birds eye view of the skull:

Top view of the cranium -
with
"sutures"
In this view you can envision the roughly cubic, roughly egg-shape of the human head. The point of greatest width of the skull is roughly 2/3rd's of the way back. (Use what you know about negative space to observe the narrowest points of the area between the skull and the format.) The nose and cheek bones protrude farthest forward.
Side note: Now what are those little squiggly lines? Those are the "sutures" or seams of the skull. They are the joints of the head. Humans are the only species of animal anywhere in the world who's babies are born with these joints unclosed. You know about a baby's soft spots right? Those are just the spots where the skull hasn't yet come together, hasn't fused.
If you watch close at a baby's soft spot (most people are familiar with the one towards the front, right in the middle - but there are 3 others!), you can actually see a pulse - this is perfectly normal. Why be born with an unclosed skull? The skull is the biggest mass of the body at birth. To get through the birth canal without flexibility - "modeling" which is bending and moving of those joints - would kill both mother and baby.
It seems we've been designed to have more brains than any other creature on the planet. And Mother Nature has made it so we finish this extra - and very risky growth - outside our mothers. If babies got any bigger than they already are at birth, no mother could withstand it. If babies were born any sooner, they'd be so fragile, they couldn't survive. Having all those brains can be a very dangerous thing. Nature's found a happy medium and a marvelous solution to building human beings.
Divisions of the Head
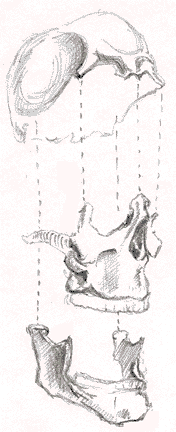
This next illustration demonstrates the head broken down into three anatomic sections: cranium, central facial bones, and jawbone. Don't get anxious, this isn't anything you'll have to reproduce (though I think you could), I just want you to understand it.
Explodo-view of the Head:
 |
|
Explodo-view of the Head
This may seem like an artificial division of the head, but in actuality, nature has divided it for us. Just like in the illustration above, the one showing the the "sutures" or joints of the cranium - there are sutures right in the middle of the bony orbits - between the two top and bottom halves of the circular bones around the eyes.
The next three illustrations show the skull divided at it's natural points of separation - in a front view:

Uppermost part of skull: front
view
Front view of middle section of skull
What's left is the mandible or jaw. This is the only mobile bone of the skull. It contacts (or "articulates" ) with a small depression at the sides of the skull (at the temporal bone) It's called the temporomandibular joint: (TMJ)
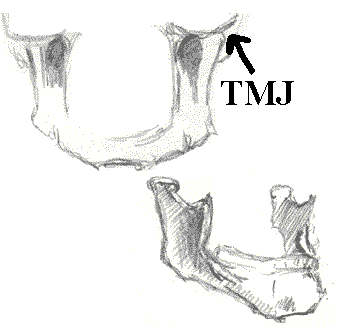
Isolating the Mandible and "TMJ"
Breaking it down
You've arrived at your first assignment. Draw everything up to this point. No, I'm just kidding, I wouldn't do that to you. You will be doing lots of drawing in this section though. Not to worry, I'm going to break this down into very recognizable and easily understood pieces. (I think they call this "chunking" in these corporate, MBA-obsessed days. ) I'm going to quiz you often and I'm going to be pretty repetitive: I'm going to drill this into your head so you can go on to be the next Kruger, or Hirschfield, or Picasso.
Get your drawing pads out!
Get lots of loose, unlined paper (any kind will do - typing paper, matte, brown paper bags, newsprint - it doesn't matter) and/or your drawing pad out. Keep them right at your side or in your lap.
Kasbohm & Company's
YouCanDraw.com
© Copyright, All rights reserved 1997
e-mail: jeffkaz@YouCanDraw