
The Supply Store
Back to YouCanDraw .Com
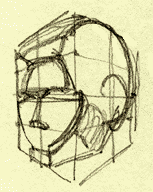
Adding crown, forehead, cheekbones, and chin
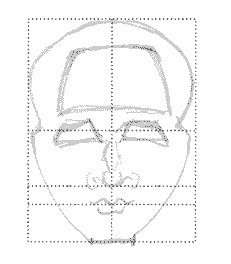
In the illustration of the head just above, you'll notice there's more than just the plain old face view you drew back in Part III.
In Part III you were concerned with getting a feel for the mass of the entire front view of the head (right now you're in section 2 of Part V). There wasn't much differentiating going on. That is, you drew the outline of the cranium, you drew a sweeping outline for the outer cheeks and cheekbones and you drew "place holders" for the nose, eyes and mouth. (I didn't tell you that's what you were doing, but that's what you were doing).
In the next 3-d rendering, you get to add a bunch more than that. (We omitted so much in those drawings, I mentioned that something there will probably just not look or feel right - but to just hang in there with me and trust I knew what I was doing.)
What was missing was the crown of the head, the forehead, the chin and the cheekbones. Take a small break and take a look at the following gif animation and you'll see real quick what I mean:
So there they are. Did you see them? (the added masses of the head? You did if you looked at the gif animation.) I'll just throw out a picture of the finished 2-d picture, but when you compare it to the first front view you drew, wouldn't you agree that even this simple one has more of a feel of depth to it? Lets compare them both.
 Front view without masses |
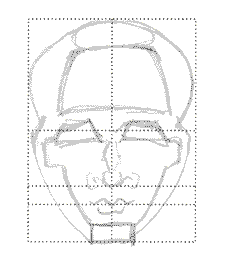 Front view with masses |
Both pictures have proportionally the exact same format (the size of the format containing the front view with masses is a little smaller). Both illustrations have eye lines that are at dead horizontal center; both have a base of the nose line that divides the lower half of the format in half again. Both have a lip line that marks off the first third of the bottom quarter of the format.
There are a few more angles to the face at the left, (like an added angle of the jaw, a rounder cranium) but essentially they're very similar pictures. Proportionately they're roughly the same.
Notice however how the face on the right has so much more depth to it. Do you get the feeling that light is reflecting up against the cheeks? That's only an illusion your brain is inducing - the side of the cheeks are no more intense white than the front of the cheeks. The heaviness of the actual pencil line adds a lot to the feeling of distance and intensity too (the relatively thinner, outermost line in the "masses" picture adds to that illusion) - but we're not going to worry about that right now.
The "picture on the right"
Also notice again in the picture on the right how the area above the eyeline (and the eyes) appears to be less than half of the total picture? ( I duplicated the picture just above, but scroll up one illustration to really get the comparison.)
That's the effect crowding in a crown and forehead will have. In the lower half of the picture, the line length, the longer sweep of the cheekbone lines contribute to this effect as well. The forehead has a blockier feel - it's more rectangular. Still, the center of the picture goes through the middle of the eyes.
(I repeat, don't be fooled: the eyes are still in the center! I quizzed the heck out of you on this same topic awhile back.)
Briefly revisiting the side view
The arrow in the following illustration shows the point where the forehead begins to transition into the crown of the head:
Transition of the forehead
The arrow here marks the dividing line between the forehead and the crown. The crown, in a side view, is just the curve of the top most part of the cranium. It's usually hid by hair so you're not always readily conscious that there's something solid there. (Unless of course you're one of us hombres who don't have the luxury of all that natural covering and are all too aware there's something solid underneath.)
The next small illustration shows that transition zone (the blue line) between the front and side views. Also note that the eyeline, the base of the nose line and lip line, all line up perfectly:
![]()
Comparing front and side views
Your turn to add parts: time to draw! |
So guess what? You get to add the four parts you saw in the "gif" animation: the crown, the forehead, the chin, and the cheekbones. I'll break it down for you here and then you'll jump right in.
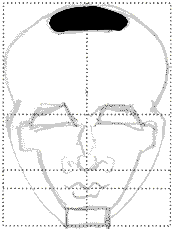
First adding the forehead
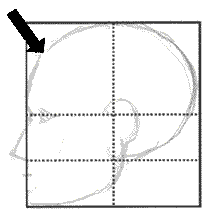
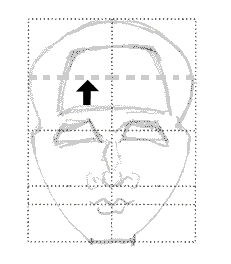
First we'll put in the forehead: I'm not going to give you any fast and hard guideline on the forehead for Mr. Average - people's hairline obscures or exposes it so much. I will say this much though: if you split the upper half of the front view format in half again, and draw the "trapezoid" shape of the forehead centered over that line, you'll have a good feel for it. Just like this:
1) Splitting the upper half of the front view format in half again with a dotted line (the arrow points out the line):
Splitting the upper half in
half
2) Then we'll roughly "skewer" the trapezoid shape of the forehead over this line just like a hog at a big 'ol Texas BBQ:
"Skewering" the
trapezoid shape
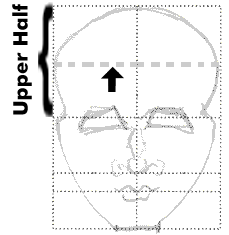
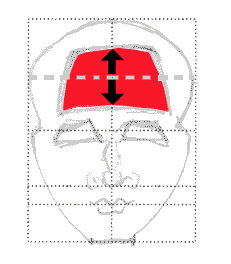
Visualizing the center of the forehead
The forehead straddles the middle of the upper half of the format. Those black arrows in the next illustration are the same size, I just flipped them to show you graphically that the area of the forehead above the dotted line is about the same as the area below it:
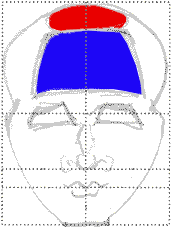
Switching into "Negative Space mode"
And as usual, let's compare the different masses of the forehead and the masses surrounding the forehead by switching into our "negative space" mode. We'll treat the forehead (the red) as the object in the left hand illustration (a), then we'll look at the space around the forehead as the object (the blue) in the right hand illustration (b):
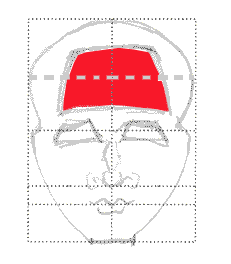 a. Forehead as object |
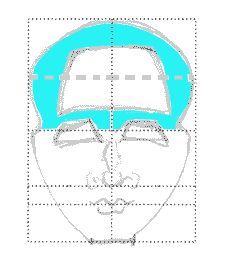 b. Shape
around
forehead |
Look at each colored shape until you feel it as it's own separate shape.
Here's' what it should look like when you're done:
The Finished forehead
Now print out this next page,
|
Next, adding the crown:
To draw the crown, just fill the space between the top of the forehead and the very top of the cranium with this oval shape:
Adding the oval of the heads'
crown
Adding it to the forehead it'll look something like this:
Now...
|
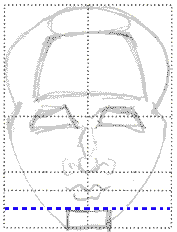
Next add the chin
We jump next to the chin: all you do here is fill the bottom one third of the bottom quarter of the face with a rectangle. The lip line as you recall, falls one third the way down, (i.e. one third the way down the distance between the nose and the bottom most margin of the jaw - all this fits into the bottom fourth of the face).
Teeny review. The base of the nose line starts on the top of the bottom quarter of the format. So if you divide the bottom quarter of the format into three equal horizontal parts, it'll be snap to construct a place for the chin. One third the way down marks the lip line, two thirds the way down marks the chin line (in blue below).
Finding the line to mark off the chin:

Chin at the 2/3rds line
The top of the chin line starts two thirds the way down the bottom quarter of the format. In the next illustration you can see how a small rectangle will suffice for the chin:
Adding in the rectangle of the
chin
How do you decide on the chin's width? In this illustration, I just added vertical lines from the point where the outside sweep of the cheeks intersect the bottom horizontal line of the format.
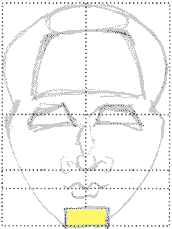
The chin!
Now...
|
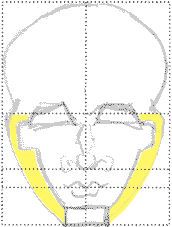
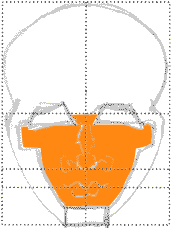
Adding Cheek bones (and mouth line)
And lastly, the cheekbones. This is really more than just cheekbones - the next pair of lines you'll draw combines both the rectangle of the cheekbones with the cylinder of the maxilla - the bone I went on about so much in the section on lips and teeth. You'll be drawing two lines: one that starts at the lateral corner of the left eye, and one that starts at the lateral corner of the right eye. Both lines finish up at the top corners of the chin.
Take your finger or a pointy object like a pen and trace your way from the corner of each eye, all the way down to the chin - right over the dotted lines - and right up here on your computer screen:
Cheekbones and maxilla
Jumping into "Negative Space" mode again
To get a better feel for the shape these lines suggest, guess what we're going to do? You guessed it: we're going to flip into "negative space mode" and view each area as it's own separate object.
In the picture on the left below (a), I've highlighted the side of the face behind the cheekbones. In the picture on the right (b), I've highlighted the area between the lines. This shape encompasses the area from chin, to corners of the maxilla, up to the eyes. It kind of buries the mouth and nose. Try squinting and the mouth and nose disappear altogether - you'll see a separate shape, a "mass" forming if you will. By adding these two little lines, you get all that added effect.
 a. highlighting the side shapes |
b. highlighting the front shapes |
Now...
And, if you need to, view the gif animation again to tie it all together: |
Kasbohm & Company's
YouCanDraw.com
© Copyright, All rights reserved 1997
e-mail: jeffkaz@YouCanDraw