![]()
The Supply Store
Back to YouCanDraw .Com
Shapes
and Masses of the Head Part
II: |
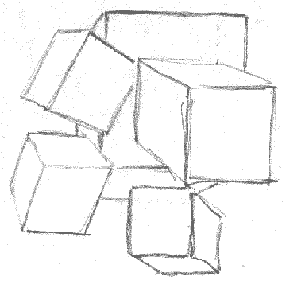
Introducing the cube (and squares)
So you got your pad and paper ready? Good. Excellent. Now, I'm going to make cuban's or cubist's out of all of you. What are those? People who draw lots of cubes of course. Why cubes and squares? Because I think if you can get squares and cubes embedded into your skull, then you can get all your skulls and faces stuffed into your cubes and squares. And, introducing "Johnny-Average Head" will be memorable and practical for you.
Who's "Johnny Average Head"? He's the composite version of the perfectly-proportioned, unisex skull and face. Memorize this guy and all your portrait and caricaturing problems will be solved. Well almost. I'll introduce you to Mr. Average, this marvel of nature a little later. But first...
Getting Square
I'm going to start with some fundamental drawable divisions of the face and skull in a front view. In order to do that, lets look at squares and cubes for a moment.
Here's a square:

Square 1
Here's some cubes:

Some Cubes
What's the difference?
A square could just be the front view of a cube - one side of it. One of six sides. When you look at a cube at eye-level, all you can see is this one side: there's little or no room for perspective to step in.
Lift the cube above or below eye-level or rotate the cube and you introduce perspective. What's perspective? Perspective is the effect distance has on an object - any object. The farther away something is, the smaller it gets. So by turning square one around a little - raising it a little, rotating it a little - you can see it's really a cube:

Square 1 is a cube!
We'll be coming back to the cube a little later in the lesson. Just pack it away for now. You're going to learn how to fill a square with the front view of the face first. Then we'll be mapping the whole head on to a cube. Is this cool or what? (The cube thing I mean.)
Understanding the Rectangle the face will fit into
Read through the rest of this page before you start drawing. You don't have to memorize it, just understand it as you read it. When you get to the drawing part and actually do your own drawings, this will all make so much more sense.
The face won't fit into a square per se, it's taller than it is wide. So lets stretch the cube into a rectangle. In fact,we'll stretch it into a rectangle that's 8 inches tall and 6 and 1/2 inches wide: this is the average height and width of the average face.
Looking at the head from the side, it'll fit into a rectangle that's 8 inches tall and 7.5 inches deep - i.e. the average height and depth of the head. I'll repeat those dimensions again for your information:
Average height of the skull: 8 inches. (from chin to crown)
Average width: 6.5 inches. (from widest part to widest part - usually cheekbone to cheekbone)
Average depth: 7.5 inches (from front of face to back of head)
1. The face:
8" tall, |
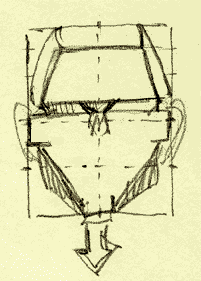 2.
Filling this rectangle |
...And a side view:
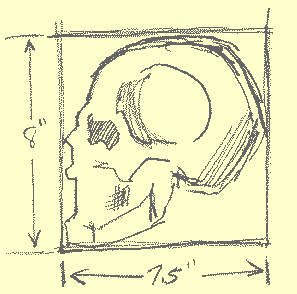
Side view with rough dimensions
Let's construct a front view of the face: starting with the Horizontal Center line
Now we're going to divide the rectangle (the 8" x 6.5" one) up into some pretty simple divisions. If you look at the this picture of an abstracted face, I want you to note the horizontal line that runs through the middle of the eyes:

Note the middle line (arrows)
This is the horizontal center of the face. That means half the face is above this line, half the face is below it, like you see right here:
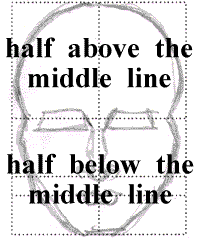
Half above, half below
Remember this: the horizontal line in the middle of the rectangle goes through the middle of the eyes. It's important. Is this always true? Pretty much yes - as long as you're looking at someone's face at eye level. (And if you're dealing with level headed people of course. Sorry, bad joke.)
We'll look at what happens to these lines when you're looking at the face from different angles i.e. from above or below eye level in upcoming sections. Onward...
Drill #1. How much face is above this middle line?
Half.
How much below it?
Half.
Why is this important? Because a very common and persistent drawing mistake beginners make - and experienced artists - is over emphasizing the face from the eyes down. They draw eyes, no forehead, then all nose, mouth, cheekbones and jaw. Why? Because subconsciously all we really need to recognize a person is to see their face from the eyes down. (Recognition is a right brain function). It's easy to forget or ignore the other half. (Where else does this happen in our lives?)
Drill #2. So if the eyes are in the approximate middle of the face, proportionately, how much of the head is above the eyes?
And how much face - proportionately - is below the eyes?
(You said "half" for both questions right? Please say yes. I'm also using face and head interchangeably here.)
Drill #3: A visual quiz
Look at the next two pictures below. Sit back in your chair and "sight" the distance from the middle line to the top of the format (remember those terms - "sight" and format? I'm testing you. "Sight" as in "sighting", is the name given to the act of measuring lengths, angles, sizes, etc. with your "artist's thumb" like back in the foundation lessons (Lesson 6 to be exact). The format is just the bounding shape around the picture. In this case the format's a dotted rectangle.)
It should be plain that the arrow to the left of the rectangle (as you look at your screen), marks the horizontal center of the format. (Just like in the picture above.)
Still in disbelief? It's probably because the main mass of the head, the spherical part, is less than 1/2 the total mass. And the transition from cranium to cheekbones starts above the half-way mark.
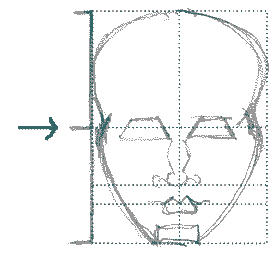
The arrow marks the horizontal
center of the format
Cover the picture with your hand, close one eye, so all you can see is the vertical line on the left hand side and it's "arrow-that-marks-the- spot" center mark, like this:
Cover the picture above with your
hand and
convince yourself the arrow marks the
center of
the format: i.e. the rectangle
Convinced the arrow divides the line in half? And thus divides the whole format in half? Your mind will play tricks on you. That's L-modes' rationalizing habit intruding on r-mode's real-time sensibilities again. Convince yourself the eyes are in the center of the rectangular format.
Have I beat this to death yet? Ok, lets move on.
Base of the nose: The second important horizontal line
There will be two other horizontal lines in the face you're' going to get to know. Right now, you're going to learn about the second horizontal division of the face: the line the nose rests on.
If the eyes rest on a line that runs through the middle of the face, the base of the nose rests on a line that divides the lower half of the face in two. That was a mouth full.
Here it is again:
If you take the lower half of the rectangle surrounding the face (i.e. everything below the line the arrow points at in the two illustrations just above) and divide that half in half again with a horizontal line, then you'll have found the base of the nose.
Well that wasn't a whole lot better. Here, a picture speaks a thousand words. (The arrows in this picture marks the line that divides the lower half of the face in to two horizontal halves):
Dividing the lower half of the face - in half
In a straight on view of the face, the base of the nose rests on the horizontal midline of the lower half of the face, i.e. the half that's below the middle of the eyes.
(Compare this picture of half a face to the full face view above. Find the second horizontal line in that full face view.)
(Note: Doesn't it seem like the lower half of the face is more than just the lower half? It almost appears to be a full face. That's because all you need to recognize someone is see them from the eyes down - in most cases. If you're' used to seeing them with a spiked Mohawk hair-do, this might be an exception.)
The
line that marks the lips:
The third important horizontal
line
The next line down marks the center of the lips. This is the third major horizontal line of the face. Where do you place it?
Here's the recipe: Take the bottom quarter of the face (which incidentally is the lower half of the lower half) and divide it into thirds. The horizontal line that marks the placement of the lips is one third of the way down the last quarter of the whole face. Like this:
The lips lie 1/3rd the way
down
the bottom fourth
Another way of saying it is "the lips lie a third of the way down the distance between the nose and the chin". Recall the space between the bottom of the nose and the bottom of the chin fills the bottom quarter of the face. That was a lot of halves and quarters. Let me summarize...
Summarizing. If you divided the face into 4 equal horizontal quarters:
the top half (i.e. the first two quarters) would be filled by the cranium and the top half the eyes.
The "third" quarter would contain the bottom half of the eyes, the cheekbones, and the nose.
The bottom quarter would be filled by the lips, jaw, and chin. The lips happen to rest one third the way down between the base of the nose and the bottom of the chin.

Summing up the horizontal divisions of the face
Lets run through this still one more time. (Remember, don't try to memorize this right now, just understand it as you read it. You'll know it when you draw it.)
Looking at the head as a whole, (as one unit) the line marking the bottom of the first horizontal quarter of the head is in the middle of the forehead (at the "1/4" mark in the illustration immediately above).
The bottom of the second quarter of the head borders on the horizontal midline of the face and gives us a landmark for placing the eyes ( at the "1/2" mark immediately above).
The "3/4" mark demarcates the middle of the lower half of the face and gives us a landmark for the base of the nose.
By dividing up the last fourth, the lower fourth of the face, into three more divisions, we can find a home for the middle of the lips one third of the way down (shown be the arrow on the left hand side of the illustration below the one and above the 2).
I hope I haven't needlessly complicated this.
Drill #4. Where is the base of the nose found?
Right, at a line three fourths of the way down from the top of the head, or at the line that divides the lower half of the face in half again.
Where is the line marking the center of the lips to be found?
Right again: a third of the way down from the base of the nose and the bottom of the chin.
And where are the eyes found?
Right-to again! In the middle of the whole thing. You're doing fantastically. (I almost said "fantabulously" but I contained myself. That would have been pretty nerdy if I did..)
As you can see, there's more than one way to describe the same lines. Were your answers saying the same thing?
Kasbohm & Company's
YouCanDraw.com
© Copyright, All rights reserved 1997
e-mail: jeffkaz@YouCanDraw