
The Supply Store
Back to YouCanDraw .Com
Part VI: Mr. Johnny Average Face |
In the first 5 parts and 7 sections of "Shapes of the Head", you learned a gang of stuff. Most all the guidelines you learned (save for the vertical center lines) were horizontal lines. In this section we're going to focus on the front view of the face and add the vertical guidelines.

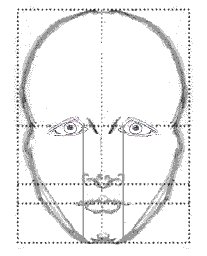
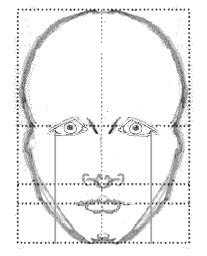
Main horizontal lines of the face
These are guidelines used as far back as the Romans - averages and standards even Aristotle thought about. None are of the "perfect" face, none are of any particular person. They're guidelines "composited" by those who've studied thousands of faces over lifetimes and they've uncovered what seems to be the basic "average" formula for a face. Certain authors call this face the "in-betweener", or the "proportionately perfect face" or just plain Ms./Mr. Average. (Some people get nerdy about it and call it "Mr. Johnny Average Face".)
The usefulness of this "average" face isn't to compare your own face to and say "drat, I just don't have that Hollywood look". Quite the opposite! People with "perfect" features and facial proportion might be easy to look at but are actually the hardest to draw. In the words of Norman Rockwell, they're just not as "interesting" as a face with wrinkles, or age, or "imperfections".
The "Average Face" is a face to look at, ingest, internalize and then compare other faces to. It allows you to say "this is why Bobby's face is so unique", or "this is what makes Paula's face so special", or "this is why I think Billy's nose seems noble - even though he's no Roman". Simply said, it's a jumping off point. Will you use it forever? Maybe. Hopefully not, because your style of portrait or caricature will take on a uniqueness of it's own - just like the miracle of your own God-given, one-of-a-kind face and personality.
Lets jump in
You know the horizontal lines: go ahead and name them. Here they are again for your review.

Review all the horizontal lines
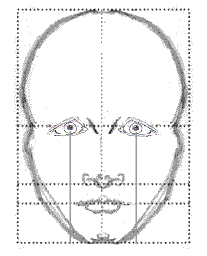
Adding the vertical guidelines
Piece by piece we'll add the vertical lines. One other note here. The eye is the unit of measure for horizontal distances and thus dictates the placement of vertical lines. Generally, the visible part of the eyeball is used as the measure. What's the visible part? Medially, that's from margin of the caruncula (that little triangular pink fleshy area at the medial canthus on the nose side, see pointer in illustration 1):
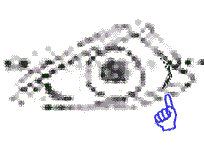
Medial margin of eyeball
It spans to the lateral canthus on the temple side as shown in illustration 2:
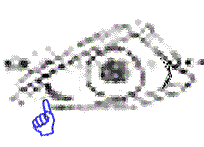
Lateral margin of eyeball
The eye as the unit of measure
Is this always the exact measure? No. It's a general rule. Some people squint, some people stare wide-eyed, Some people's eyes just plain bug-out. Some people are in between. Race will play a role. You have to judge - and in a short time, after you look at and observe enough eyes and faces, it'll be clear. You'll find your way through this.
Still the idea of using the width of the eye as the standard unit of measure works. We'll can describe shapes and distances on the face as "about an eye width wide, about three eye widths high", etc". Just for you information, the face is about 5 eye widths wide, the eyes are about one eye width apart, there's about an eye width of space on each side of each eye that's either cheekbone or skull. You'll hear this again before this lesson is over.
As you've seen before, watch the animation and you'll get the overall idea of this lesson and a visual reference of what I think is most important. It's about 39 kb in size.
1. The first set of vertical lines
The first set of vertical lines run from roughly the medial margin of the eyes, to the lateral (outside) margin of the nose. That is the, the widest margin of the nose generally falls within the width of space between the two eyes. See this illustration:
Nose and inside margin
of eyes
line up
2. The second set of vertical lines
The second set of vertical lines line up the widest border of the mouth with the pupils. Said a little differently, the corners of the mouth line up underneath the middle of the pupils. I should be saying the corners of the mouth almost line up under the pupils - since generally people's mouths don't get quite that wide. (Please don't beat on me for being a little wishy washy here - it's a general rule.)
The second set: Pupil/margin
of
mouth
Just for comparison's sake, here's the first two sets of vertical lines in the same picture together: the medial margin of the eye/widest part of nose, and mid pupil/widest margin of the mouth lines:

First two sets together
3.
The third set of vertical lines:
the lateral margin of the eyes.
The third set of vertical lines mark off the lateral border of the eyes. They really don't have a counterpart in the features the way the first two sets of vertical lines do. They're just kind of there. Some would argue that where they intersect with the mouth's horizontal guideline they provide a landmark for directing the cheek lines down to their home on the chin. That is, the cheek line should cross through this intersection. In fact, that's exactly what they do in this picture. The intersection keeps Mr. Average's face from getting too skinny or too fat. (You'll see in a moment what other good they'll do.)
Lateral Margin of the eyes
4. The fourth set
of vertical lines:
the lateral margin of the face
The fourth and last set of lines we'll concern ourselves with are the lines that mark off the widest margin of the face. The widest part of most people's face is usually at the cheekbones or just to the sides of the eyes.
The widest part of anyone's head is usually not on the face - it's found farther back. Remember the head is egg-shaped if you look down on it. The narrowest part is in the front and the widest part of the "egg" is about two thirds the way back. Often you don't see the widest part of the head because it's hid behind hair. Perspective can play a role in close-ups too: with the face so close, you just plain can't see the rest of the head. (It's farther back and so is shrinking towards the vanishing point.)
It can be deceiving, so you need to look at the whole shape of the head to find the true margins of the face as you try to draw somebody. You really have to jump into a "negative space" mode to recognize it.

The 4th set of lines: the
outermost margin
Dividing up the face according to vertical lines
This next picture shows how the face might look if we color the different sections we talked about about. (I'm skipping the pupil/widest part of the mouth pair of lines.) Here's what I want you to notice. Notice how each of these sections are about the same distance apart?
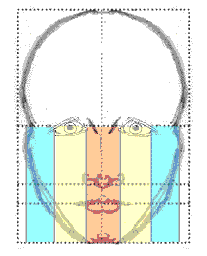
Coloring sections of the face
The eye as the unit of measure
All the vertical dividing lines, except for the pupil/widest part of the mouth, are about one eyewidth apart. Is that convenient or what? If we superimpose an eye over each section, notice how the eyes end up distributed pretty evenly over the top of each section?

Distributing eyes across the face
The take home message
And here's the take home message:
A face has two eyes. Those two eyes are pretty darn close in size.
Those 2 eyes are about one eye width apart.
The widest part of the nose lines up with the inside (or medial) margins of the eyes.
The outermost edges of the mouth line up roughly with the center of the pupils.
The vertical lines marking the outermost border of the eyes will intersect with the horizontal center of the mouth. The cheek lines will cut across that intersection on their way to the chin.
The widest part of the face, in a front view, is about five eye widths wide.
This next picture illustrates how the sections of the face correlate with eye widths. (I superimposed eyes over each colored section.)

Adding eyes over the sections
of the face
Finally, I've added the pupil/widest part of mouth lines in amongst the rest of the vertical lines.
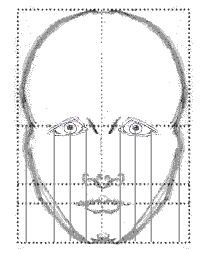
All the vertical lines
of the
face
If you didn't take the time to really look at the lines, the illustration above will be a little complicated. All in all, this illustration has the necessary guidelines you need to "frame" your drawings of the face. Watch the animation several times, then re-read the text above. You should start getting a pretty good feel for this if you do all that. Then take the short quiz below.
Pop quiz: try to answer the questions before you look at the answer. You'll be quizzed on all the faces guidelines - that's both vertical and horizontal guide lines. 1) What's a "unit of measure"? Answer to 1: A unit of measure is some arbitrary feature or line length you find in something you're about to draw. It's a size that makes sense for the picture you're composing. In drawing faces and in this lesson we're using the eye as the unit of measure. Everything can be explained in terms of how many eye widths or fractions of eye widths they are. For example: the face is five eye widths wide; the nose is one eye width wide; the mouth is almost two eye widths wide; the eye is about a one half eye width tall, etc. Getting it? 2) How wide is the Mr. Average Face ? (Hint: give answer in terms of eye widths and inches.) Answer: five eye widths, or about 6 and 1/2 inches. 3) How far apart are the eyes spaced? Answer: about one eye width. 4) How wide is it from one corner of Mr. Averages mouth all the way to the other corner? Answer: almost two eye widths. 5) How many mouth widths are the pupils apart? (re-read the question carefully! - this is a trick question.) Answer: about one mouth width. 6) How many mouth widths wide are the eyes at their widest? (That is from outside corner to outside corner?) Answer: About one and a half mouth widths. Think about it. The pupils are about one mouth width apart. The pupils are roughly in the middle of the entire eye structure. That means there's a whole other half eye width to the outside of each pupil. You got two eyes, so you add another eye width to the total. That gives you three eye widths. A mouth is about two eye widths wide, and one eye width is about half a mouth widths. Total them up = one and one half mouth width. 7) How much space is there between the outside corner of the eyes and the widest part of the face? Answer: about one eye width. 8) The horizontal guideline of the eyes divides the front plane of the face in _____ . (Fill in the blank.) Answer: half. 9) The base of the nose falls ____ between the distance from the horizontal center of the ___ and the ___ . Answer: half way; eyes; bottom of the chin. 10) The distance between the bottom of the nose and the bottom of the chin can be divided into ___ equal parts. The horizontal center of the ___ begins one third the way down this distance. The top of the chin begins ___ ___ the way down this distance. The bottom of the chin is therefore ___ ___ the way down. Answer: three; mouth; two thirds; three thirds or at the bottom. 11) The front view's horizontal base of the nose line continues into the side view as the ___ of the ___ line. Both mark the horizontal ___ of their respective views. Answer: bottom, ear; center. 12) Another way of saying that (question 11) is that the bottom of the ___ and the base of the ___ are at the same level. Answer: ear; nose |
Fantastic!
You are doing awesomely.
Take a break
then try to do this
quick assignment.
For fun
assignment: |
Don't worry about getting any of the features looking perfect. Don't worry about perfect proportions. Just draw the grid of the face, mark off the horizontal guidelines, then divide the face into five equal sections like you see in this picture and sketch in the features as best you remember them.
The 5 vertical sections
of the
face
The idea is to get you to look and "feel" for placement and distances between features. I recommend doing this assignment after you've worked your way through drawing al the features. One last thing - don't forget the vertical lines lines between the pupils and the corners of the mouth .
Go for it!
Ready to pull it all together? Click on this:
Lesson 15 Putting it all Together
- Case Studies
Kasbohm & Company's
YouCanDraw.com
© Copyright, All rights reserved 1997
e-mail: jeffkaz@YouCanDraw