The Supply Store
Back to YouCanDraw .Com
Lesson 15 Master Link Page |
Putting it all together: Introduction
- In essence a quick synopsis of different approaches and techniques used in drawing caricatures. It's a real grab bag.
Here's the other sections you'll find in Lesson 15:
- Case Study 1: Keith Richards
- Case Study 2: Hugh Hefner
- Case Study 3: Ani DiFranco
- Flash Interactive Exercises
- Related e-mail Archive mini-explorations
The Case Studies
Here's the mindset I want you to shoot for while reading through these case studies. Don't worry about getting it all right away. Read through case studies 1,2, and 3 first. Click on all the additional links you find sprinkled within the text. There's embedded animations that demonstrate a point graphically, there's exercises (especially in the Ani DiFranco In-Depth discussion), and there's a smattering of anatomic charts that'll help you recognize and understand how and why faces wrinkle, change, shadow and highlight the way they do.
Read your way through to get a feel for the scope of things (details as well as landmarks) that you get to look for in any face you want to draw. As that becomes clearer to you (and it will as you work your through the repetition), you'll have a gestalt, an "aha!", about what it takes to draw and caricature a face. Then to really drive home what you read about in the three case studies, go through the Flash Interactive exercises.
THEN, go back and re-read each section again and DO the exercises in the Ani DiFranco case study and the assignments in Flash Interactives three and four. If you're intrigued by the Flash Exercises, check them out first - by seeing the same basic method used and re-used, you'll "get it". Now dive on in and don't be afraid.
- Case Study 1: Keith Richards
- Case Study 2: Hugh Hefner
- Case Study 3: Ani DiFranco
- Flash Interactive Exercises
- Related e-mail Archive mini-explorations
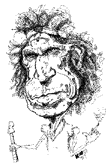
Case Study #1: Keith Richards
(back
to top)
- Here's the first of the
case studies. It's fairly advanced - but you'll see how
all the different perceptive tools come together: from
sighting, to abstracting shadow, to applying the
"Average Face" rules and a whole lot more.
There's also little extras on anatomy and nomenclature -
which isn't necessary for drawing caricatures or
portraits but just makes the different features and
sub-features easier to talk about. Links are supplied to
the relevant sections you'll need to access if you get
stuck. Dive in!
(back
to top )
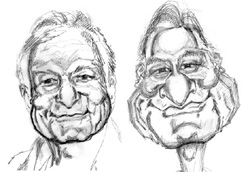
Case
Study #2: Hugh Hefner
(back
to top )
In this
lesson you'll be working your way through a front view analysis using
Hugh Hefner as our subject. You'll review the five main evaluation
techniques you saw in Case Study # 1. (You know, Keith Richards right there
just above). Prints out at about 60 - yes, I said sixty -
pages. Lots of pictures. Read to see what you'll learn,
rehearse, and review.
Review: The five
evaluation techniques as I see them
In the first part of this book - lessons one through nine
(the foundation lessons), you were exposed to the five skills of
drawing. In the second main section of the book you applied and
rehearsed those five skills by learning to draw the different features
of the face and the shapes of the head.
In this, the third section, I want you to get practice at using five more techniques of observation peculiar to looking at faces. The five main evaluation techniques are each concerned with different and relevant observational guides and all incorporate and build on the five foundation skills of drawing. And just what the heck are those five "guide" techniques and how will you use them? Here's how:
- In Part
I you'll be looking at Mr. Hefner and evaluating the overall
shape of the face and head as well as the gut sense you
get about the personality of the person; and you'll analyze
our subject in relation to the horizontal guidelines
of Mr. Average; you'll also find links to some good pictures of
Mr. Hefner available for your study on the web; Go
to Part I
- Next, in Part
II you'll evaluate Mr. Hefner in relation to the vertical
guidelines of Mr. Average; Go
to Part II
- Then In Part
III you'll walk through an evaluation of
each feature - even a few of the main lines and wrinkles
of the face - and relate those to Mr. Average; you'll
have your first exposure to the deeper anatomy of the face -
starting with the superficial musculature just under
the skin; you'll see briefly how the lines and contours of
the face are caused by the action of muscles and masses (look
carefully: the links to the anatomic illustrations
are buried in the text);
Go
to Part III
- In Part IV you'll experiment with visualizing the largely two-dimensional front view of Mr. Hefner in terms of the "Mr. Blockhead" model. Mr. Blockhead is a tool used to develop a sense of depth reducing the face to, and focusing on, the four main masses of the face: the forehead, the maxilla, the cheekbones and and the lower jaw. Then in this same section, you'll walk through a step by step exaggeration of our exaggeration. So have at it and enjoy! Go to Part IV
Go
to Part I
Go
to Part II
Go
to Part III
Go to Part IV

Case
Study #3 Ani DiFranco
(back
to top )
OK! We pulled out all the stops in this, the final in-depth example of "what to look for in a face in order to caricaturize it or draw a realistic portrait". It's five sections are comprised of almost 300 illustrations and over 140 pages of printable material. It's a small book in itself!
You'll pull everything together here: from mere rehearsal in recognizing the vertical and horizontal landmarks, the shapes of the head, to the female facial differences, line studies, anatomy, the most common shadow shapes, and lots of practice exercises. By reading your way through the easy-reading and cross-referenced text you'll nail down what to look for in a face - any face - and anything else you'll ever what to draw.
In
Case Studies One and Two (Keith Richards and Hugh Hefner, above) you got a
fair amount of introduction to a method of approaching a caricature or
portrait. Here you'll hone those skills to a fine precision. But will
your work be done then? Not unless you draw! So dive in fearlessly,
you can't go wrong! All your successes and your failures are stepping stones
to your final outcome: becoming one heck of an artist.
Here's
a break down to what really amounts
to a "book within a book":
(back
to top)
-
In Part I: Reviewing and then adding to your analytic vocabulary. We'll be putting a little more emphasis on the lowest fourth of the face: from the bottom of the nose to the bottom of the chin. You'll review and apply to our subject, Ani DiFranco, the horizontal guidelines and landmarks. Go to Part I
-
In Part II you'll be introduced to "secondary facial features". These are the smaller parts, the smaller shadows and highlights that exist in all faces but few books go into identifying and naming them like we do here. In addition, you'll begin to see the extent with which you can use horizontal guides and references for constructing your picture - all necessary steps to accurate portraits and recognizable caricatures. You'll also find a very educational animation that helps summarize how to use horizontal guides. You'll also begin looking at topics like "asymmetry".
Go to Part II
-
In Part III you'll review and apply to Ani the vertical landmarks and you'll find two informative animations that illustrate foundation topics like "sighting" and a working application in applying the vertical landmarks. You'll also start quantifying what makes Ani different from Mr. Average. You'll find a whole gang of "fly-out exercises" - these are spoon fed, directed study assignments to get you drawing and and away from reading so dang much :-). Lastly, you'll take a look at what makes drawing men and women different - what's different in each features and what's acceptable in exaggeration between the genders. You'll be exposed to Attraction Theory. (There are differences!) This a big page so it's been divided up into two sections.
Go to Part III, section A
Click here to go to Part III, section B
-
Part IV - In Parts i, ii, and iii, you looked at the superficial differences between the placement of the features - a la the vertical and horizontal guides and landmarks. In Part IV you'll get down the nitty gritty, you'll really take the plunge and see what is specifically different about each of Ani's features. And you'll see what makes all those features, shadows, and highlights appear on Ani's or anybody else's face - right down to the actual underlying anatomy, right down to the actual muscles.
I think after you diligently work your way through this page you could have an understanding of the face and how it works that would rival 99.99% of the world's population knows about it. All the time reviewing the foundations of drawing. Lot's of assignments, lot's of links - this is a huge page so we've broke it down into three separate sections. (Types out on my printer at ~55 pages - not counting any of the assignments or fly-outs.)
Go to Part IV, section-a
 Navigating Part IV This is what you'll find in
This is what you'll find in 2) Ani's
nose
|
3) Apron
of the upper lip
4) Ani's lips, mouth and teeth This is what you'll find in Part
IV, section C: Complex shadows of the lips, mouth and teeth 5) Dimples - and their subterranean influences 6) Two more areas: intro to chin and forehead 7) The Forehead - and hairline 8) Last section on less obvious complex shadows 9) The hairline |
-
In Part V, you'll take a look at constructing the hair and it's sub-shapes. You'll also see a summary of "What makes Ani's face unique" and a from-the-hip, computer-aided caricature of Ani. You'll get to begin your caricature of Ani - yes you read that right: you get to caricature Ani. But not to worry: you'll be spoon-fed everything you need to put together your own hilarious caricature. In fact. it'll be so non-threatening, you might get miffed with me :-) Go to Part V
Go
to Part I
Go to Part II
Go to Part III
Go
to Part IV
Go
to Part V
(back
to top)
Click here to go to the on-line sourcebook
|
![]() The
Flash Interactive Exercises
The
Flash Interactive Exercises
Ok, you've read the case studies above so you've got a pretty good idea on what you need to look for when drawing just about any face. Now it's time to rehearse those skills, internalize them, make them part of your traveling repertoire so you'll know how to sit right down and zoom in on the most revealing, caricaturable features on anyone you want to draw. Here's four foundational interactive exercises Check 'em off as you check 'em out.
![]() Flash
Exercise Number One
Flash
Exercise Number One

In the first exercise you'll concentrate on recognizing just the horizontal guides and landmarks in a real-time evaluation. You'll learn to identify them on the fly. I put YOU on the spot. :-) This is a chance to start actively exercising your powers of observation in a simulated "gig" situation (which are right brain muscles that you'll learn to build with practice and repetition). Dive on in! Be fearless! (And don't worry, it's fun!) (back to top )
![]() Internalizing the
horizontal landmarks
Internalizing the
horizontal landmarks
![]() Flash
Exercise Number Two
Flash
Exercise Number Two

The object of Flash Interactive Exercise Number Two is to further drill home the concepts of visually sizing up your subjects. In particular, Exercises Two's focus is on the vertical landmarks of the face - and its easier than you think because theres really only two you have to memorize (there were 5 horizontal landmarks). By memorizing these, by literally imprinting them and their proportions - as found on Mr. Average - into your brain, you'll be carrying around a mental measuring grid. At least thats my hope.
![]() Learning
to see the vertical landmarks
Learning
to see the vertical landmarks
![]() Flash Exercise Number Three
Flash Exercise Number Three

Flash Exercise Number Three is going to make you work a little
harder. Yep, you'll have to roll up your sleeves today and really do
the work - but it IS fun I think. And it could be a little
challenging, since it is a large leap. But take your time and do the
assignment at your own pace - spread it out over several weeks if need
be. But do it. It'll really help hone your "rapid fire
recognition skills".
So what's it about?
Well in a nutshell it's about learning to recognize the shape of
the face and
head at a glance. It's about learning to see the larger framework a
person's features reside in by not worrying about the features so much
themselves. It's about...well you'll just have to see for yourself!
![]() Learning to see
the shape of head and hair as a whole
Learning to see
the shape of head and hair as a whole
![]() Flash
Exercise Number Four
Flash
Exercise Number Four

A continuation of Flash Interactive Number Three - though
this will stand on it's own two feet. Flash Interactive Number Four
focuses on discovering your own built-in feature scaling system
(spinning off Mr. Average of course). By contrasting and comparing
side by side, focused pictures you'll gain yet more laser sharp skills
of observation and gain the confidence to start stepping off into your
own hilarious caricatures (or portraits - the lessons suit one as well
as the other). It's also concludes part II of a giant assignment
initiated in Exercise three. Chip away at it folks :-)
![]() Digging back into the
features
Digging back into the
features
Links to past
step-by-step exaggerations in the Archives - going
from realistic to exaggerated. Click on these for specific, feature
by feature celebrity caricature mini-accounts:
(back
to top)
Carlos Santana
10
March 2000
25
March 2000
Snoop Doggy Dogg
21
April 2000
8
May 2000
Tonus Balonus
28
July 2000
l0 August 2000
Anthony Robbins
9 September
2000
23
September 2000
Magic Johnson
9 October
2000
23 October
2000
31
October 2000
Kevin Spacey
7 November 2000
28
November 2000
John Goodman
10
January 2001
26 January 2001
Bill Maher
3
March 2001
6
April 2001
Paul McCartney
27
April 2001
10
May 2001
And guess what? There's even more. Go Search the Archives for more, shorter, compact past emails. (back to top)
Note on Web picture references
Due to copyright laws, I'm not allowed to scan or reproduce any photographs of art/subjects without the written consent of the photographer or artist. There's still lots of places to turn though. In many of the sections you'll find links to sites that have good pictures of the subject at hand so you can 1) draw the subject yourself and 2) see if we've captured a likeness. Enjoy.
| Directions: (if the link isn't underlined or in blue) Highlight the entire web address, then press "ctrl + C", then place the cursor in the "address" line of your browser, hit enter and you're there. |
Kasbohm & Company's
YouCanDraw.com
© Copyright, All rights reserved 1997
e-mail: jeffkaz@YouCanDraw