The Supply Store
Back to YouCanDraw .Com
|
Case
study 3, Ani DiFranco, Part IV: |
Click on any feature of the face and be
transported
instantly to that section of the book
 Navigating this page 1) Ani's eyes
2) Ani's nose |
4)
Ani's lips, mouth and teeth
5) Dimples - and their subterranean influences 6) Two more areas: intro to chin and forehead 7) The Forehead - and hairline 8) Last section on less obvious complex shadows 9) The hairline 10) This takes you to
the final section of the book: Part V |
Back
to Part I
Back
to Part II
Back to Part III
You're
at part IV
Go
to Part V
Here in Part IV, you're going to take one last feature by feature excursion into each and every feature, highlight and shadow shape on Ani's face. A big job? Yes it is. So hang with me. Where it makes sense you'll see how they compare to Mr. Average and other characters.
The idea here is not e.g. to memorize what Ani DiFranco's pretty eyes look like, but rather learn to look for shapes, lines, highlights, shadows and identify relations between everything you look at within her face and within the face of anyone or anything else you draw. (That was a mouthful.)

Learning to look deep
In the previous sections you went through detailed steps on how to align all the features, how to build "mental spaces" (a la the vertical and horizontal guidelines and landmarks), and how to proportion a subject's face with Mr. Average's. In a word you saw how and where to place or exaggerate placement of the facial features. Now, you're going to look with depth into just exactly what you're going to draw into those envisioned grids.
This, the ability to look deeply, to be open to the information coming in through your senses more than anything else, will make you a roaring success as an investigator, a visual sleuth, and yes, especially as an artist. And it's a very learnable skill. So let's dive on in.
1) Ani's Eyes
( back
to top )
Remember all the parts of the eyes and the parts around the eyes? Let's do a quick review of that. Here's a laundry list of anatomy and regions:
-
pupils;
-
highlight of the pupils (the bright spot of reflected light within the pupil);
-
iris -the colored part of the eye - the pupil is within the iris, actually an opening within the iris;
-
upper lid;
-
lower lid;
-
medial canthus - the inner corner of the eye, i.e. the corner on the nasal side of the eye;
-
lateral canthus - the outside corner of the eye - on the temple side of the eye;
-
groove of the upper lid: (also called the "palpebral fold"), when your eye is closed this line disappears, when you open your eye, the lower part of your upper eyelid folds under the upper part of the upper lid the way a garage door slides up and hides under it's garage housing. This groove is formed in a similar way;
-
bony brow -the ridge of bone over your eyes (and just behind your eyebrows);
-
eye brow;
-
lower lid;
-
lashes;
-
infra-orbital folds (bags);
-
naso-orbital fold or line - the curved diagonal line that runs beneath the lowest infra-orbital fold and the nose;
-
root of the nose - where the nose comes out of the forehead between the eyes.
Let's get you involved
- here's an exercise
( back to
top )
Breeze through this exercise: repetition will make you a pro! With your finger or a pencil, point out and name the following parts - right here on your computer screen. Then run your eye or pencil over the outline of that part like you were tracing it - again right on your computer screen. .
A) Ok, 1,2,3, pupils, highlight of the pupils
and the iris - go find those three parts in the following
picture:

Find the pupils, highlight of the pupils and the
iris
Find them all? See if you got them right by scrolling down to the next picture - the pupil, the highlight of the pupil and the iris:

Pupil, the highlight of
the pupil and the iris
B) Now identify the root of the nose,
the bony brow, and the eyebrow and run your finger tip
or your pencil around them like you were tracing. - yep, it's
going to get really repetitious here :-) but that's how you're going
to really internalize this stuff and become the best dang anatomist and
caricaturist in the west! Go:
Find the root of the nose, the bony
brow, and the eyebrow;
trace them with your fingertip, your eye, or pencil
Find them? Scroll down to the next picture and identify them and make sure you trace them with your finger or pencil right there on the screen - every nook and cranny:

The root of the nose, the bony
brow, and the eyebrow
( back to
top )
C) Don't look ahead now. Right, like that's going to stop you (and don't think of the color blue :-) Just keep cruising right on down the page here. I want you to identify the groove of the upper lids - this one's a little harder to identify because the pencil gets a little thinned out in this scanned pencil drawing:
Identify the groove of the upper lids
Did you find it? We'll turn to this next illustration to help you identify the groove of the upper lids. It's a little better defined in this next picture - plus you won't get as tired of looking at the same old picture of Ani. (Interestingly, some people get a little disoriented when switching from person to person or illustration to illustration like this - switching is a good exercise - and all the same minute detail is there. ) Go for it, find the groove of the upper lid (the palpebral fold):

For consistency's sake, here they are pointed out on Ani (they're a
little tougher to identify since the pencil drawn lines aren't nearly as well
defined as the mechanical looking guy above...and make sure you trace them
with your finger, a sharp pencil or your eye):

Very lastly, the correct anatomic name for what we're calling here the "groove of the upper lid" is the "palpebral fold". It's shorter in name, and it's the proper name, but "groove of the upper lid" just explains it better. That's my opinion anyway. ( back to top )
D) You should get this one right away: the medial and lateral canthii (canthii is plural for canthus - which is Latin for 'corner'). Go. Go find them in both eyes:
Find the medial and lateral canthii (plural for 'canthus')
Here they are on our spaceman looking guy:

And here they are on Ms. DiFranco:

E) So much for the canthus of the eyes. You're familiar with the upper and lower lids. That's pretty straight ahead. But what I want you to take special note of is the thickness, the substance of the lids and especially the margin of the lids. (The margin is the edge.) Why? Because often the margins have a highlight attached to them or they form a bare spot between the actual white of the eye and the place where the eyelashes start. Look close and you'll see them.
|
|
Check out the upper and lower lids and
see if you can't make out the lid margin. Like the edge of a coffee
cup or the edge of a tube, they have a thickness to them that often captures
light as a highlight or obscures parts of the iris.
This obscuring of the iris often times adds visible cues about the emotional state of your subject. You can see them both a little more clearly than in Ani in the illustration to the left and just below: |


Highlight of the upper and lower lid margins -
it gives them depth
| Check out the highlight and substance of the eyelids
in these next three drawings. Also, while you're here and a s a
warm-up, observe the shape of the shadows around the eyes, the skin
folds and the highlights - both above and below:
|
|
|
|
|


Shape of the lid margins
( back to top
)
F) And while we're on eye lids, lets look at the shape the margins of the upper and lower lids form between their edges. (I erased the iris and pupil in Photoshop):

Here's
the whited-out basic outline of each
eye lid margin
Again, the eyelid margin is the very edge of the lid. In the picture above the eye has been erased and the lid margin is more exposed. Though the eye at the picture's left may be cleared out a little less than completely, it's still of a slightly different shape than the other eye. Even so, look at the difference of shapes just going eye to eye on the same person.

Bluing-out the shape of the eyes
between the lid margins
(Reminder: you're seeing Ani's eyes in detail here. Everybody - and just about any animal with a backbone - will have these same in-depth details.) Ok. That's a fair amount of detail. You can go back to the section on eyes (Lesson 12: Drawing Eyes), if you want to research the eye more.
Shadow shapes
We're now going to switch gears and look at the shadow shapes of the eye and specifically at the shapes of the folds under the eye lids. Like any feature of the face, these - the shadowing and the anatomy they convey - can be fertile ground for exaggeration. One word to be remembered for this section: SQUINT!
Ready for something new?
( back
to top )
This next set of illustrations will focus on shadow shapes in and around the eyes. Many beginning artists (me included), draw or drew the obvious stuff: the almond of the eye, the eyebrows, toss a nose in between them etc., but failed to see the real defining shapes, lines, and contours between simplistically drawn or "bare bone" memorized features. So what are these "defining shapes"? What are they and how do your draw them?
To answer the "what are they?" question, they
are shapes particular to shadows, shapes of contours and subtle lines within the
features. The vast majority of what we're referring to are shadow shapes. These sorts of very unique shapes truly make a portrait or a caricature
recognizable. You
saw this in all the earlier In-depth caricature analyses and we're going
to get into even more depth here.

Tones and values
In the next illustration, the detail of the pencil drawing has been collapsed into regions of tone. By "regions" I'm referring again to shapes. Tones refer to the different shades or values - in this case - of gray. The darkest shadows are still very dark, even black and less intense shadows are lighter, but all the hundreds of different grays have been reduced to just five different shades or values of gray. Nature has literally millions of shades of gray that the human eye can differentiate. (Actually there's 256 shades of gray that have been reduced from nature and are recognized by computer grayscale programming. And don't forget, squinting is another way to do the same kind of reduction.) So...
...Squint!
( back
to top )
Squint until you see the shadow shapes of the pencil picture on top begin to look like the same shapes you see in the computer enhanced picture just below it:
|
Above: the pencil version - 256 different
values of gray |
|
The five-tone picture = five values of gray |

Your job now is to focus on all the different shadow shapes outside the actual eyes. This includes the eyebrows, the shadows between the two eyes and on the side of the nose, and the shadow shapes below the eyes: (these are shadows defining the infra-orbital folds). Find these in the two pictures above. "These? What are these?" you say...yes, these are:
-
the eyebrows,
-
the shadows between the eyes and on the side of the nose, and
-
the shadow shapes below the eyes
Once you've done that, look at this next
picture. It's the same illustration of Ani's eyes but this time the grays
have been removed and all that remain is the outline of the shadow shapes. (By the way, you'll be drawing all of these very shortly - but not
to worry, it'll be easy and fun.) Here's the outline-only picture:
|
What's this? Is this a map? - of Scandinavia and Asia? |
Scroll back and forth (or hit your "page up" and
"page down" keys on the far right of your computer keyboard).
Scroll up and down between the outlined version, the 5-tone
version and the original pencil drawing. Make sure the outline shapes make
sense to you. What does "make sense" mean? Try to visualize
or imagine the
outline version as color-filled. Distinguish between what's a shadow
and what's white space. (Scrolling between a filled in version and
the outline, again, will help you differentiate between shapes.)

The richness of detail
Note how rich and original the shapes appear when they're reduced to this - reduced to the outlined version? It's amazing to me. All that detail literally hid in the shadows and as shadow. Going through these steps reminds me of the pure contour drawings you did in lesson Lesson 4.
Question: Are you
going to go into this much detail while caricaturing?
Answer: it depends.
If you're doing commission work and you're getting paid a lot of green
backs then the more detail you render, the more realistic your final drawing
will be. How about when you're at a gig where you're pumping through 10 to 20 pictures in an
hour? You may not be recording - that is drawing - that much detail. But
the ability to look for the minute detail and zoom back and forth
between overall features and back to fine detail (like you see in shadows),
is more than a worthwhile skill to develop. In
fact, the better you are at seeing all this detail the better and faster a
portrait artist or caricaturist you'll be. What are you
really doing in these in-depth pages? You're building a visual vocabulary.
What are you
really doing in
these in-depth pages? You're
building a visual vocabulary
Moving on to the
"infra-orbital folds"
( back to top
)
Let's focus on the folds below the eyes: on the "infra-orbital folds". We haven't looked at them yet in too much detail so now's a good chance. This is a bit of an aside, but it's kind of interesting: the skin below your eyes is also the thinnest skin on the body. If you're over tired or having an allergic reaction (or a cold, or hay fever, or a hangover), if you're "retaining water" the infra-orbital folds will be one of the first parts of your body to betray you. The skin under the eyes, being so thin, gives it little room to hide anything. extra fluid immediately swells them. They puff out and bulge. If you'd like to see what muscles are at work around your eyes just under the skin, click here.
Back to the great illusion
Here's the great illusion of drawing:
your brain makes sense of those strange shadow shapes and fabricates from
that information a full
third dimension to the two dimensions of paper. And the brain - your
brain - recognizes your subject through shadows and highlights as much as it does
looking at the actual features of the face. The lower lid folds
(or "infra-orbital folds"), are pointed out here:

Pointing out the shadows of the "infra-orbital folds"
Here they are again in the outline picture:

Here they are again: the shadows oh the infra-orbital folds
Drawing Exercises
( back to
top )
(back down to the nose-
drawing exercise)
Ok. Onward. Time to pick up a real sheet of paper and a real pencil. Print out the following as instructed. The first item here is a grid pattern. It doesn't follow the vertical or horizontal landmarks of facial feature placement, but it will be both utilized and instructive in reproducing these next two drawings. This grid will be overlaid upon the next two illustrations. Click on the blue link below the grid and start printing it out.

Click here for the grid - print several copies
This'll be your first drawing in this section. It's the "outline-only" drawing you saw briefly above. The grid's been laid over it very accurately - so all the features will line up on it exactly in any of the pictures. Your job is to draw this outline view (that you'll see just below) on the grid you just printed out. (You've seen this numerous times and in part three.
| Review: watch how and where each line enters and leaves each rectangle. Note where and at what angle it traverses through the main body of the small rectangles. Equally important, note the angles it forms with the vertical and horizontal lines. Go for it. Dive on in. Don't be afraid. |
Print out a large version of the outline-only picture by clicking on the link just below this picture (or you can draw it right from the screen on to the grid you just printed out).

Click here for the outline grid
Now go for it. Print out the empty grid and draw the outline version of
the shadow shapes right into the empty grid. Good job!
In this next exercise, you'll be drawing the shadow shapes. The goal here is to see the the unique shapes as just that: as shapes - as more than just lines as you did above. These correspond to all the shadow shapes, highlights and different line-shapes formed by the different tones of gray. Click on the "Contour Grid" link below and draw this "five tones of gray" version on a blank grid. Pay special attention to the shape of those lower lid and infra-orbital fold shapes. Pay attention also to the different tones of gray as well. Then take a break and commend yourself on having the courage to really dive in. I'm proud of you.

Click here for "Five tones of gray contour grid"
Next drawing: on a separate piece of paper, with or even preferably without your own home made grid lines, try to duplicate this next complicated drawing. Hint: draw a rectangle on your paper first. And make sure you draw it the same shape as the rectangle around the picture. It will serve as the format (the container) you draw within. If you just have to know what this is before you draw it, click here . (Before you do that, let me remind you, the brain finds things it can't name much easier to draw.) But self restraint is a virtue. C'mon, do the drawing first. ;-)

Try
to draw this - envision it with a grid cutting
it into vertical and horizontal halves
(4 squares total)
Flipping back and forth
( back to
top )
Thus far your concentration has been on the shadow shapes. With all that attention on the non-white parts of the picture, I want you to now shift gears: try to see the white and almost white spaces as separate shapes. The white shapes have been colored yellow in this picture:

See the yellow shapes as separate shapes
This is a review
of sorts of negative form - even though the negative form is somewhat
arbitrary. What's "negative form"? In this case it's all
areas and shapes that are white, or areas lighter than any gray shapes.
How's it arbitrary? It's an arbitrary negative form because we've
chosen shapes within the picture that are part of a positive form
already but can be conceived of as different,
distinct or separate entities from the shapes or shapes our attention was originally
on. Gads, that's confusing. Read the blue box if that doesn't make
sense.
Reviewing negative shapes True negative forms would work like this: if you were drawing a portrait of a friend and in the background far off stood mountains and blue sky, the positive forms would be your friend's face and the mountains. They're real, they're things you can put your hands on - thus positive forms. On your paper however, the shape occupied by the sky still occupies area on your drawing paper. The sky is a negative form or shape because it's something you can't put your hands on out there in the world. Still it has a definable shape to it on your paper. That shape is defined by the line it shares with teh mountains and the edge of the paper (or format), you're drawing on. You could cut it out like you could cut out a shape in a crossword puzzle. See Lesson 6: Negative Space if this isn't clear. Onward. |
Here, in this next picture - and not to belabor this any further - all the gray areas have been blackened, the white areas yellowed and the picture has been flipped to make it look like non-sense to your brain. (Click here to see the yellowed-accented picture right side up.)

Why'd you do all that?
That pretty much wraps
up the area around the eyes, it's shadow shapes and it's highlights. Before we move on though, take the next
mini-quiz. So why did you go through all of that? It was a
review. And to get you re-introduced to looking for fine detail in terms
of abstract shapes, tones and contours. (It's been awhile I imagine since
you've looked at "negative shapes an positive forms"). Besides,
you're being geared up for the bigger task ahead of you.:-)
Mini-quiz
( back
to top )
Quiz: now that you've gone through all that, can you identify all the parts you just read about on the following photo? If you can't, scroll up and down until you can name all the parts. Minimally, find the following list of parts:
|
pupils upper lid lower lid medial canthus lateral canthus groove of the upper lid (the "palpebral fold") shadows between the medial canthus of eyes and the nose bony brow |
eye brow lower lid lashes infra-orbital folds (bags) naso-orbital fold root of the nose shadows of the infra-orbital folds highlights of the eye lids the substantial nature of the eye lids don't forget about the lashes: they have a definite shape too |

Name all the regions and features of the eyes before
going to the key below
| Click here for a printable key to the quiz. (It's already rotated and sized for your printer on the linked page.) |
Here's another little observational quiz: which is the correct orientation of Ani's left and right eyes in the following two illustrations? (Not to worry, there's a picture of both of Ani's eyes below you can compare to.)

Which is the correct left eye?

How about here?
By using the list of details above in the peach tone box, can you describe in words what is different about each detail in these pictures? Look at the shape of the eyebrow, the overall shapes of the eye, the lids, lashes, the shadows of the folds under the eyes etc. (Now you'll see the the value of the drawing assignments you just labored through.)
Compare to this:
Yet another detail: judging the horizontal angle of the
each eye
( back
to top )
What angle does a line drawn from canthus to canthus form in relation to vertical and horizontal? Recall what you read about women having more of a "cat eye" look. What's that mean? Basically it boils down to the angle of the line drawn from medial canthus to lateral canthus through each eye.
What about on the color photograph above? (It's not Ani by the way.) What other differences can you discover? How would you caricature the eyes you see in the color photo compared to how you would caricature Ani? What angle line is formed when you draw a line from medial canthus to lateral canthus ?

Check out the angle of the eyes - canthus to canthus
Ok. That's enough on the eyes. Let's move on. The rest of this should move a little faster - the eyes just contain so much subtle detail. I spared you a direct comparison to Mr. Average. Why? "Mr. Average" is more important for getting a feel for gross dimensions and proportion. He starts becoming less and less important as you really "dig" into a picture - don't get me wrong - he's always in the back of your head and internalizing those proportions is important.. But it's more relevant to invoke real observations and report those observations as pencil marks on your drawing paper. Mr. Average is the frame work behind all that. Does that kind of make sense? You'll see more reference to him in the nose section. Next feature...Ani's nose.
2) Ani's nose
( back
to top )

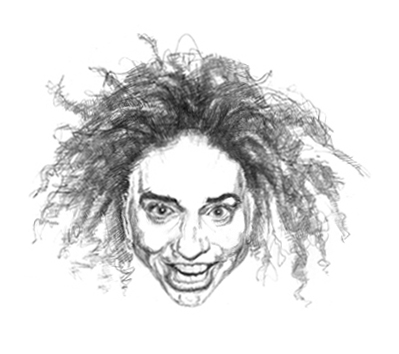
Ms. DiFranco's nose
Had a little break from all that drawing above? Let's take a second and review the main, most obvious parts of the the nose:
-
Root of the nose
-
Base of the nose
-
Nares (or nostrils)
-
Top diamond
-
Middle diamond
-
Bulb of the nose
-
Nasal septum*
-
Nasal shadows - those peculiar to the nose
*It's difficult to see the septum in this picture because
it's the partition between the nose's halves - it's the piece you can grab
if you pinch the piece of flesh between your two nostrils - which also
happens to be just above the philtrum at the base of the nose. The
root of the nose is up there between the eyes.
Commit these parts to memory
( back to
top )
It'd be
a great - and attainable - accomplishment to someday really be able to reel off these distinct parts of
the nose (and all the features). When you can run down your list mentally, you can even identify differences
after you're done looking at your subject. In fact...
recall the abnormals. What they're doing when they sit down to write out that physical exam report is this: they're comparing it to their memorized list of the head-to-toe physical exam they learned in school and have performed thousands and thousands of times on other patients. Often times they actually recall a large portion of the exam - even days after they've done the physical! This comes from committing to memory all the details of a head to toe physical. Want to see what one looks like? Check it out. |

Back to the nose
We'll look closer in a second at the actual common shadow areas but before we do that, let's label Ani's nose with the short list of items from above:

Comparing Ani's and Mr. Average's noses
( back to
top )
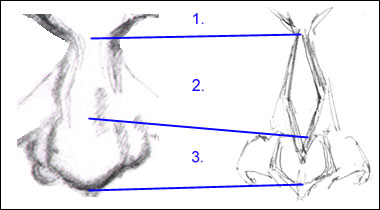
And let's take a second to compare Ani's nose to that of Mr. Average. Note in particular the differences in proportion of each section:
-
compare the width of the root of the nose
-
contrast the heights of the nasal roots (see area 1)
-
compare the length of the middle diamond (see area 2)
-
compare the height and width of the bulbous tip of the nose ( see area 3)
-
compare the width of the base of the nose
-
Contrast and compare the width, depth, and breadth of the span from the left nares to the far edge of the right nares.
Comparing Ani's an Mr. Average's noses
What sorts of things can you say about all divisions of the nasal anatomy? Here's my short list:
-
The root of Ani's nose (in area 1 - above the blue line), is broader than Mr. Average at both the very top where it comes out of the forehead, and is broader at it's narrowest point where it transitions into the middle diamond of the nose (right at the blue line under the "1"). It has significantly more mass proportionately too.
-
You can see the blue lines demarcating the middle diamond narrow as you go from Mr. Average to Ani (area 2). This suggests the middle diamond of Ani's nose is proportionately smaller. However, it is significantly broader.
-
The bulbous tip of Ani's nose is again, larger in all respects than Mr. Average's (area 3).
-
The one area that the Mr. Average dimensions overpower Ani's is at the base of the nose - specifically when you contrast the total width of the nares. Check it out in this picture:

Comparing the base of the
nose and nares
Above we extended vertical lines off the "average
nose" to contrast it to Ani's. You can go through the same vertical and
horizontal "lining up" as you superimpose parameters
over the dimensions of any line, form, shadow shape, highlight, or negative
space. It's like going through the exact same steps you saw in the
first sections (on horizontal and
vertical
guides and landmarks). Except in this case you're going through the steps in miniature. Again, identifying these differences in all your subjects
is the key to capturing likenesses. And the key to discovering those differences
is learning to make the visual comparisons and contrasts on the spot and
in real time .

Putting you back to work - more
exercises
( back to
top )
I'm hoping you practiced your nose drawings back in Lesson
11: Drawing Noses . Just in case you did not, now's your opportunity to review if
needed and to try really capturing a likeness of Ani's nose - before we
try some computer aided distortions. In a moment you'll also see those famous grid
patterns applied to help you focus in on the areas of important
detail
1. Draw Ani's nose. You saw this above. We're going
to go through the exact same steps. Print out the empty grid - print as
many copies as you like. Then print out the the grid with the nose. You'll
be seeing three noses: one with the normal nose, one with the blown up
nose, one with the nose "imploded", then a final one focusing on the shadow shapes - that
you get to cross-hatch
in.
Here's a realistic rendition of Ani's nose collapsed into tones of
gray:

The realistic five-tone nose
Here's the same nose with a grid applied:

Realistic five-tone nose
with grid applied
You'll be using this toned version of her nose to complete your drawings.
-
Click here for the print-ready empty grid.
-
Click here for an enlarged, print-ready gridded nose.
You know what you're supposed to do:
-
observe and mark on your empty grid where each shape crosses the grid lines;
-
observe the angle at which it crosses the vertical and horizontal lines;
-
lastly observe the course each shape makes as it crosses each rectangle of the grid.
-
draw it (and if you want to go that extra step, color it).
Need to review above for a little more
explanation on how to use the grids? Click
here to jump up the page. Click the "return to nose"
link there or click your back button to
transport you right back down here.)
Next assignment: Drawing an enlarged nose and grid:

Here's a distorted nose: it's a
"fish eye" view
-
Click here for the print ready full-size.
-
Click here for the print-ready grid you get to draw this funky nose into. Now let's do the reverse: shrink it, like this:

Shrinking the nose
-
Click here for a larger print-ready version.
-
And of course, here's the full size grid you get to draw it into. Click for it.
Note how the stretching and shrinking of the nose in each
picture effects the shadow shapes. Pick one section of the grid, for
instance the upper right hand corner. Scroll back and forth between each
picture and see how and where each section has changed. For example, the
blue line in this next illustration points out the upper right hand rectangle
in each grid. Scan up and down, then left to right within the grid to
compare the changes in each area of a given gray tone:

Comparing the upper right rectangle of each distorted nose
Now will this make you a caricaturist? Not necessarily. But these are great practice exercises and I'm hoping that combining all this
stuff together and urging you to "get out of the box" you'll
have that first glimmer, that "Ah ha, I'm getting it!" that get's you
all pizazzed to go crazy drawing.
The rest is experimentation and practice. But learning to go through the same steps, comparing what you know you ought to be seeing in each feature of anatomy to what really is presented in any subject's face - is in my opinion - the major jumping off point.
Squint in order to reducing the gray areas to shadow shapes
Before going on to the next facial feature, I'm going to hammer this point down again: squint in order to minimize the complexity of the shadow shapes. You can collapse those complex shadow shapes the shades / values and tones of gray into very manageable thus drawable shapes.
Seeing not just lines but whole areas of Shadow shapes
( back to
top )
You can look at this illustration - the five-tone version we used above and think it's complicated. Especially in the beginning. What you're going to review one last time is learning to see the shapes:
The "five-tones of gray" nose
Compare that illustration to the original realistic pencil drawing of the nose:
Original realistic penciled nose
By squinting you can collapse these areas into drawable shapes - much like the shapes you'll see as red in the next two illustrations (scroll back and forth between these pictures until you see the areas of penciled-in gray more or less match the shape of the areas with overlaid with red ):
|
|
|


By the way, I never mentioned it, but did you spot the
nose ring in her right - our left - nostril?
3) Yet another layer: the
apron of the upper lip
( back
to top )

Zeroing in on the much ignored apron of the upper lip

Highlighting the actual apron of the upper lip
Before looking at the mouth and teeth, let's take a very short little tangent through the area known as the "apron of the upper lip". Did you notice this: when it's shape is highlighted (the way it's highlighted in red above), it's shape becomes very recognizable? It's comprised of or contained by the following:
-
the margin of the base of the nose,
-
the nares,
-
the margin of the cheeks and dimples,
(i.e. "the naso-labial fold") -
the nasal philtrum
-
the upper lip
Click
here to see the enlarged, labeled, print-ready version. Recall
the underlying anatomy: in particular recall the cone shape of the maxilla
(the bone that forms the structure behind the upper lip and the entire rim
of the nasal cavity). I bring this up so you don't lose sight of the three
dimensions you're working with. Here's a schematic drawing of the maxilla
and it's place in the face:

(You can read more about the maxilla in Lesson 14: Shaping the Head and specifically in Lesson 13: Lips and teeth )
I bring it up - the apron of the upper lip - because in a
subtle way, you barely notice it. It's an afterthought. In in a sense it's
a
"negative space". This is so since your attention is on
the better known and more obvious features like the nose and mouth. Because
of that it's shape exists in a figurative and literal shadow of the
other features.
It's very much a positive form mind you, but if you learn to visually proportion it
(i.e. if you learn to compare and contrast it's width and height and shadow shapes
with that of the cheeks, the dimples, the nose and the upper lip and
mouth), and see it as part of a "jigsaw puzzle" you'll soon see it as a shape all it's own.
Shadow shapes of the apron of the upper lip
( back to
top )
Since the apron of the upper lip is essentially wrapped over the cylinder of the maxilla, it "lights up" like a cylinder too: if the light is coming from above and in front, you get the most intense shadowing away from the most direct light. In the drawing of Ani we're using the light is coming from almost directly above and in front of her. It makes sense then the strongest shadows appear towards the lower edges of the naso-labial groove. Why? because the apron of the upper lip is curving away from the light:

There's a second major shadow area of the apron of the upper lip and that's at the nasal philtrum. When you were developing in your mother's womb, the left and right halves of your body had to meet in the middle perfectly to to form the midline of your body. In fact, if this joining was disrupted, you would have developed a cleft - and this is exactly what happens in a cleft lip deformity. And it goes deeper than just the lip - often the entire hard palate (the roof of your mouth), and the maxilla are disrupted. That's a little off task I know, but it is interesting.
The point being your philtrum is one of those obvious - and delicate - fusing areas. What's also interesting to note is this: the philtrum has two pillars. Two pillars can cause two shadows. And since light is rarely dead center in front of your subject, each pillar will cast it's own unique shadow.

Pointing out the "double pillar" shadows of the nasal
philtrum
Just for funsies, check out the next two illustrations -
both exemplify very different aprons. Don't be fooled in the mustachioed
example (the top left picture). Your best guide to defining the apron
of the upper lip is to recall it's hemmed in by the naso-labial fold
and the upper lip. (The naso-labial fold is marked be the blue asterisk on
the guy with the mustache and beard):

Locate and compare nasal philtrums and naso-labial
folds
Note the variety of apron of the upper lip
dimensions in these next two caricatures below: Arnold on the left has an apron
than spans across eighty percent of his face while on the right, Bill
Maher's is absolutely dwarfed by his nose:

Contrast the breadth of the apron of the upper lip in these two
I was going to make you draw this right now, but I think it's more important you recognize the apron of the upper lip as a separate entity that stands on it's own two feet. You can draw it during your next drawing session - or at least hold this thought in your head: that'll you'll be extra cognizant of it's presence. I want you to be aware of it though when you talk to people too. In fact that'll be your assignment for today...
Assignment
-
While you're out people watching or talking to someone, look at the apron of the upper lip:
-
look for how it starts at the top side of the upper corners of the nares,
-
notice how it courses along the inside edge of the cheek,
-
and transitions right into the upper lip,
-
also watch how the philtrum transitions down into the lip and up into the nose and how the nose rises right out of the apron,
-
be aware of how it changes with age: in the very young it's very well contained, whereas in old age, it seems to extend all the way down to the chin,
-
lastly, note how malleable it is - it's constantly changing shape.
-
And if you really want to draw it, click here for a print ready gridded realistic version and it's corresponding empty grid.
Pretty fascinating in it's elegant simplicity. Onward. Next topic: the mouth, lips and teeth
4) Ani's lips, mouth and teeth
( back
to top )
You can't talk about the apron of the upper lip without talking about upper lip proper and the rest of the mouth, so lets look at those here. This has been mentioned in earlier sections: that Ani has a full lower lip and a beautiful "Close-up" smile toothy grin. ("Close-up" as in "Close-up" brand toothpaste.) In cartoons the mouth and lips can be drawn in a minimalist fashion like this:

...simple lines sufficing for lips, mouth, and apron of the upper lip. It's amazing that with so little detail you can generate so much personality. But in realistic renderings, you've got to be more observant and report much more information. For instance, if you understand what's going on under the lips, literally under the skin, you'll see more and thus portray more when you draw them. It's simple - but complicated. Let me take a stab at it.

Squint and identify all the different areas of anatomy
Lips ( back to top )
Here we are at what I think is the face's most difficult
to draw piece of anatomy: the lips. I think it's difficult for many
reasons: structurally you have the joining and bridging together of soft
tissue over the richly varied topography of the bones that make up the upper and lower
jaws. ("Soft tissue" is skin, the muscles of facial expression,
fascia, nerves, blood vessels, and the "subcutaneous" or
"under the skin" tissue - a nice name for the fat layer:)
| Two halves In broad terms, here's what's going on. There are two halves of jaw: upper and lower. The upper and lower jaw open and separate. If the mouth were just bone, (and had no skin or soft tissue spanning it's halves), the bones would open and there'd be a huge gap between the two halves. Plus, everything inside the mouth, including things we really don't want to talk about (like half eaten bologna sandwiches), would just fall out. |
|

So we need lips and teeth and cheeks and all that to form a mouth. Plus
without those muscles of facial expression, we couldn't make faces at
people in order to scare them away from our Fritos - like I'm doing
right now at a friend who's trying to grab mine).

Bridging the gap
The lips and their underlying soft tissue bridge these two halves. The upper and lower jaws both have a set of teeth too. In bony terms the upper teeth are rooted in a semi circular array of bone above (in the semi-circular construction of the maxilla). The lower set of teeth are also grounded in a semi-circular base but the foundation of this base is wrested into the angular lower jaw.
|
Lots of layers Not only that, there's underlying muscular support sandwiched between the bone and skin. And these muscles span their reach from each side the nose, from the cheekbones (the zygoma and malar bones) and even the chin. All these muscles - the muscles of the jaw, cheeks, around the lips, and even nose - converge around and over the teeth just beneath the lips. In fact the lips have no significant intrinsic muscles of their own, they're very much controlled by several nimble muscle groups just beneath their pulpy roots. |
 |

That's what makes lips tough to draw
For that reason the lips are difficult to capture: they're constantly riding the waves of this great architectural meeting space that causes wrinkling, stretching, bunching up of tissue, flashing highlights and fine shadowing.
And it is fascinating when you slow down to appreciate all that's occurring here along with appreciating the sculpture the head and face (in fact the whole body), really are. What's even more fascinating is the meaning we give all those little expressions. That's why faces are simultaneously so interesting and so complex...and why the lips can be a challenge to draw. Click here to see the bones of the face and the muscles that overlay it.
Let's break it down into pieces: the drawable parts of
the mouth
And Ani's, as you can see, are very unique in some ways and in other ways just like the rest of ours. What's most notable about Ani's lips? What's most unique? I think it's the full, fleshy lower lip with it's asymmetric pull to one side. And since this is our last run through the in-depth studies, we're going to go into a little extra detail here - even if some of it was mentioned in the section on lips and teeth.
Let's do a quick anatomical review of the main parts of
the lips:
( back to
top )
In the upper lip: Cupid's Bow

Lets label those those other drawable parts:

Lips: specific areas of interest
-
corners of the lips: best described as where the upper and lower lips meet. This is challenging to draw at first - if you start looking too deep. Look for the main character of the line between the two lips first - the shared edge where the two meet. Then squint to collapse all those funky shadow shapes into more drawable shapes. We'll look at the complex shadowing of this area in a section just below where you'll see how and why the musculature and skin "bubble up" under all the various tensions.
-
the middle, foreshortened lip: this is an area of transition from the frontal plane of the face projecting to the most extended part of the lower lip. Often times it's obscured by all sorts of streaky highlights and shadows snaking their way down to the lower lip. This can be a difficult traverse, i.e. from the corners of the mouth through the "S" shape of the foreshortened projection of the mid lip to the tubular lower lip. And there's always lots of character in this region of the mouth:

Each foreshortened section of the lip is designated by blue
This leads us to this curvy middle section of lip. It starts at the very corners of the mouth and transitions into to the largest pulpiest mass of the lower lip.
Remember that word "foreshortened"? The lip is foreshortened through this section of it's course because you have to remember it's coming out at you. It isn't just laying flat like it seems it is on two dimensional paper. it's jutting towards you. Conjure up a profile view in your brain and it'll make more sense. You know this when you're looking at people face to face, but it's easy to forget when you're drawing them. (The blue foreshortened link will take you to a section in Lesson 8 that discusses foreshortening.) -
the highlight of the lower lip - if there's one thing that's most consistent in the lower lip, it's the sketchy areas of highlight. In the areas marked "2" and "3" above, you can follow it's trek through the middle of the lip. The difficult thing about capturing a highlight on the lip is that in living moving people, it's constantly changing shape. As are the shadow shapes. If there's any hard and fast rule about where and how to capture these highlight and shadow shapes - any highlight and shadow shape - it's this. Ask:
i) "what's the foundational primitive shape of the body part I'm trying to draw? (is it a circle, square, tube, triangle, sphere, etc.)...
ii) "how reflective is the surface of that shape? (Glossy lipstick will give a sharper edged highlight than say the natural vermilion of the lip), and, lastly,
iii) "and how do light and shadow normally react on the underlying primitive shape?"
Answer those three questions then both "seeing" and drawing-in the correct highlight will be much easier.
-
the shadow shape of the lower part of the lower lip - we touched on this just above, but in normal room lighting, you get a shadow under the lower lip that does a better job defining the visible lower margin of the lower lip than the lip does itself. That's because the highlight generally reflects off the middle to lowest part of the lower lip making it almost invisible in certain situations. The shadow beneath the lip (and actually running on the chin), demarcates it.

Pointing out the shadow under the lower lip that often
demarcates the lower lip better than the lip itself
-
the shadow of the oral cavity: a negative space - as you'll see below in a second, the dark space of the mouth that outlines the teeth -- it's actually behind the teeth -- is a negative shape. Seeing it as such allows you to concentrate on the shape and not the detail. In many pictures, you'll see the subtle outlines of the tongue and even the "uvula" (that little thing that hangs down in the back of your throat) within the shadow.
-
the vertical lines of the wrinkles of the lower lip - since the lips have to jockey around, stretch, chameleon their morphology to every thought and emotion, every eating utensil, and literally to every situation you find yourself, they need a certain amount of elasticity. Nature has built in it's own version of the rubber band: it's built right into the substance of the lips and it's a combination of elastin, and collagen and a couple other very elastic materials.
When you're not grinning ear to ear, the lips want to bunch up like an accordion. (Look in the mirror and purse your lips like a fish to see an exaggerated version of the "accordion effect"). And in drawing terms, this accordion effect can be represented as these small, fine vertical lines:

Noting the accordion pattern of the fine vertical folds in
the lips represented here by fine vertical and diagonal
lines
Getting back to particulars, and in particular Ani's lip,
it's that extra curvature of Ani's lower lip adds to the sense of
fullness and of someone enjoying themselves. Ask yourself how it would
that feel to be giddily saying "ah hah ha" and torque your jaw and lip
to one side? Try it on yourself. You'll literally feel identical
emotions.
Teeth
( back
to top )
In drawing Ani's teeth, awareness of the negative space, of the blackened background of the oral cavity behind her teeth defines the the unique shape of her teeth as much as her actual teeth do. Check it out:

Highlighting in blue the negative space of the mouth
and oral cavity behind the teeth
Take a second and try to perceive just the blue shadow shape and a few of the gray shapes that surround the teeth. Squint - this almost always helps, especially when you're drawing from photos or pictures. Focusing your attention on just those shapes outlines the overall positive form of the teeth. Did you do that? Go on, give it a whirl!

How much detail to draw?
We'll look in a moment at the main highlights and shadow shapes of the rest of Ani's face (which isn't a whole lot more). And though we haven't referenced Mr. Average for awhile, that's ok - we did a lot of that in the previous sections on the vertical an horizontal guides. Again, what you're doing here is learning to look at what goes into those areas you already proportioned and marked off on the face as they compare to Mr. Average.
And how much detail? Every caricature master has his or her own style. If you go the "minimalist" route like Al Hirschfield then your goal would be to distill all the major areas we've discussed down to one or two lines. If you do or plan to do ultra-realistic super exaggerations like the German great Sebastian Kruger, then you'd shoot to capture everything we've discussed here and then a whole bunch more in terms of different media, color, texture etc. The sky's the limit.
 |
Drawing
exercise 1) Look back at the section on Lesson 13: Lips and Teeth and the Lesson 14: Shaping the Head to see features you can capture with line alone. 2) Click here to draw Ani's lips, mouth, and teeth yourself (has the usual empty grid and an overlaid version of the picture.) |
Complex shadows around the mouth and lips
( back to
top )
While the lips and mouth are fresh on your mind, let's
take a look at the general shadow shapes immediately around the mouth,
namely the corners of the mouth and dimples. I've alluded to it many times
before and you first saw it in depth in the Case
Study #2: Hugh Hefner example. The prime mover, the main attraction, the source of
tall those complicated lines, shadows, and highlights is the interplay of
soft tissue. That's soft tissue that's pulled, tensed, stretched, pressed and squeezed by the action
of the underlying muscles on the rest of the face over the hard molding of the bones beneath. Having at least a mental picture of
the those "prime of prime" movers - the muscles in
your head - grants you a level of understanding you can't get any other
way.
Let's look at a color aided snap shot of this area of
Ani's face:

Pointing out some major areas of shadowing
around the mouth
Without going into super duper detail - because there's literally books written on the subject - let's just look at the junction of muscles in each of these areas:

What causes those cute dimples?
5) Dimples - and their subterranean
influences
( back
to top )
What causes those dimples is the interplay of all those muscles pulling in different directions with different and changing levels of tension. Note this too: the muscles on one side of the face are tugging on the muscles of the other side of the face through the common linkage of the orbicularis oris and the layers of subcutaneous tissue (the fat), and skin above it. Here's a picture of the the muscles and the directions they're being tugged in:
 |
As you can see by the orange arrows, the different muscles pull on the ring of the orbicularis oris in different directions with varying tensions. The tension in each depends on the emotion expressed. Muscles can only contract. Also remember when muscles contract they shorten and thicken, so they tend to bundle-up as does the overlying tissues causing ridges and depressions on the external contour of the face: voila: dimples! |
| Adding a fat layer - as you can see to the left, when you add a fat layer (the layer in red) - which we all have just under our skin - and then you contract the underlying muscles, everything becomes yet more distorted. Someone has big puffy cheeks because they have a little extra baby fat that gets extra bunched up when they smile - or grimace for that matter. Imagine this red area getting squeezed together and puffed up in the same direction the arrows point. |  |
What are the names of all those muscles - and do you need
to know their names? No to the second part, but it word sure impress your
friends it you knew their names. (It does make it easier to talk about
their influences if you know the names.) And next, I'll name a few of those muscles for you. Here
they are:
A review of the muscles that help form amongst
other things, the dimples
So to run that by you one more time and say it in a slightly different way, the cheeks get puffed up when the zygomatic major and minor, the naso-labii levators (lip lifters), and the orbicularis oculi all pull up and out the corners of the mouth in the direction of the temple. These bunch up the fat layer that you saw in red just above. The triangularis and a couple other muscles on the chin and neck pull down and away (in opposite directions) from those muscles I just mentioned. These add lines of stress along the sides of the mouth that travel almost to the chin like those pointed out in this picture:

The roots of these long lines at the sides of the
mouth are caused by the tensions within
the underlying musculature and skin
| The deepest part of the dimple The deepest part of the dimple appears as a depression left behind from these opposing tensions: the rearward pull of the buccinator; the up and out pull of the zygomatic muscles; the inward tug of the orbicularis oris - leaving something of a vacuum between them. Add to that the bunching effect of fat and other soft tissue above the dimple and you're left with an area full of contours. |
|

Refer to the dimple anatomy example within the Hugh Hefner case study and you can see the contribution deep muscles like the buccinator are adding to the creation of dimples - - and make sure you use your browser's back button to come right back here.
Taken together, the results of all this emotionally and neurologically driven activity looks like this on Ani's face - (and specifically her right dimple in this picture):

Looking up close and personal at
Ani's right dimple
And of course we can't leave Ani's left dimple out (right to us - squint or take a few steps back from your screen to help see this as a less complicated jumble of lines):

Shades of gray: a light and shadow account
The shades of gray you see in this area are a light and shadow account of the tension within the facial muscles just underneath the skin and soft tissue. It's a constantly changing landscape as they (the muscles), navigate their way over the topography of the underlying bony structure and traverse the ever-changing emotional atmosphere. (Hey, that sounded almost scholarly :-)
6) Yet two more areas
( back
to top )
Ok, hang in there. You're almost through. The last two areas of shadow we're going to touch on are the shapes and shadowing of the chin, and the forehead: the two poles of the face. (The toughest stuff is behind).
Chin and jaw
As you move bit by bit down the face, from eyebrows to eyes, eyes to nose, nose to apron of the upper lip, to the lips and mouth and the shadows in these area, you naturally reach the chin and jaw. In fact, after having discussed the longer shadows and lines of tension that stretch from the dimples to the chin we've got the chin half licked. So to speak. About the only thing left to look at is the dimple of the chin and the little pad of muscle around it.

And it's really pretty simple. There's one small muscle there that adds a lot of character to the shadow shapes of the chin. It's called the mentalis muscle . I'm not sure of the etiology of the word, but I think it comes from the Latin mentate, or "to think". Why on earth would you name a muscle on your chin after something you do with your brain? Hmm. Very interesting. When I say "hmm" and think to myself "why on earth..." I find myself stroking my chin. I think about the classic old statue "the thinker" with his chin resting on his fist.
And here's the interesting part: the frown that's a trademark for all that heavy thinking is buttressed right smack in the middle of the chin with a little tuft of muscle tissue: the mentalis muscle. It's as if the effort of thinking causes the brain to bundle and knot itself up in order to squeeze out an answer. That effort manifests itself amidships in the middle of the chin in the form of the contracted mentalis muscle. Go look in the mirror - you'll see it. Of course some folks just have more bone there, but the mentalis is the big contributor as far as "soft tissue" structures are concerned. Click here to see the mentalis muscle. (Use your browser's back button or the link at the bottom of the page to return here.)
|
|
|


The little bundle and dimple of the chin is caused
in part by the mentalis muscle
In a profile view like the cartoon just above on the right - the mentalis gives up it's share to the "jutting" of the chin, but the length of the jaw is the more important contributor. When you're drawing it's important (though not necessary), to know what causes the shadows of anything you're drawing - even if it's a very subtle influence. Yes there are other muscles at work here like the muscles that run from the corner of the mouth to the chin (like the triangularis), that make a contribution, but you can look at the section on anatomy (upcoming), to see more.
You don't need to be overwhelmed nor bored with all that right now. Just know that to make really accurate portraits or even caricatures it can really help to know what's going on below the external surface of the face. Why's that? Because you can actually predict how a face will contort or change with a given expression. ( back to top )
7) And yet another: the
forehead
( back
to top )
The forehead: as you've read numerous times before, you can leave off the forehead altogether and minimally you're left with a primitive version of a portrait. With a little more spicing, you have a ready-made caricature. Point is you can leave off the forehead altogether - the brain doesn't need it for recognition.

The forehead and it's main masses
Of course the bones - the frontal part of the cranium - are the greatest contributor to the mass of the forehead. It's the underlying musculature that accounts for much of it's subtle shadowing, wrinkles and expressions, and of course influence it's final, drawable forms.
The main area of forehead shadowing and contour are pointed out in this next illustration (remember to squint your eyes to collapse the shadow areas into more unique, definable shapes):

Look for these lines and contours (the ones pointed out by the arrow), in a bald person:
It's where the temporalis
muscle arises. Actually it's just the most anterior edge (anterior:
on the
side closest to the face), of it's
length-wise span across the side of the head. Women have this just as men
do, it's just more notable in men. Men tend to lose more hair as they age
so it's usually more visible in men.

Click on temporalis
muscle for
more info and an exercise
Next time you encounter a man with a totally bald head, unobtrusively note this landmark across the forehead and along the sides of the head. You can actually see the muscle contracting while you eat. Again, if you note a really bald guy at a restaurant unobtrusively note the action of this muscle. You'll see it working. Or less obtrusively, watch Star Trek and you'll see that bald commander guy with the same landmarks and visible muscle and jaw action.
[This muscle origin* adds to the subtle, elegant and
but slightly complicated convergence of planes and shapes that are the
basis of these shadows. (Origin is the place on in bone a muscle
arises from. The insertion is the bone the muscle acts on. So the
the temporalis muscle grows out of the cranium and inserts on the jaw bone.
It helps you clench your jaw and chew your food.)]
Forehead wrinkles
 |
The wrinkles of the forehead (the "furrowed brow") are a result of the interplay between the orbicularis oculi and frontalis muscles. In Spanish, "el frente" means "forehead". It comes from the same root as the English "front". Frente - front - you get the idea right? So it's not a big stretch to now see why this muscle is named as such. |
| For the most part men have more forehead furrowing than do women. In fact, there's a treatment women - and men - are now seeking to diminish or at least prevent further furrowing of the brow: plastic surgeons now inject botulinum toxin (as in "botulism"), in very tiny amounts into the frontalis muscle. The toxin paralyzes the muscle and so you're spared any further wrinkling. ( back to top ) |
|

, 8) A few last tidbits on complex
shadows
( back
to top )
Shadow shapes and color
One final word on these other shadows: these are as unique to any individual's face as are the main features (ears, eyes, nose, mouth, lips shape of the head, etc.) We pay them less attention than the features though. Painters will tell you shadow shapes hold the key to the most accurate paintings and the highest form of realistic art - be it realistic portrait or realistic caricature. Developing a sensitivity to shadows and their subtle tones directly extends itself into color recognition. The step between the two is inseparable.
In a front view with the light coming form in front and above, you get
these common areas of shadow: 1) shadowing between the cheeks and
the ears, and then 2) from cheekbone up to the temple area:

A few more areas of subtle shadow
The very last shadows - fine tuning your observational skills
Note how the shadows on the sides of the cheeks blend into the temples above and the jaw below. Also note the variation of shadow within the shadows: not so much the tiny variation of color or tone per say, but the variation as signs of reflected light reflected within the shadows. If you squint these become more obvious. And as you play with the "degree of squint" you'll become aware of how you can influence your perception.
Can you see two levels of shadow?
Try and perceive two levels of shadow: the very deepest shadow and an intermediate color of shadowing. These are a mixture of shadow and reflected light. Under the chin and over the neck is another area of subtle contour. It's the shadows in these areas that give the brain the needed information to perceive the three dimensional shape revealed by the shadows. Identify these different shadows in this next illustration of comedian Bill Maher (for more light and shadow explanation see Lesson 9: Light and Shadow ):

Identify those shadow areas
you just read about
9) Shape of the hair line
( back
to top )
In all your subjects you can perceive the hairline from two directions. Firstly, perceive the hairline as you move from the face to the hair: as a shape the forehead makes as it merges into the hair. And then, in a reverse perspective, perceive the shape the hair makes as it thins and tapers down to the slope of the forehead. Yes, it's two ways of seeing the same thing: but like all lines, you can see it as just a line, or as the meeting of two worlds. (Thus a shared edge.)
| That makes me think of what weatherman call a "dry line". It's a place where you see huge thunderstorms pop up. And you can look at it as two things: as the distinct place where the clouds seem to appear out of nothing or as the place where two giant air masses - air masses the size of continents - are running into each other. Another example. You can look at the Rocky mountains in a similar way: as a place where "the rocks are piled high" or as a place where two continents are colliding. Shared edges. Does that make any sense? |
|

Two ways of looking at the hairline:
( back
to top )
1) Way one: as the face disappears into into the hair (focus on the red tinted transparency as the primary overall shape the face presents us with):

Seeing the face as the overall shape merging into the hair |

Coloring the overall shape of the face red as
the |
2) The second way - the reverse of the above: you can see the hairline as hair encroaching onto the face
(see the red tinted transparency as the overall shape we're focusing
on):
|
Tinting the hair in order to |
Coloring the overall shape of the hair to bring out the hairline |


Either perspective yields the same line. And in the end, the line between the two is still an identical shared edge much the way the United States / Mexico border looks the same as you look down on it from space whether you look at it as a citizen of the United States or as a citizen of Mexico. (Though that could be a controversial example. You saw shared edges way back at the beginning of the foundation lessons. )
Looking at the shape on either side of the shared edge (as
red above or red below) is an extension of the "negative space to positive form idea".
Except in this case we're expanding
on that idea, dividing up an area of positive form, making it more
flexible in order to see the same object - the hair line in this case -
from two different perspectives. See Lesson 6:
Negative Space for more information. Here's'
the gleaned hairline / shared edge:

The shared edge of the hairline
If you were in an exaggerating mood, you could amplify the existing shapes and contours of the shared line.
At the very, very last
This brings us to the very last section in this third and final In-depth lesson. In fact, talking about the hairline segues us very nicely to a short description on drawing hair. And Ani sure has a head full.
But I think we'll finish up this lesson on the next page - part five. In Part V you'll see how the hair was put together on Ani, you'll see a caricature I started of Ani and instead of me doing further caricatures of Ani - which we did of Hugh Hefner and Keith Richards - you'll get to do the caricaturing. Here we go...Click below Part V for hair, your chance to caricature: the final section of the book:
|
Back
to Part I |
|
Ani DiFranco web links |
| To see photos of Ani DiFranco on the Web: Welcome to AniDifranco.org http://corbis.altavista.com/referrals/ Don't forget about the Alta Vista Image finder - just go to the Alta Vista link and click on "images". Type in "Ani DiFranco" when you get there. http://www.altavista.com/ |
Kasbohm & Company's
YouCanDraw.com
© Copyright, All rights reserved 1997
e-mail: jeffkaz@YouCanDraw