The Supply Store
Back to YouCanDraw .Com
|
Putting it all together -
case study #3: |
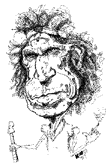
Click on any feature of the face and be
transported
instantly to that section of the book
Back
to Part I
You're
at Part II
Go to Part III
Go
to Part IV
Go
to Part V
Ok we've made a big deal of the horizontal landmarks. Don't get hung up on them - they're there to keep you rooted in the overall picture. Look at them as training wheels and as a place to turn back to if you get too "into" a picture. They'll bring you back if you lose perspective.
I mentioned
this in part one: that in the course of a drawing you make hundreds
even thousands of comparisons. The question comes up - what do you
compare? These guides we're spending all this time on use the major
features as a foundation. You know, on the obvious things: eyes, nose, ears,
top of head, bottom of chin. Obvious stuff. But within and around those there's a great deal of other detail.
| Part |  |
Listing a whole bunch of secondary facial features and details
Well let's just go through a quick but fairly exhaustive list of a few things you can see in every face that exist on both sides of the face and in every face. But don't get overwhelmed, just get familiar. They're good landmarks for spotting as you scan horizontally left and right and back an forth again and again. (Picture these as you read them - I'll give you a little illustrative help in a few spots):
Picture in your mind's eye these details of
the face and try to relate them to any other part listed as you read down the
list (how do you "relate" them? Ask the same old
questions "where are these lines, or highlights or
shapes compared to any other in the list? How do they
compare in size to the others in the list? What kind of angle
do they form when compared with any horizontal line? - since in
this section we're still concerned with how things relate to
a horizontal line. Those kinds of questions):
|

Checking out the wrinkles at the highest part of
the root of the nose
|

The "infra-orbital pads" or more commonly called the
"bags"
under the eyes (not a very flattering term :-)
Continue comparing the left half of the face with
the right (remember to ask the same old questions "where
are these lines, or highlights or shapes compared to any other in
the list? How do they compare in size to the others in the
list? What kind of angle do they form when compared with
any horizontal line):
|

Note and compare the heights of each of the lip's highlights
To continue,
|

|

|

Closing in on the cheeks and the dimples - how
does their horizontal placement
compare going left to right?
Observe:
|

Compare the heights of the corner of the mouth
and all the little detailed shadow shapes
Whew!
Is that enough yet?
Whew! And folks those are just the beginning of the less dominant features - you know, the details of the face. This is just a primer list intended to open your brain to all the elements that can be found. Regardless of the many layers of depth you can dive into, all those details you hunt down can be represented in caricature or by drawing using skills you've already learned. Namely by using lines, shared edges, positive forms, negative space, highlight, shadow, angles and curves, and tone (which is really color). You can review those skills in the foundation lessons section.)
The heart of the matter
 |
The meat, the actual activity you engage in while drawing, the act of observation while drawing involves making the million and one contrasts, comparisons, left-to-right trips you make sizing up all the relationships the way a sheep dog is constantly zipping around trying to contain, to shape up his flock. |
In drawing a picture, any picture, you do this until you begin to form a picture within your mind. You might call this your "sizing up" period - before you place even one line on the paper. (You don't have to wait though. For instance in figure-drawing, you often work out this "sizing up" directly on the paper - and the results can be beautiful.)
| In the following animation, treat the pointer finger as representing the track your eyes take going left to right comparing all the major, all minor, and even the less noticeable features and shapes of the face. And keep your eyes peeled for things that may not have been mentioned in the partial list above (the one in the light peach tone boxes above). |
|

|
Check out this animation for a very short visual explanation of what we've just talked about. When
viewing this I want you to be aware of these three
things more than anything else: |

| Asymmetry |

The amazingly asymmetric Flounder
All of this" right to left", and "left to right" comparing and contrasting we've been stressing in this section leads to the next important point: symmetry. Or lack of it, also called asymmetry. Nature and God have played a little trick on us: we'd like to believe our left side is an exact mirror image of the other side. But the truth?
| There's all sorts of subtle differences. We're "left or right-handed", or we have a "dom- inant" eye. These lessons are built on the assumption our brains are constructed asym- metrically. The beauty mark on Marilyn Monroe's and Janet Jackson's cheek, or Werner Klemperer's monocled look come to mind. (You know, Colonel Klink on the TV program "Hogan's Heroes" - he had that lens over his right eye). |
|

Or think of a flounder: The fish with it's whole face, it's eyes, even it's scales limited to one side of it's body. It's about as asymmetric as you can get! Few trees or bushes are exactly symmetric, especially trees at high, windy elevations where branches grow only on one side. A crystal or even an ice cube can't form unless there's some kind of imbalance or asymmetry to set off a molecular chain reaction in the first place. Water spins down the drain clockwise north of the equator, and counter clockwise south of it. If hemoglobin wasn't lopsided, it couldn't fold on itself. And if it can't fold on itself, it can't carry oxygen. No oxygen no life. Not the way we know it. And that would leave us off in some parallel universe I suppose. If we'd "be" at all. Asymmetry abounds in nature. In fact, without asymmetry, there might not be nature.
Asymmetry in people
In most people the facial features are close but not the same on both side of the face. There's a good deal of asymmetry: cock-eyed smiles, cock-eyed shadows, crooked noses, asymmetric cheeks, any of the major features or wrinkles, etc can vary side to side. And we an go right through the rest of the body, inside and out: left arm, right arm: throwing and non-throwing, kicking leg, non-kicking leg, the leg we put into our pants first, the way we do things. Internally: the way the abdominal organs wind left to right, liver on the right, spleen on the left, male and female parts, all sorts of things are, well just plain off-kilter in their own balanced sort of way. Even asymmetric molecules have mirror images. You'd have to look that up in a chemistry book - they're called "stereo isomers" and they're described in the part of chemistry called "stoichiometry".
|
|
Often times just a little careful observation reveals the differences. I had a friend in high school. He had one blue eye and one brown eye. ( The girls loved him.) Went on to play professional baseball for the Texas Rangers as guess what? A pitcher. A left-handed pitcher at that. You can't escape it. :-) |

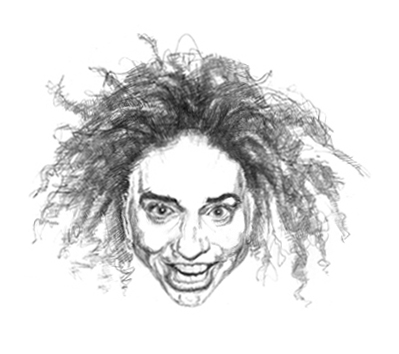
How does asymmetry play out on Ani's face? Let's look
Let's get specific. How does asymmetry manifest itself on Ani? Here's two views of her face - I've flipped these in Photoshop:

Mirror images of Ms. DiFranco
You know right away they're different but can you pinpoint the differences? Let's look a hair deeper. Like you've been doing, drag your imaginary horizontal lines right down her face from top to bottom and compare and contrast each line, shadow, and feature to your horizontal line as you descend. See any differences between the pictures? Look at Ani's mouth and especially at her lower lip for one of the more striking differences.
[More subtle differences: what happens to the vertical shadow in the middle of Ani's nose? Compare to the mirror image. Does it move in relation to the rest of the nose? And did you happen to notice a nose ring? Which nostril is it in? ]
Here's what I mean when I say "drag your imaginary horizontal lines down her face" (remember, I'm taking it for granted now you'll automatically stop off on those major horizontal guides and landmarks) - I'll illustrate:

Horizontal scanning
Horizontal scanning is just like it sounds: the way you see it in the animation above. You're carrying your pencil up and down the page observing, comparing, and contrasting what's on the left with what's on the right. You're stopping at those intervals along the way to look and see how the left and right half of the face is aligning.
Split personalities
Now here's the really interesting picture: I've made one face out of two left halves and the other face out of two right halves. Split her right in half. I find the results pretty fascinating:

Making two faces out of opposite halves Look close: the illustration on the left is made of two left halves and the image on the right is made of two right halves. Compare to any of Ani's illustrations above and look close for the different halves in the original picture. Look at the eyebrows, look at the lower lip, compare the overall shape of the upper lip, the curvature of the upper set of teeth, the dimples, the chin, the width of the head, in fact go through the same exhaustive list above as you compare pictures. What's really remarkable?
Of course, there's so much variation between the two faces, all the giant FBI computers in Washington DC can't tell the two apart. But our brains can differentiate between those two and identical twins once we've become familiar with them, right? Same principle at work here. (Truth is I don't know that about the FBI computer situation, but it sounded good. I do know they're working on computer recognition systems that look for the exact same things you're learning to look for here - the things the brain recognizes unconsciously and automatically.) |

I'm going to leave it to you to go through all those steps deciding what's the same and what's different on Ani's face. Take the time to do it though: it's what you'll do for every face you ever want to draw and it does become very natural and very effortless once you've done this a few times.
Moving on
So it's time to move on. In the next section, Part III: Vertical landmarks you'll see the same kind of scanning you saw here except you'll be waving your imaginary wand (the pencil), left to right while holding it vertically. You'll also take this idea of symmetry / asymmetry a step farther.
Back
to Part I
You're
at Part II
Go to Part III
Go
to Part IV
Go
to Part V
|
Ani DiFranco web links |
| To see photos of Ani DiFranco on the Web: Welcome to AniDifranco.org http://corbis.altavista.com/referrals/ Don't forget about the Alta Vista Image finder - just go to the Alta Vista link and click on "images". Type in "Ani DiFranco" when you get there. http://www.altavista.com/ |
Kasbohm & Company's
YouCanDraw.com
© Copyright, All rights reserved 1997
e-mail: jeffkaz@YouCanDraw