The Supply Store
Back to YouCanDraw .Com
|
Case study
#3, Ani DiFranco - Part
V: |
Ani DiFranco - click on any of the features to
be
transported instantly to those pages
On this page:
See the on-line site for updates Back
to Part I |
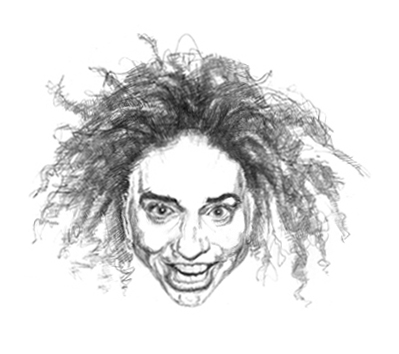
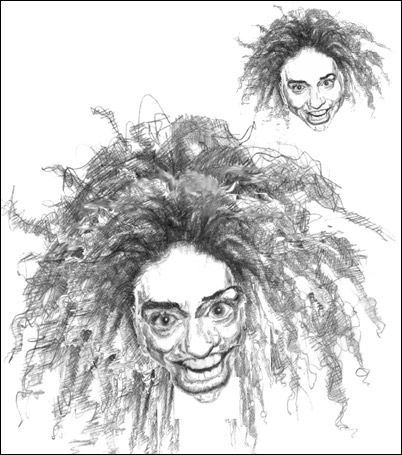
Building hair
We left off on the hairline in Part IV. You'll see next
how Ani's hair was constructed in the 6-step illustration. The following comments
refer to the big picture just below:
As you progress through the big illustration, note the following:
-
Hair has a shape like any shadow shape or positive form. It has shadows and highlight within itself.
-
There are sub-shapes within the overall shape of the hair.
-
Hair likes to stick together in clumps or curls.
-
These clumps and curls and locks all become the "sub-shapes", i.e. the smaller shapes within the overall shape .
-
As far as highlight and shadows are concerned those sub-shapes generally follow the same shadow and highlight pattern shapes you find in primitive forms - since they're generally in some sort of primitive form themselves.
Depicting hair can get tedious: it has so many layers. Key: look for the overall shades of light and dark first (squint). That'll clue you in on the sub-shapes. The sub-shapes in Ani's hair are pretty random - she has a cross between corn rows and a Rastafarian "doo" in this picture. So take a second and work your way through the picture - pick one sub-shape and follow it's progression through all the pictures. (back to top)
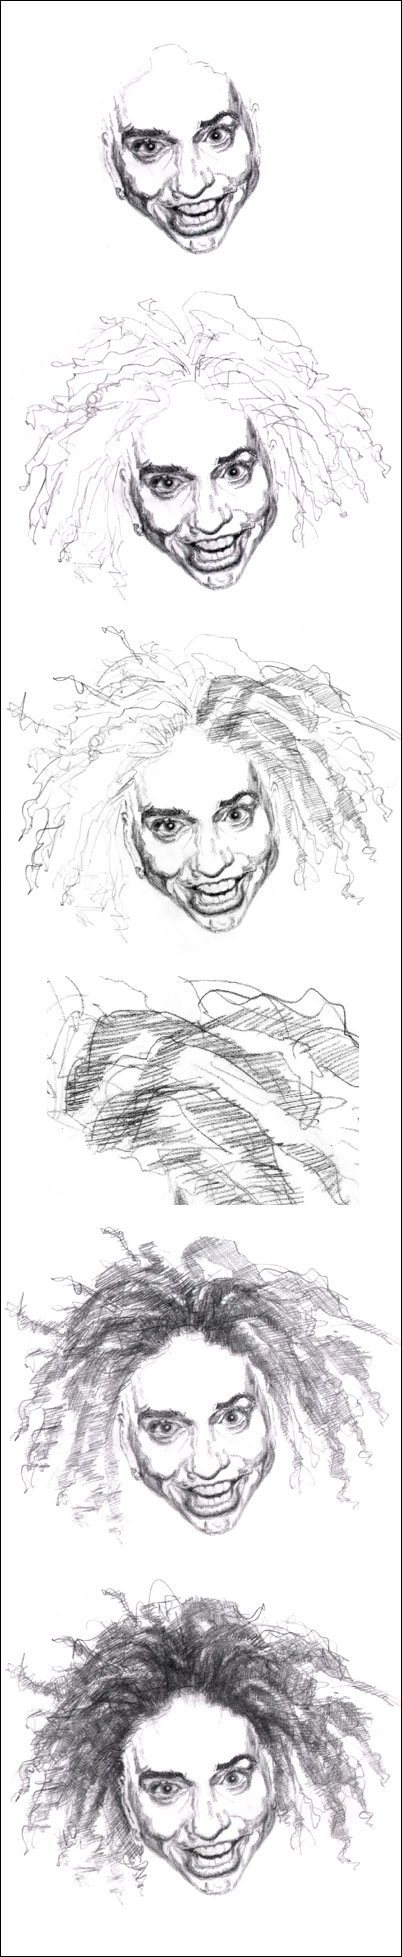
Let's go through the picture. There's six drawings here:
-
the first is with Ani without hair.
-
Next the sub-shapes are drawn in - she almost looks blonde.
-
After that the first layers of cross-hatching are added. First in one direction - uniform over the entire head of hair. (The hatches are mostly horizontal in this first layer - I learned that from New York Review of Books Artist David Levine)
-
There's a close-up next showing the fairly uniform - but loose - hatching. A loose feel matches the look of this hairstyle.
-
Further layers of hatching are then added. The areas that are darkest receive the most layers of cross-hatching.
More on hatching
(back to top)
When I cross-hatch I generally go through the entire picture with one direction of hatches at a time. Throughout the actual hatching sequence and as I near the end of filling in all the hatching, I always make sure of three things:
1) to be sure to leave areas with highlights cross hatch free. In other words, it takes me a certain amount of discipline to not over-hatch - and believe me it's easy to do. (Over-hatch that is.)
2) I try to keep all the hatching uniform: that the diagonal hatches that start high on the left and traverse to the lower right all traverse at the same angle in any part of the picture. (The third and fourth picture down give you some idea of what I mean there.)
3) Again: quit hatching before everything is over-hatched. That's really learning when to quit. You can always take a step back before you're through and come back and add more. If you feel a little of the "hmm, what else can I add?" that's a sure sign it's best to take a step back. The distancing will help your judgment too. (If I could do this as easily as I make it sound :-)
Other patterns in the hair
As far as general patterns of hair shadows and highlighting are concerned, hair tends to be darkest right where it intersects with the face, and then again at it's outermost edge.
Hair color
You also need to weigh hair color. Blondes get by with much less hatching. Afro-hair is made up of lots of tiny curls so using what kind of lines do you think would work for this kind of hair? Three guesses. Yes, tons of teeny tiny curls is both realistic and effective - with or without hatching too.
Drawing the hair's sub-shapes first
We kind of worked in reverse to arrive at the overall mass of hair shape in this particular picture: the sub-shapes were drawn first. They're pretty random, and they go all over the place. In the aggregate, they do form a shape. You can't really appreciate that overall shape until you draw all the subshapes - which is why when drawing you need to have an overall outline in mind that will contain all the subshapes. Does that make sense? Let me illustrate in a slightly differently way. Think of a tie - a man's tie, you know, kind of a long triangular shape with a a point at the bottom? Can you see that in your mind's eye?
Now, picture that tie as being completely black. Just a long, stretched out black triangle, right? Close your eyes. Envision it again. Open your eyes, imagine the same shape again. Good. Now, picture the most flamboyant, colorful tie with all sorts of overlapping rectangles, squares, circles and cylinders. Now picture that sober black tie again.
Next step: in your mind imagine all those funky geometric shapes fighting for space on that same, triangular black tie shape. Imagine yourself drawing the tie by just drawing the geometric shapes within it first - so that when you've drawn all the geometric shapes you've in essence drawn the tie shape by default. Your awareness was on the geometric shapes. The overall tie-shape reappeared as a direct result of that attention on the smaller shapes.
Does the way the overall black tie shape remind you of anything else? It might remind you of the section on "formats" (Lesson 6: Negative Space ). A format as by by now I'm sure you're aware is the overall shape or frame you put any picture, painting or drawing inside of. You may not even be aware of it, but you're using a format when you draw on paper - the paper is the format, the containing frame. So when you draw hair, or the overall hair shape, often times it works well to envision the overall hair shape - without drawing it on the paper first - but then you fill in that imagined shape with actual lines on your paper. I hope that makes sense.
This is in essence an example of the fifth skill of drawing: the "gestalt" skill where you see first - by collecting and arranging in your brain the information your senses (in this case your eye sight), have given you, then you draw everything in. Once you experience this, you'll know exactly what I'm, talking about. (The Lesson 1 Vase/Face exercises where great "gestalt" practice)
That's something of the process I go through when drawing hair, and exactly what I did when I drew Ani's hair. If you'd like to see more on drawing hair, there's several more references in the Archives. Go check them out when you get a chance:
|
| Into the home stretch:
summing up Ani (back to top) |
|
|
Well you've come a long way! Congratulate yourself. And like I mentioned a long time ago, getting you involved is the best way to learn. So in this very final section, you're going to do the caricaturing - not me. Now don't be intimidated. Sure we'll look at the things we discovered about Ani's face but you're going to do some "pin the tail on the donkey kind of work". What the heck does that mean? It'll be clear in a little bit. :-) |

| Summing up and ''compiling'' what we've observed about Ani |
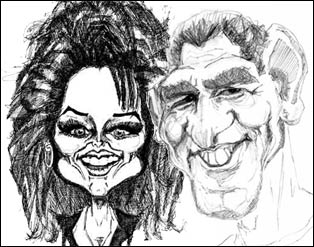
OK, let's go back and see what we've discovered abut Ani in comparison to Mr. Average. From Part I: In comparison to Mr. average, we can make this general statement about the overall shape of the head:
Ani's head is proportionately pointier and longer
in the
area of the chin, and broader across the forehead
That sounded a little stuffy :-). Here's an illustration comparing the two - you saw this back in Part I:
Give this a good sighting: Ani's a little
more angular, wider in
the forehead and sharper at the corners of the jaws
Secondly, we also saw the
Space between Ani's middle of the eye line and the top of her head
closely approximates the same area of Mr. Average. The Horizontal landmarks
demonstrated that too:
Superimposing the horizontal landmarks
of Mr. Average over Ani's face - note the
space between the middle of the eye
line and the top of the head line
We can make this general statement about the overall dimension of Ani's face between the middle of the eye line and the top of the head line:
Ani's face is of about the
same dimensions as
is Mr. Average between the middle of the
eye line and the top of the head line
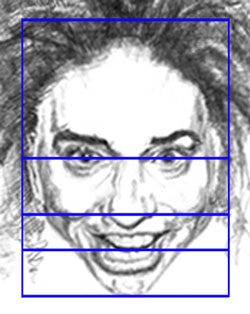
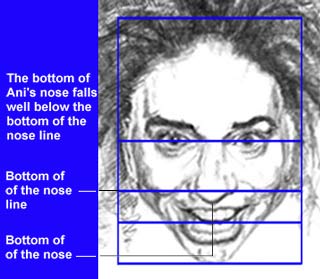
That was discovery number two. In Part I, we also saw - by virtue of the horizontal landmarks - that the bottom of Ani's nose closed right down on top of the upper lip (which simply tells us we can make her nose longer):
Seeing how the superimposed Mr.
Average's
blue horizontal guides align on Ms. Ani
As we continued on we discovered that if we concentrated on the area of her face between the middle of the eye line and the bottom of the chin line, we saw these kinds of subtle differences when compared to Mr. Average:
![]() Again, from Part I we surmised that the
general area between the bottom of the nose line and the middle of the eye line was
bigger on Ani than on Mr. Average. You can see that demonstrated in this
illustration:
Again, from Part I we surmised that the
general area between the bottom of the nose line and the middle of the eye line was
bigger on Ani than on Mr. Average. You can see that demonstrated in this
illustration:

Ani's nose is longer than Mr.
Average's
What fits and stretches into this space?
-
Proportionately, this pushes the bulbous tip of the nose deep into the apron of the upper lip;
-
In the areas to the sides of the nose, namely the cheekbones, (the cheek bones and the area around them) might get stretched and elongated along with the nose. They could fill this space between the middle of the eyes and the middle of the mouth.
What's that saying in terms of exaggeration? I kind of already said it: you could give Ani longer, bigger cheekbones too - cheekbones that might stretch as long as the nose in this middle space between the middle of the eye line and the bottom of the nose line.
![]() You also saw that
mouth, lips, and chin all seemed to be proportionate
with those of Mr. Average - but only because her mouth was open a little bit.
Then I dragged you through a long explanation of why it was important to
accurately identify the real middle of the mouth line which is
demarcated by the
lower margin of the upper teeth.
You also saw that
mouth, lips, and chin all seemed to be proportionate
with those of Mr. Average - but only because her mouth was open a little bit.
Then I dragged you through a long explanation of why it was important to
accurately identify the real middle of the mouth line which is
demarcated by the
lower margin of the upper teeth.
This, the lower margin of the upper set of teeth, was the most important marker. Why? Since the upper teeth are rooted in an immobile bone, the maxilla, they don't move. That proportion won't ever change. (So if your were sitting across the table from Ani, this might be a characteristic that would strike you as unique and unchanging.)
If we corrected for that, that is if we mentally closed her mouth we saw that her features - upper and lower lips, teeth, and chin - got crammed in pretty snug. Her chin is smaller and pointier proportionately than Mr. Average's. The lower lip dips down pretty low too, and it became that much more obvious when you start applying the horizontal landmarks (but more on the actual features in the "feature by feature" section).
Side note: Here's a kind of useful
measure we haven't talked about before: it's the dimensions of
proportion around the mouth and chin.
|
In
Part II, we named some subtle dimensions and
named *non-traditional features that faces in general share.
| (*Non-traditional in the sense that most traditional drawing books won't label all this detail; it's my firm belief that unless you know about certain details - that they exist at all - you won't look for them ). |
And you saw a whole list of things. For instance we saw there's some asymmetry in everyone's face - Ani's included. We saw the little differences in the heights of the lines at the corners of the mouth, the eyebrows, the way the lower lip curves more to one side than the other.

Looking for asymmetry by comparing mirror
images
We also saw in Part II how we've really been building our visual vocabulary: We named things. We considered the point of view that the real key to drawing great caricatures as well as great portraits was knowing what to look for and that by having a name for it, you can actually look for what you've got a name for in the first place. "You'll see it when you believe it" rather than the reverse.
Which lead us to the question: "is there anything here exploitable?" Of course we're always asking that. :-)
In Part III, Using the vertical guides now as the entry point - i.e., as the method of sizing up Ani's face, as another angle of evaluation - we showed graphically and without a doubt the obvious again: Ani has a bulbous nose. But if you hadn't measured it, it may not have been obvious. And yes sometimes it seems ridiculous to go through all this, but the idea is to put together a quick system to evaluate a face until the things you look for become second nature. (The vertical guides are really a measuring stick for width.)

Lining
up the vertical landmarks/guides of
Mr. Average on Ani can be done only if
you funnel out the guides to fit Ani:
her nose and mouth get wider as
you move down her face
|
Flash Interactive One |
Reviewing the horizontal guides
To get more work recognizing and using the horizontal landmarks and guides see Flash Interactive One: Internalizing the horizontal landmarks (right click if you're viewing this on the web.) |

 |
Reviewing the vertical guides: Flash
Interactive Number Two
To get more work recognizing and using the vertical landmarks and guides see Flash Interactive Two Learning to see the vertical landmarks (right click if you're viewing this on the web.) |
Gender considerations
Ok
what else, gender
differences. Was there anything to really add in this picture of Ani
by considering peculiar gender differences?
Sure. Women generally have smaller noses, proportionately larger eyes that
also have - via make-up or naturally - the "cat eye "
look. In women the space between the eye brows
and the top of the eye lid is taller than in men and crowned with thinner, more
arched eye brows. (Popularity tests prove that larger eyes are
friendlier and therefore more attractive. President Clinton's PR staff had
numerous close-ups of him modified with computer enlarged eyes. These pictures actually
scored higher in popularity tests. Exceptions? What about those Betty Davis
eyes?)
Overall caricaturing rule regarding women
And then there's the overall caricature rule that dictates that when caricaturing women, you cut slack - not because women can't take it or anything like that, but rather because there's such a double standard in the world placed on women's looks. (I'm not going to get into the whole argument here, mostly because I only have superficial understanding of it, but take my word for it - and I'm sure you have some feel for what I'm talking about especially if you're female - there's an injustice to women here.) To give women a break when caricaturing is firstly just good manners and secondly, some kind of small repay for the unjustness.
So all of this goes into the mental stew we cook up for where and what to exaggerate on Ani. These gender differences tell us we could be cruel but are tempered by the overriding rule (that you cut slack on women) and guide us to not be so hard on Ani - so we won't be so hard on Ani's nose, but we have even more permission to give Ani bigger eyes (because bigger eyes are generally friendlier eyes. Generally.)
Looking
for gender differences...look
at brows, eye lids,
spaces between features, feature sizes neck size, etc.
Let's
keep rolling here...the nitty gritty of isolated features
(back to top)
The horizontal and vertical landmarks/guides gave us a framework to work with. They allow us to do a general sizing up of the face, connoitering the face the way a sheep dog tightens up the herd: from the outside working his way in.
Part IV we really got into the nitty gritty of taking apart all the different shadows, common shadow areas and specifically, the features. Did we really discover anything new going through all that? Maybe, maybe not but you got one more layer of depth excursion into what little things make a feature noticeable.
We
also saw how important shadows, highlights and shadow shapes are in
configuring a face. In fact, we hopefully demonstrated the subtle power shadows and highlights
contribute to the overall recognizability and uniqueness of a face. You saw where Ani's
shadows were darkest: in the dimples, under the eyes, along the temples,
the very sides of the cheeks, under the eyelids, and at the
hairline. (Pretty much the same on everyone - and one added note: this
is with light coming mainly from above.) Let's look real quick at those
shadow areas again...
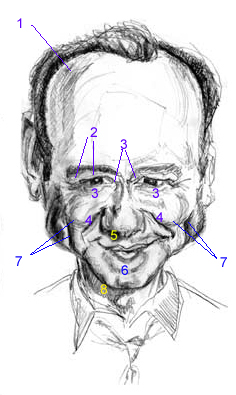
Common areas of shadow
This is an excerpt from an on-line page from one of YCD's larger archived articles:
http://www.youcandraw.com/showcase-svoye.htm
"What you can also get here is a feel for areas of common shadows - common to all almost everyone. And those areas* are these - if I had to name them - going from top to bottom:
Summing up Ani one last time:
feature by feature
(back to top)
What a deal. So, so far, how would you exaggerate Ani? Let's look at Ani feature by feature very rapidly - yes, this'll be more repetition, but as you review ask yourself if maybe you can't start forming in your head a direction the exaggeration might take.
![]() 1)
The
overall outline shape of the head: broader across the forehead,
sharp angular jaw corners, narrowed or pointier tip of the chin:
1)
The
overall outline shape of the head: broader across the forehead,
sharp angular jaw corners, narrowed or pointier tip of the chin:
 |
The importance of reviewing outlines
Remember, you can get lot's of practice learning to zero in on the outline of the face and head by reviewing and doing the exercise found in Flash Interactive Three. Click on the picture if you have the e-book on your computer otherwise click here for a link to the Flash exercises. |
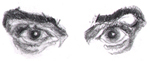
![]() 2)
The eyes: note the angle of the eyes (cat-eyed), the eye lids, the lid
margins,
the shape of the space between the lids, the shadows between the eyes that
really were the sides of the nose, the almond to watermelon seed shape of
the eyes, the thickness of the eyebrows, the thickness of the eye lashes
(there was a lot, but look at Part IV for the real breakdown if this is
sounding foreign to you). Here's those eyes all by their lonesome:
2)
The eyes: note the angle of the eyes (cat-eyed), the eye lids, the lid
margins,
the shape of the space between the lids, the shadows between the eyes that
really were the sides of the nose, the almond to watermelon seed shape of
the eyes, the thickness of the eyebrows, the thickness of the eye lashes
(there was a lot, but look at Part IV for the real breakdown if this is
sounding foreign to you). Here's those eyes all by their lonesome:
![]() 3) The nose we said was slightly bulbous, but in Part IV we
saw a lot more than that. We saw how it was proportioned, where, i.e.
which part of the nose's three wedges was most disparate when
compared to Mr. Average.
3) The nose we said was slightly bulbous, but in Part IV we
saw a lot more than that. We saw how it was proportioned, where, i.e.
which part of the nose's three wedges was most disparate when
compared to Mr. Average.
We saw how it blended into the nasal root (at the forehead) and with the eye brows and the eyes themselves. We saw how the tip of the nose had the most mass, how the central wedge was proportionately smaller than that of Mr. Average, the wedge where it emerged from the forehead was broader than the Average model. Yes, we got ridiculous. But these are all the little comparisons you'll learn to make unconsciously as you gain experience.

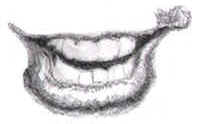
![]() 4) Then we looked at the mouth: which is really a
combination of the apron of the upper lip, the lips themselves, the teeth,
and the shadows that are all a direct result of the bony under-structure
underlying the tissue of the lips and mouth. Then we looked at the mass of the lips
themselves.
4) Then we looked at the mouth: which is really a
combination of the apron of the upper lip, the lips themselves, the teeth,
and the shadows that are all a direct result of the bony under-structure
underlying the tissue of the lips and mouth. Then we looked at the mass of the lips
themselves.
When dealing with the mouth we're dealing with curves and and rectangles (like teeth), and spheres and cylinders and constantly changing highlights, and shifty shadow shapes and the ever unsteady dynamism of lips that change with every spoken word and emotion. Still, we discovered we could find some characteristic constant - at least one you might find within an expression frozen on a photograph or through familiarity with any given subject (in this case Ani). Characteristic enough to draw anyway.
 |
Getting more practice drawing individual features To get more practice on isolating and perfecting drawing the features see Flash Interactive Three: Digging into the features. If you have the e-book, click on the graphic for the exercise, otherwise just right click here: Digging back into the features |
![]() 5) And
we looked at some specific areas of shadows - for instance, like those around the
eyes...
5) And
we looked at some specific areas of shadows - for instance, like those around the
eyes...
And we saw how intricate and involved shadows could get (and of course, to collapse all that complexity into something manageable, you saw how squinting was a very valuable tool).
![]() And we saw those shadows that made up the dimples and the sides of the
cheeks...
And we saw those shadows that made up the dimples and the sides of the
cheeks...

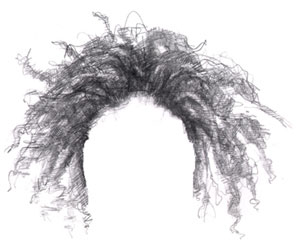
![]() ...and
the shadows between forehead and hair...and that crazy hair again...
...and
the shadows between forehead and hair...and that crazy hair again...
![]() ...and
shadows around the chin (see the overall shape of the head above again for chin shadows).
And you saw how light reflected under the nose - right next to the darkest
shadows of the face: under the nostrils. Of
course throughout this excursion never
loosing sight that all of this is built on a three dimensional base:
...and
shadows around the chin (see the overall shape of the head above again for chin shadows).
And you saw how light reflected under the nose - right next to the darkest
shadows of the face: under the nostrils. Of
course throughout this excursion never
loosing sight that all of this is built on a three dimensional base:
The three dimensional shapes
underlying the features of
the face and head
(To see more on understanding the three dimensional shapes of the head see Part VII: Extra - the Three Quarter View)
And the
overriding point in going through all this danged doggedly long explanation was
not to memorize Ani's face, but rather was to understand one specific case
of a generalized approach to observing - an education in learning to look for specific things that you'd see in all faces and probably applicable to any
drawing you'll ever do. That was the ambitious goal anyways. :-)
The exaggeratable Ani in a nutshell
(back to top)
So, drum roll please, in a nutshell here's our summary of what we could name as exaggeratable in Ani:
-
big hair,
-
big eyes,
-
longer - than - average - for - a - women bulbous nose,
-
strong cheek bones and dimple shadows,
-
catty angled eyes,
-
noticeable shadows under the eyes,
-
the full lower lip,
-
the crowding of everything below the lower lip into a tiny space,
-
small chin,
-
and did I say BEEEG hair?
Of course, when I say "big" or "small" or "narrow" or "long" or add any of those modifiers it's always implied that that feature is big, or long, or, wide, or narrow, or redder, or bluer, or hairier or whatever in comparison to Mr. Average or to your own intuitive, built in measuring scale.
And it's implied that if you do enlarge, or shrink, or change a feature, you preserve the natural shape or most noticeable part of the natural shape or feature of the original person. Since after all we're drawing a unique somebody and their features are all unique to them. We, as caricaturists just amplify what we see. That's where our power of observation and realism pays off. If you're doing realistic portraits, then just skip most of the exaggeration steps. Everything else is the same. :-)
So back to Ani. Here's what we get, err, what I get when I just do a rote "summing" of all those what I thought were exaggeratable features :
First (cruel)
caricature of Ani - it just popped out this way
All done on computer
I know, not very flattering. I know there's a much more complimentary way to draw her, but there's a little twist: I did it all on computer! All I did was resize existing features according to what the vertical and horizontal landmarks suggested and by what jumped out at me intuitively. Does the caricature work? Again, kind of but a bit cruelly. I felt pretty evil after finishing this one (I'd be a liar if I said I didn't laugh though :-). It's not the "quintessential" caricature of Ani, but it's a start. Yes with a little more time and effort and re-working of this ground floor attempt, I have confidence I could come up with a winner.
If
you have the time to keep going over and over the same face, great!
Studio jobs give you more latitude to do that. Gigging does not. So learning
to accept "less than perfect" isn't a cop out, it's a move towards
sanity. (Perfectionism is way too stifling.)
Let's look at everything you've done to get here!
OK! You've done stupendously. You've muscled your way through a mighty amount of material. Let's look real quick at all you've done - and you can go back and review if you need to brush up on any of it (there's links to all the main sections).
In Lessons 1 through 3 you learned how to drop in to your artist's brain - the "right side of the brain". You learned it in steps, and in increasing levels of immersion. You saw in Lesson 3, Upside Down drawing, it was within you to already to draw things way beyond what you thought you could draw:
In Lesson 4 you took a "depth" step into pure observation to sink deeper still into the quieter, in-the-now observational side of your brain: Pure Contour Drawing:
In Lesson 5 you started corralling your observational skills by slowly getting your attention on to what you're drawing while still maintaining that deep connection with the purely observational side of your brain:
In Lesson 6 you started differentiating different shapes that existed within the drawing - more so you began to respect non-objects as having as much relevance as the actual object or person you're trying to draw: the discovery of Negative Space. This becomes so important when you begin observing shadow and highlights - as well as the shapes around your subject:
Lesson 7 introduced you to the viewfinder: an extension of framing your subject and using the frame as the creator and delimiter of your subject and drawable negative spaces:
Then on to the most difficult part of drawing: Lesson 8: Perspective and proportion. You learned about "sighting" - sizing up your picture and subject by declaring something from with in your subject or scene as the "unit of measure". Then measuring everything else within your drawing with reference to that basic unit of measure:
Lesson 8: Perspective and Proportion
Then, in the most comprehensive section, Lesson 9, you applied everything you learned earlier to closing in on color tone, shades, shadows, and highlights, and seeing them as nothing more than unique shapes of tone and shade:
Then, in Lessons 10 through 13, you started getting specific about what you were drawing - namely you shifted your attention to the features of the face. This was the beginning of a subtle shift from pure observation to observation with the idea that you will observe more, i.e. you'll see more if you know more about what to look for, one feature at a time:
In Lesson 14, you saw how to construct and place features of the head, you saw Mr. Average and how everything points back to internalizing his landmarks, plus you saw an introduction to drawing the (at first) difficult three-quarter view:
Part VII: Extra - the 3/4 view
Whew! And like they used to say in the sixties: "You've come a long way baby". Pat yourself on the back...and take a crack at the next exercise :-). Have fun with it! (And of course, you're still in Lesson 15 :-)
It's your turn to really
caricature. Yes, you can do it!
(back to top)
Now, instead of me doing all the caricaturing, it's your turn. Yep I'm putting you in the hot seat. And not to worry, I've done most of the work for you. But this is your stepping off point, your first nudge out of the nest. And you are up to the task.
Here's what follows. Every further link here is linked to some feature of Ani's face. All features have been isolated and they've all been sized and resized multiple times. Your mission should you accept it ...all you need to do is:
-
Click on the links
-
print out the features
-
with scissors or Exacto knife cut each feature out
-
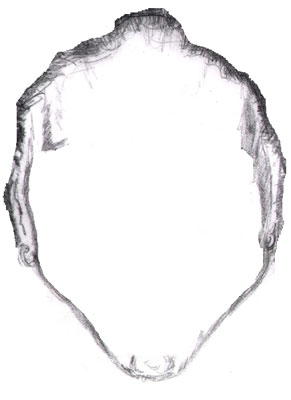
play with their placement on the overall outline of the face
-
Have fun!
Remember to "get out of the
box" - the features do not have to fit on the outline of the face!
One eye can be huge, the other small. The nose can be pasted together from
two noses. Piece it together any way you like, two, three, a dozen times!
Just have fun with it. Then, when you're done, send me a photo copy of the
finished hilarious concoction and it will be my total pleasure to post it
here in the book - forever, for the whole world to see!
So again, Here's what you do:
Print out all the features. Print out multiple copies of each. Take a scissors - cut out all the features. You might want to get an envelope or a folder for each set of them (an envelope for eyes, one for lips...etc. eyes).
Here's the fun part: after you cut out each feature, lay out 3, 4, even a half dozen of the overall outlines of the face. Then just stick them on wherever you think they look "right" - but try this from as a wild a perspective as you can. See how outrageous you can get and still maintain a likeness to the original Ani.
(Note: concerning the overall facial outline is, I recommend taking that to Kinko's Copies and enlarging it.)
Here's your
ammunition:
(back to top)
| Features for printing: | |||||||||
|
|
||||||||
Contest?
If enough people participate, we'll vote and there will be a prize awarded to the winner. What kind of prize? We'll come up with something :-)
In each outline, start experimenting with spacing, with different sized features, (proportion) try mismatching a big left eye with a small right eye, a big right dimple with a small left dimple. Stick in a long nose, try making it crooked. Just experiment and experiment and see what wild combinations you can come you with. Have a beer or a glass of wine so you're feeling just a hair less inhibited and just a trickle more evil! Now go for it, dive in. Send me a picture of your wildest conglomeration and I'll post it for all to see!
Other exercises. Go to a magazine and cut out bodies - all different sizes, genders, types of clothes - you'll be adding these to your finished faces.
Draw, draw, draw! Collect and build a library of drawings and caricatures you like and admire. Then draw them. Caricature the caricatures. If you can put aside 20 minutes a day to just caricature a caricature, you'll make amazing progress. Use a timer and quit when times up.
Flash Exercises. Return to the Lesson 15 Master Link Page, go to the Flash Interactive Exercises and start rehearsing the information there. There you'll drill home concepts like the the vertical and horizontal landmarks and guides as well as step into some real caricaturing opportunities in parts three and four.
And just below that, on the Lesson 15 Master Link Page are links to Archive pages that go through shorter feature-by-feature explanations of selected celebrities. So head on back there and step up to the plate. You can do it!
Lesson
15 Master Link Page
(back
to top)
Back
to Part I
Back
to Part II
Back to Part III
Back
to Part IV
You're
at Part V
Kasbohm & Company's
YouCanDraw.com
© Copyright, All rights reserved 1997
e-mail: jeffkaz@YouCanDraw