The Supply Store
Back to YouCanDraw .Com
|
Putting it all together -
case study #3: |
Ani DiFranco - click on any of the features to
be
transported instantly to those pages
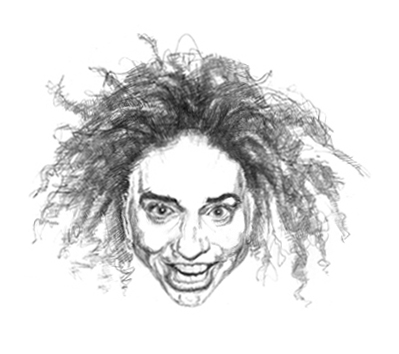
Ani DiFranco, besides being a total bundle of energy, makes for a very interesting study - she's got a wild look to her and it really comes out in her music and in her whirlwind performances (not to mention her hair). Listen to her speak and to her sweet singing voice and you'll have a hard time believing she's gone through all the passages she has. Listen to her lyrics and you'll get a glimpse of life in the margin. You'll see this is a woman on a mission! But I'm no music critic and this is no Rolling Stone "day-in-the-life" story. You're here to draw so let's get to it. ;-)
You're
at Part I
Go
to Part II
Go to Part III
Go
to Part IV
Go
to Part V
|
Super short review
(Back
to top)
Like you saw in the two previous In-Depth studies, (Hugh Hefner and Keith Richards), we're going to go through this methodically. I'll reiterate again what we're shooting for: I want you to internalize the five steps I use when sizing up a person's face. The main goal here is to eventually have the "Mr. Average Face" grilled into your brain so deeply you can unconsciously apply the Mr. Average template to any person's face you're trying to draw or caricature without even thinking about it.
Those five steps (and they're different than the five skills of drawing), are these:
-
sighting, comparing, contrasting the overall shape of the head and hair;
-
sighting, comparing, contrasting the horizontal landmarks;
-
sighting, comparing, contrasting the vertical landmarks;
-
sighting, comparing, contrasting the features;
-
sighting, comparing, contrasting the shadows and highlights;
-
Extra step: And to keep us on our toes we'll go the extra step sighting, comparing, contrasting our subject to a "blockhead" version of our subject to glimpse their three dimensionality. Relating all of it to Mr. Average.
The last step above is really an extension, a depth extension of all the other steps you'll be working through.
When appropriate we'll also look at differences between male and female features. I'm also assuming that if you're jumping in here at the third in-depth lesson you have a pretty firm grasp of the basics of drawing. Of course, it's just fine if you're just browsing - just don't let yourself feel intimidated or discouraged if something sounds a little complex. It's all within your grasp.
(See the foundation lessons if you haven't made your way through them. At least make a note to your self, promise yourself you'll work your way through them soon. If you're stuck on how to construct a feature - like ears, eyes, nose, teeth, lips - click on those features on the portrait above and you'll be immediately transported to the those sections of the book.)
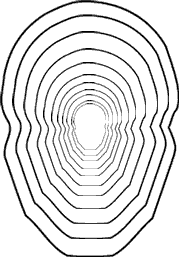
The overall shape of the face and head
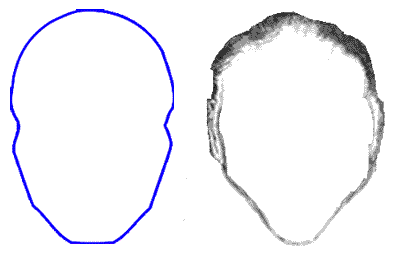
On the left in the illustration just below you'll see outlined in blue a rough configuration of Mr. Average. When you look at this picture look long and hard at the blue outline first. Run your eyes around it's border. Go all the way around it. Start at the middle of the top of the head - right at the top of it's arch, go around down to the small indentation of the cheekbone, down to the angle of the jaw, down to the square bottomed chin, then back up the other side, past the other cheekbone, right back to the top of the head. Follow every little increment of that line all the way around - just like you did way back in the Pure Contour section. Use your finger or a pencil and trace your way around it right on the screen.
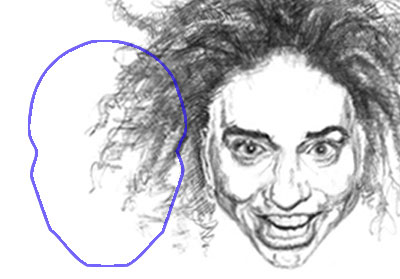
Mr. Average outline on the left, Ani on the right
A little conditioning
Had a chance to look at it? Great. Now read the next two paragraphs. We're going to do something a little new: we're going to try and "burn" this picture, the blue outline, into our heads, into our visual memories. Normally, when you draw you want to reference nothing except the pure sensory data that's coming in through your eyes seeing only the object as it exists in the world in front of you. This exercise goes a little bit against the Drawing on the Right side of the Brain premise - maybe through it is closer to what you'll be doing here. Here's the exercise:
Exercise: Step one
(Back
to top)
Take a mental step back from the picture (above). Far
enough so you see the Mr. Average outline shape as
a whole. See it - the whole outlined-in-blue shape in your brain.
Close your eyes and try to see it. Open your eyes. Stare at it, perceive it
again as
a whole. Now close your eyes. See it. Open and look again. Close your eyes again. With
your eyes closed "perceive" it in your mind's eye. Open your eyes,
look at it again. Perceive it. Now "image" it, that is
re-project it right from your mind on to the canvas of your eyelids. Starting
to see it? Starting to see the Mr. Average shape?
Step two
With your eyes closed work your way around the outline - with your eyes closed mind you - just like you did at the very beginning of this exercise but then your eyes were open). Start right at the top. Work your way down the arch of the top of the head, right into the little notch by the eyes, down the cheek bone to the jaw, then the chin and then the reverse of all that as you start your way up the opposite side right back to the starting point at the top. All with your eyes closed! Is this fun or what?
Repetition
Repeat the process two or three more times. Do this until you start seeing the blue outline without even working at it. Open and close your eyes in rapid succession as you direct your attention on the illustration below. Starting to show up a little? Ok, great! Awesome job. Not working? Not to worry, if you see it often enough, and you keep trying this exercise, it'll come to you. Let's isolate Mr. Average:
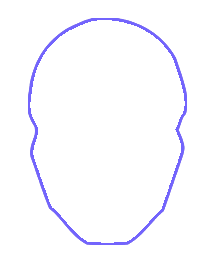
The Mr. Average Outline
(go to "Are you back?")
Developing X-ray vision
(Back
to top)
At this stage of drawing, you're learning how to see beyond just what's in front of you. Even if it isn't clear what you're doing you're learning to overlay and even infuse a subject with structure that isn't immediately apparent. Here's the idea: If you don't know something is there, you might not see it. Let me say that a little differently. Knowing something is there allows you to see what you might have missed before. So in the same way learning deep anatomy helps you understand shadows and contours and the shapes of the body and face without directly seeing what lies underneath, internalizing certain templates gives you a different kind of comparative foundation to work from.
And again, that's what we're attempting to do here: burn a picture into your brain. Once it's burned into your brain (the way the old masters memorized anatomy), you'll develop a "feel", an intuitive feel for shapes and proportions in the face. If you've worked your way through all the sections up to this point you now have a firm foundation in the basics. You're ready for this ;-) Here we go again.
Make it huge, make it tiny!
Next step: Stretching your imagination
Stretch this shape - the Mr. Average outline. In your mind stretch it again. With your eyes closed see it huge! Blow it up until it's filling the whole sky of your imagination. See it up there? Making a 747 look like a gnat? Huge!! Great. Now shrink it down to fit into the palm of your hand. That's right make it super tiny. Super duper tiny. Down to the size of an ant's fingernail. Got it? Now blow it up huge! Make it monstrous in your brain. Huge huge, huge! Now make it tiny. Super tiny. Like the guy who used to fall into the "Time Tunnel" (an old TV show) shrink it out of site.
Speed up the process now. Make it normal size, then huge, then tiny, normal, huge, tiny, normal, gigantrious, miniscule, humongolous, normal, the size of a mouse, the size of the Goodyear blimp, ant-sized. Now stop. Open your eyes. Look at the picture screen. Do you have the feeling it's getting familiar looking? I don't know about you but that little exercise was fun! I know, a little different but fun!

Now before you scroll down one more pixel, go back to the picture above. Look at the blue outline one more time. Picture it in your brain, then ....drum roll please, in your brain picture it, that is imagine it, "image it" laying transparently right over Ani's face. Have you done it? Proceed to "Are you back?" (it's just below ), after you complete this.
Stop -
Go no farther until you've at least toyed
with the exercise above!
Are you back?
(Back
to top)
Tell the truth. You did the exercise,
right? Scouts honor? Ok, good. Now, after all this conditioning and
visualizing, you should have the very beginnings of a "Mr.
Average" outline burned into your brain.
Want to know something interesting? This "Average head" guy is already in you! How do I know this? Have you ever looked at a person and said to yourself "Look at that hairdo!" or "Look at the size of that poor person's nose" - "there's a very unusual chin", etc. That's in the extreme cases. (And when I find myself saying something like that I always try to remind myself all these people - all shapes, sizes, colors and proportions, they're all God's creations.)
Now back down a little and think about this: even when observing people with fairly normally proportioned features you're able to differentiate large from small, wide from narrow, round from square - without giving it any conscious thought. True? I look in the mirror and I think "bigger than average nose, slightly smaller than average chin, thick mustache". You might look in the mirror and size your own features up - consciously or subconsciously. Point is you already do it.
|
|
What's new is we're putting actual visual parameters (the blue outline), on the so-called "average" dimensions and bringing them up to a place in our conscious minds where we can use them for comparing and contrasting. That's the idea anyway. (That's what all this visualizing and opening and closing your eyes was about above.) Is this absolute? No. Of course not. As you look at more and more faces from this dimensionalized or comparative perspective, you'll start seeing your own Mr. Average - he'll change subtly to fit your own experience. Once internalized, he'll disappear again altogether. You won't even give him/her a second thought. You'll just "know" how someone compares. (Back to top)

Perfect Pitch In music there's a talent a lucky few have. It's called "perfect pitch". That's where people can hear a note and tell exactly what note it is without benefit of comparing it to a note played on a piano or pitch pipe. Or they can start off a song exactly in key without hearing any reference notes to sing it against or without hearing the band play the chords to it first. People without a natural built-in perfect pitch can, with practice, learn to get pretty dang close to the right note in the same situations. Analogously that's what we're shooting for here: building an instinct through repetition. Is there an analogous gift in drawing? Like perfect proportion? Good question. I don't know - but with practice you can get pretty darn close! |
Applying the average outline to Ms. DiFranco
Ok, now that you've done the little exercise above, it's time to make the next step, and that's this: apply the Mr. Average outline to Ani DiFranco. Before we apply the template to her face, what do you perceive about the overall shape of her face compared to what you know about Mr. Average? Here's Ani again. Imagine the Mr. Average outline over her face:
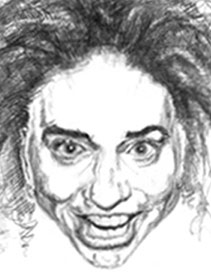
Ani by herself
And here's Ani after we paste the Mr. Average outline over her face:
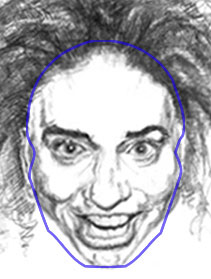
Pasting on the Mr. Average outline
Gives her a slightly bearded look, doesn't it? (For some strange reason this picture also makes me think of Fidel Castro. Don't ask me why.) Did you get the same results when you were imagining Mr. Average's outline placed over her face? Don't worry if it didn't work. Try and answer this more important question: did you perceive Ani as being a little narrower than Mr. Average in the lower half of her face? (like around the chin and jaw - from the nose on down?) If yes, you're on the right track.
So that's observation number one: Mr. Average is slightly light bulb to oval shaped and Ani is a more extreme version of that. (The big hair is probably the most obvious feature, but we haven't even got into that yet.)
A rough comparison of facial outlines
Moving on to the next perceptual tool
The next step is to start lining up the features. Even if it's at first difficult to get a "gestalt" about what makes a person's face unique, your first back-up plan is to take the next methodical step:
get a rough idea about the placement of the features.
The first step after perceiving the overall shape of the head and hair is applying or seeking out the horizontal landmarks of the face. The next step would be working your way through the vertical landmarks; fourthly, you'll be zeroing in on the actual features; and fifth you'll be building on your three-d skills. Articulating shadows and highlights, deciphering their unique shapes and their interplay on the face - this is how the illusion of three dimensions reveals itself on two dimensional paper.
The Horizontal Landmarks - Review (For an in-depth
study of all the facial landmarks, see Lesson
14)
(Back
to top)
Like you've seen in the last two in-depth studies, here's a quick review of the horizontal landmarks. If this seems a little repetitious, it is. All art is. That's why anything you call art is a discipline: repetition teaches you the rules you eventually learn so well you can catapult off them and make your own stunning discoveries. So take a second and reacquaint yourself with the horizontal landmarks.
The horizontal landmarks of the front view
| [Note: as complicated as what you're about to read will sound, work your way through it. It's important you get this - at least aim to understand it as you go through it.] |
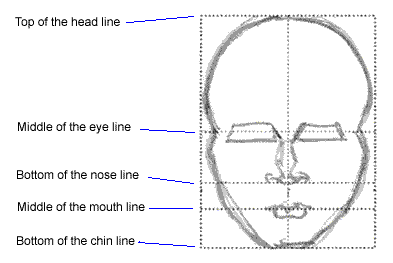
Top of the head line - the Top of the head line marks the top of the head. OK, no new information there. In relation to the other horizontal landmarks of the face, the distance between the top of the head and the middle of the eye line fills the volume of the upper half of the head. Said a little differently, half the surface area of the face is contained between the middle of the eye line and the top of the head line. Is that any clearer? See Lesson 14 , and in particular, Part II of Lesson 14 for the in-depth explanation. The hair usually obscures a good part of this area. (I think of old pictures of the Beatles with hair spilling down to their noses like a crew of sheep dogs as an extreme example.)
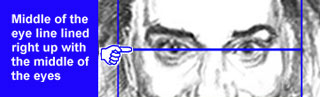
Middle of eye line
Middle of the eye line - Just as it says, this lines runs through the middle of the eyes, thus the "middle of the eye line". The face is divided equally above and below this line and thus the middle of the eye line is also the horizontal center of the face. Widths of the face will vary as you travel up and down the face and the sheer mass of a certain part of the face will distort this rule (illusory as that is). But very simply put, the middle of the eye line divides the upper half of the front view of the face from the lower half.
![]()
Bottom of nose line
Bottom of the nose line - In the first part of Lesson 14 the bottom of the nose line was set at half the distance between the middle of the eye line and the bottom of the chin line (or three fourths the distance down the face - assuming you started at the top of the head). This was for simplicity's sake. The actual placement of the bottom of the nose line is adjusted upwards towards the eyes to a point two fifth's the distance down the face. ( That is, two fifths the distance down between the middle of the eye line and the bottom of the chin line.)
The actual bottom of the nose line touches the lowest part of the nose on the face: if the tip of the nose is the lowest part, that's where you place this line. If you're caricaturing Miss Piggy (who's all nostrils), then you place the bottom of the nose line at the lowest part of the nostril.) The bottom of the nose line turns into the bottom of the ear line in the profile of Mr. Average.
![]()
Middle of mouth line
Middle of the mouth line - the placement of this next marker, the middle of the mouth line, is still based on the original proportions you saw in Lesson 14. And that was this: the bottom of the nose line originally divided the lower half of the face in half again. That remaining lower half of the lower half of the face is divided still again into thirds. The middle of the mouth line falls on the line of the first third; the top of the chin on the line of the second third; the bottom of the chin the full distance down - or at the bottom of the chin line (which is really the bottom margin of the face).
![]()
Bottom of chin line
Yes, I know it seems complicated but work your way through Part II, of Lesson 14 if you're having trouble with this. Once you get it, it'll always come right back to you.
Applying the
horizontal landmarks
(Back
to top)
So those are the
major horizontal landmarks, the "get your bearings" foot-in-the- door,
start'er up lines we'll begin with. I say "starter" and
"major" lines because in the course of drawing an actual face
(or drawing anything for that matter), you make hundreds of checks back and forth across the picture, going side to
side, left to right, looking for symmetry, asymmetry, comparing and
contrasting for example, the left infra-orbital fold with the right, the angle of
the left nostril to that on the right, the highest crease of the dimple on
the left with the dimple on the right, the little wrinkle of skin on the
right corner of the mouth with that on the left and on and on. Sometimes
it's easy to get too close, too microscopic. That's when you need to take
a step back and look at the bigger picture. The major landmarks/guides
give you
that perspective.
Note about this particular sketch of Ms. DiFranco
There's one thing to note in the drawing we're using of Ms. DiFranco. Note the placement of the ears. Note in particular the bottom of the ears. In a picture where you're looking eye-to-eye with your subject, the bottom of the ears line up quite regularly with the bottom of the nose line. So what does this tell you? Correct, the picture is oriented with the face rotated down just a little. If we were looking from the side, i.e. in profile, you'd see the frontal plane of the face was angled just a tad downward towards the floor.
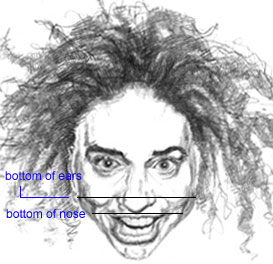
Noting the rotation of the face by
observing the bottom the ears
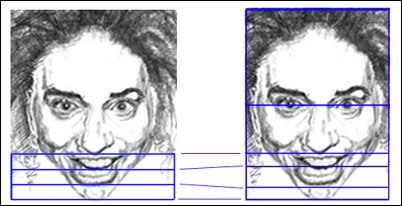
What's the implication of this? By rotating the face downward everything will be lowered even more into the lower half of the face. That's something to put into our back pocket list when we get around to doing the actual exaggerations. It's an interesting aside though: some people's uniqueness can be more readily identified and exaggerated by changing the perspective or orientation of the face. That being said, let's start slapping on the horizontal landmarks - and these are the horizontal landmarks as they would appear on Mr. Average. And we'll impose them using a format (remember the format? The framework within which we want to work? The blue rectangle that contains all the other blue lines is the format in this picture):
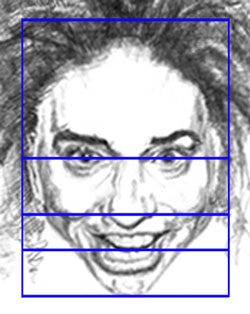
Overlaying a format with
the horizontal landmarks
There's the five horizontal landmarks. They're just stripped from old "Average face" (don't forget to count the top of the head and the bottom of chin lines) :
Who is this guy?
Looking at how the Ani's features align with the horizontal landmarks, what can you say? That is, how do they compare? Run through each line and articulate in words what you see. Then go on. Here's my version of that:
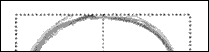
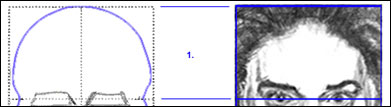
1) The top of the head line is hid up in the hair somewhere but it's pretty easy to say there's plenty of the top of her head left that's buried out of sight . Even though it's not shown here try to remember. It's very easy to forget there's so much left of the head above the eyes.
2) The middle of the eye line is set right through the middle of her eyes. For me, this is the easiest place to start - you usually look at person's face by looking into their eyes first - even if it's just for a second.
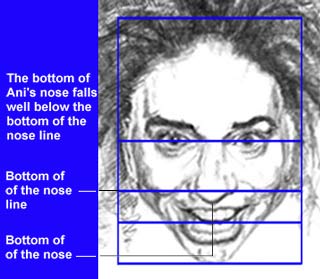
3) The Mr. Average bottom of the nose line lies well above the bottom of Ani's nose wouldn't you say? (So right away we can note that - her nose is a little longer than average.) That doesn't tell us much about the other dimensions of the nose - it's width, the proportions of the different wedges, the nostrils, etc. But we'll leave that for later.
4) The middle of the mouth line falls right on the lower border of the upper teeth. When you smile, the muscles of the face (like the buccinator, the zygomaticus, and risorius, etc.), draw the lips apart and back across the teeth exposing them.
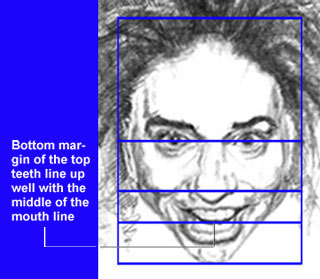
Taking a reading on the Middle of the Mouth Line
How do lips and teeth normally align?
The lips line up pretty well with the teeth when they're relaxed with the mouth closed: the upper teeth with the upper lip, the lower teeth with the lower lip. So you can say the lower margin of the teeth of the upper jaw (the maxillary set), roughly align with the lower margin of the upper lip. (You don't have to memorize this. Just the act of reading it builds a an awareness at some level in your brain.)
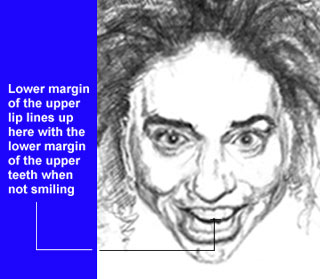
Upper lip and upper teeth will line up
To make a long story short, the lips line up with the teeth. We can say then the middle of Ani's mouth lines up well the middle of the mouth line. Kapeche? (That's that Italian word "kapeesh"... but I don't know how to spell it.)
5) The bottom of the chin, just like you saw in the Hefner study, lines up just right with the bottom of the chin line. Of course, that's from me sizing up Mr. Average and Ani in Photoshop. They're in a 1:1 proportion between the eyes and the chin - they're that way by design.
A snag in the system?
But that brings us to a slight conundrum here. We know Ani's chin narrows and it looks pretty small and cute there nestled under her full lower lip, yet the bottom of the chin line lines right up with the bottom of Ani's chin. What's up with that? Can you figure out the problem? (Do you perceive the problem? It may not seem like any biggie right now, but when we're looking for things to exaggerate in a face, we need to look for subtlety - especially if the person has a face with features that are very "average" .)
Here's the problem
The problem: Why is it that when compared to Mr. Average's chin,
Ani's looks so small and quaint yet when aligned with Mr.
Average they line up so perfectly? Hmm. What's going on here? Let me
see if I can't reason this out. I was stuck on this myself for couple minutes too.
| Please bear with me here - this might seem unimportant, but I think it's important - a method is being proposed here and it should be consistent within itself. If it only works when it's convenient, it's not really helping us any. So, get a soda or a coffee if you like and stretch a little before you sit down and try to muscle through this. |
A little left brain logic: running through facial proportions one more time
(Back
to top)
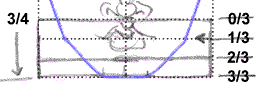
The middle of the mouth line starts on the first third of the lowest fourth of the face (Remember, in the old way of dividing the face we set the bottom of the nose line at the half way mark between the middle of the eye line and the bottom of the chin line. Then we divided that segment (from the bottom of the nose line to the bottom of the chin line) into thirds thus leaving the middle of the mouth line at the line marking off the first third and the top of the chin at the second third. (The top of the chin line lines up on the second third line - the 2/3 line you'll see in a second.)
Again, Ani fits just fine into all of this - but the problem is she looks like she shouldn't and I can't account for why not - not yet anyway. I want to be able to account for the gap in my little theory. Yes there's more to sizing up a face than just drawing horizontal lines across it. Yes, the thickness of the lines we draw can account for inaccuracies (on both the subject and on the "Mr. Average" model). Yes, the uniqueness of your subject's features plays a huge role. But without sticking any of our "theory" on her picture, doesn't it look like she's just got a lot features tucked in tight below her lower lip? That is, she has a relatively small chin, right? And if so, it ought to show up in our "Mr. Average" grid. Ok, am I getting ridiculous here? (Back to top)
Before you go any farther, work your way through the next peach colored box to make sure you understand graphically these divisions below the nose we're talking about. Look at the peach-tone box to get a picture of all this:
|
Revisiting the divided-up Front View of the face
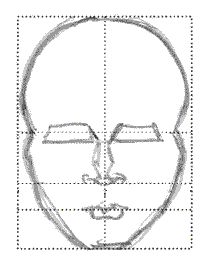
Understanding the front view facial divisions Just for fun we're going to break the front view into four quarters. Reading down the left side of Mr. Average: On the left side of the illustration you see "Total Head". The size of the Total Head is equal to 1 and we're going to break it up into four divisions:
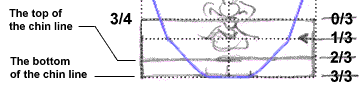
Why hang on to this old remnant? (That is, why hang on to the old bottom of the nose line?) Because the Mr. Average face splits up very nicely into thirds between the old bottom of the nose line (at the 3/4 marker) and the bottom of the chin line...and it's easy to remember.
So let's look at the divisions of the last fourth of the face, the bottom fourth of the face - that is, everything between the 3/4 marker and the bottom of the chin line. We'll focus now on the markers at the bottom right of the picture. (Hang with me folks, you're going to get this! :-)
If you'd like to print out just this peach colored box, click here for a duplicate page of this box - then print that out. (Back to top)
|

Subtle differences in faces
It's a truism that the dimensions, the
distribution of the features of the face, differ little from person
to person. Still the entire variety of human faces the world
over fits within those narrow parameters. Said a little differently,
the combination of all those little variances between features makes for a huge visual
vocabulary.
Back to our subject
So for all the obvious difference in appearance between Ani and Mr. Average, it just wasn't accounted for by the horizontal landmarks. In particular, the parts of her face below the nose just weren't jiving with what the Mr. Average comparison and our own common sense was telling us. Until I realized this:
Her mouth is open! Duh...
Ani is smiling and her teeth are apart. It only follows: the tooth bone is connected to the jaw bone, and the jaw bone's connected to the head bone. And the whole head bone looks longer or shorter depending on how far open the jaw bone is. That's the crux of the issue.
Her teeth are apart and that means her mouth is open and and so her lower jaw must be lower than it would be if her mouth was closed. Therefore, her jaw, lower teeth, lower lip, and the top and bottom of the chin lines will be lower too! Is that a "duh" thing or what? Imagine Ani's mouth closed and it's very easy to imagine a gap between the bottom of the chin line and the bottom of Ani's actual chin. Awe heck I knew this the whole time. And if you followed that whole thing, you have immense stamina and I salute you! (Whew, got our theory out trouble there :-)
Dividing up the face below the nose
Check out this next illustration. We've taken the lower
three divisions of the face below the nose from Mr. Average and we've
pasted them over both Mr. Average's and Ani's face (even though Ani got
cut off a little). Then we lined them
both up side by side. (The top and bottom of the chin lines are
indexed there too.)

Slicing up the bottom fourth of the face again
I know, groan, you thought you got through this stuff. "This guy is relentless" I hear you saying. But suffer with me just a little longer here. These three divisions are split up essentially into three rectangles like this:
-
the top rectangle is bordered by the bottom of the nose line on top and the middle of the mouth line on the bottom. It contains the nasal philtrum, the apron of the upper lip, and the upper lip.
-
The second or middle rectangle is bordered above by the middle of the mouth line and on the bottom by the top of the chin line. In it are contained the lower lip, the shadow under the lower lip and part of the cheek and jaw.
-
Lastly the bottom most rectangle is demarcated on top by the top of the chin line and on the bottom by the bottom of the chin line. The chin is contained in it's entirety here.
Now lets apply these "thirds" rectangles, this
grid, to just Ani's face. (Remember, this little grid shape is the
Mr. Average grid and has been
shrunk proportionately.)
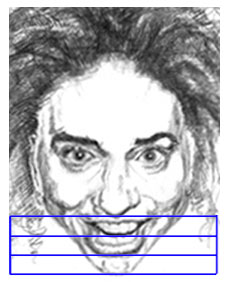
The three divisions of the bottom 1/4th
of the Average face shrunk to fit
under Ani's nose
When it comes time to draw Ani recall that we already saw above that Ani's bottom of the nose line falls well below the Mr. Average bottom of the nose line. Proportionately this whole space and it's features must be adjusted. So a few of those features below that line, below the middle of the nose line, can be exaggerated in that direction. For instance the chin will be made smaller - it needs to fit into a smaller area. And it's obvious the lower lip is going to be relatively large. Those are exaggeration hints we got by comparing her to the horizontal landmarks of Mr. Average.
| Remember, we're caricaturing - but
these are the exact same steps you'd go through if you were
drawing a realistic version of Ani. In fact, is easy to lose sight
of what we're trying to accomplish here.
And what's that? It's this: figure out a consistent way to compare and contrast everybody's face until you've developed your own method. Mr. Average is the model we compare everybody to. Another way to think of it is this: by trying to force every face fit the Mr. Average's dimensions, we learn to see where they don't. Does that kind of make sense? |
Really fine tuning your powers of observation
(Back
to top)
In the next illustration you can see these three horizontal lines again - the bottom of the nose line, the middle of the mouth line and the top of the chin line - except this time they're aligned with Ani's actual features. We're also going to get more accurate: we're going to thin the lines down so we don't hide parts of the lip and chin. Then you'll see where there's a true difference in proportion. (Remember, these three spaces are spaced equally on Mr. Average and thus, so are his features):
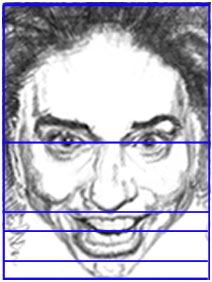
Adjusting the middle of the mouth line
and the top and bottom of the
chin lines to fit Ani
So how's all this different from Mr. Average? Well it's subtle, but 1) in Ani the middle of the mouth line (which also lines up with the lower margin of the upper teeth), gets pushed up.
2) Secondly, the top of the chin line (a line we haven't said a whole bunch about - except that it falls two thirds the way down the distance between the old bottom of the nose line and the bottom of the chin line), gets pushed down compared to Mr. Average.
Even if we adjust these lines for a closed mouth you can imagine that Ani has certain proportions that will be uniquely different from Mr. Average. What are those differences? Let's get down and dirty and find out.
| (How to adjust for a closed mouth? Hint: you can by lining up the middle of the mouth line with top margin of the lower teeth or the bottom margin of the upper teeth (because that's approximately where the middle of the mouth line will fall with the mouth closed. I say "approximately" because if you want to get really nit picky, most people have a slight overlap of upper and lower teeth.) |
Getting down and dirty - and gathering up the threads
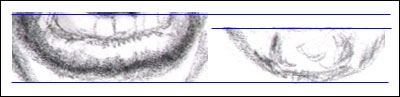
The main features of the face in this small area - the bottom two thirds of of this lowest fourth of the face - are the teeth, lips, chin and jaw, right? These are found in the space between the middle of the mouth line and the bottom of the chin line. Right? (Click to review those sections above - hit your browsers "back" button to come right back down to here.)
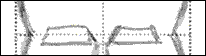
What lies between the middle of the mouth line and the top of the chin line? On Ani it's the lower teeth (those in the lower jaw), and the lower lip. I've isolated that much on the left in the picture below.
What fits between the top of the chin line and the bottom of the chin line? The chin, obvious enough right? (And maybe some peach fuzz.) . You can see that on the right side of this next illustration: .
You can see in illustration these two areas are compared side by side. (On the left side of the illustration you can see what's found between the middle of the mouth line and the top of the chin line. On the right side of the illustration you can see what's between the top and bottom of the chin lines. |
Back to Mr. Average
(Back
to top)
On the Mr. Average model these areas should be the same height - the area
between the blue lines. (Remember we made all that noise above about
the blue grid's rectangles being proportionate?) But in Ani they're
not. And now we have visual proof that in this lowest fourth of the face
the height of lower lip/lower teeth (which fit between the middle
of the mouth line and the top of the chin line) are proportionally much
larger
then the height of the chin (the area between the top of the chin line
and the bottom of the chin line).
I know, you can just look and see this - or can you? (The rhetorical "you".) I can't always tell right away what it is when I look at a face what makes it unique. The mind subconsciously grabs onto things in another person's face in order to recognize them. Discovering consciously what those are, that's the trick.
So let's compare the two grids we've made so far. The first one, the one on the left in the next illustration, is Ani with the Mr. Average grid pasted over her. It shows three proportionate divisions within the overall blue rectangle. Those divisions, for the umpteenth time, are marked off by the bottom of the nose line, the middle of the mouth line, the top of the chin line and the bottom of the chin line.
The right side of the illustration shows Ani with the middle of the mouth line and the and the top of the chin line adjusted to reflect accurately where those parts of Ani's anatomy really do start and end. The blue lines between the pictures show where the proportions differ (you saw a hint of this above):
Seeing Ani's unique proportions:
lining up the guides accurately
|
Again, why all the fuss? I know, you're probably wondering why all this splitting of hairs to show the obvious. In college or high school or your professional school I'm sure you remember getting those summary lists that were supposed to make those really complicated subjects simple - gleaned right down to the bare detail. People would pay good money for them. Only problem is though, if you didn't have a good feel for the subject matter to begin with, the cheat notes made little sense. So that's the real reason: seeing the "cheat note" version of this will be much clearer, you'll have a much better grasp of it after work your way through in long hand. You may not even need the cheat notes! Another way to look at this: In this section of the book where you're reading your way through the in-depth explanations, think of these as a sort of verbal and pictorial data dump into your brain. As you work through the explanations you're building and organizing all of this at different levels of your brain - both left and right. You'll be building still another leg into your understanding both consciously and unconsciously. Repetition strengthens those connections. Then, when you get to the "Flash" sections (coming soon), you'll have the understanding - the legs to stand on - already in place to make sense of the purely visual rehearsal you'll get there. If the "Flash" exercises don't make sense, you'll probably find yourself right back here - they build where these leave off. (Back to top) |
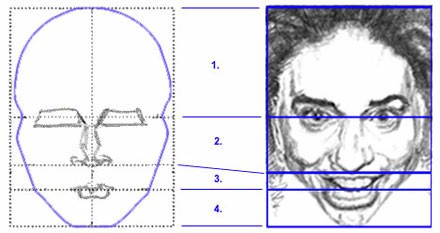
Here's what we've been shooting for now for some time: making a direct comparison we can understand - comparing the horizontal landmarks of Mr. Average (with the adjusted bottom of the nose line), with those of Ms. DiFranco. Also note the lines and the numbered spaces: they're different entities.
| Going way back
in time: Reviewing subtle shifts of perspective
Now this might seem like a subtle and simple distinction but note how it feels in your brain - note the shift of perspective when you view these guides as five distinct lines and then as four distinct spaces. Feel that shift? Just like when you change your focus from the cheese and the holes in the cheese. Is either more real? That's a shift in your perspective and it's a skill we're shooting to install within you. I know this is review, but it's important - if you feel a little confused it's the same confusion you felt when you looked at the vase-face phenomenon in Lesson One or you felt in in the section on positive forms and negative space. (Lesson Six)
|

Let's go through these section by section:
Space "1" is the space between the top of the head line and the middle of the eye line. Note how similar in proportion it is between the two.
Comparing space one
Space "2" is the space between the middle of the eye line and the bottom of the nose line. Things stretch a little between the middle of the eye line and the bottom of the nose line - Ani has a long nose.

Comparing space two
This is the key horizontal area in
Ani's face that sets up her up for exaggeration: it's taller - the length
of the nose is the feature we're pinning this proportion on. (Will we use
it? We'll see. Also notice what other facial features fall in this
area....e.g. the cheeks and the dimples to name two.)
Space "3" is the space between the bottom of the nose line and the middle of the mouth line. Since the nose pushes space "2" into space "3", and space 3's lower boundary, the middle of the mouth line remains in the same place compared to Mr. Average, this area has to be shrunk - it gets "schmooshed" down - and you can see that happen in space three. So this is the second area ripe for exaggeration :
![]()
Comparing space three
In fact when we looked really close, we saw the middle
of the mouth line was actually raised a little and so narrowing space
three even more. we looked at this using the old bottom
of the nose line - which is lower than the adjusted bottom of the
nose line:

Space three narrows still more - can you find it?
And lastly space "4". As you can see it's pretty proportionate
compared to Mr. Average. But we also know this
space is actually smaller in reality because Ani's mouth is open.
(You remember all that Mickey Mousing around above don't you?)
That makes a difference when we compare Ani to Mr. Average because Mr.
Average's mouth is closed. We don't want to count the space
between her upper and lower teeth as part of our comparison. That was just
a way to make sure our little theory has at least some validity.
![]()
Comparing space four
An open and closed case
You can also say we learned this: whether someone's mouth is open or not any one moment in time that in either case it'll influence the proportions of the face you're viewing. (Talk about a "duh" discovery!) But it did teach us to look closely...right? Back me up on this :-)
Directly related to that we took a run through some real tedious verbal
gymnastics until we "proved" that Ani has a small chin. You were
also introduced to the "top of the chin line". And in the next
picture, you can see again all the horizontal guides / landmarks below the
bottom of the nose line and how they're different between Ani and Mr.
Average.
Squeezing in and comparing vertical guides under the
nose
Lastly: The overall shape of the head
At the very last...
The last thing to recall - and you saw this right off the bat above - is a comparison of the overall outline of the front view of the head. (Can you imagine Madonna fitting right into the outline on the right?)
A rough comparison of facial outlines
So that's about it on the major horizontal landmarks. To really summarize the general differences we found between the two check out this table (the guide or landmark is on the left under Mr. Average; how the subject, Ani in this case, lines up is on the right):
|
Mr. Average |
Ani DiFranco |
| top of the head line | more or less line up |
| middle of the eye line | again, line up |
| bottom of the nose line | Ani's is lower |
| middle of the mouth line | the same or slightly raised |
| top of the chin line | definitely lower |
| bottom of the chin line | equal |
| Shape of the head - average! | sharply narrowed at the bottom |
|
Very
Lastly in this section here's |
| To see photos of Ani DiFranco on the Web: Welcome to AniDifranco.org http://corbis.altavista.com/referrals/ Don't forget about the Alta Vista Image finder - just go to the Alta Vista link and click on "images". Type in "Ani DiFranco" when you get there. http://www.altavista.com/ |
You're at part I
Go to Part II
Go to Part III
Go
to Part IV
Go
to Part V
Kasbohm & Company's
YouCanDraw.com
© Copyright, All rights reserved 1997
e-mail: jeffkaz@YouCanDraw