The Supply Store
Back to YouCan Draw.Com
Lesson 1 |
Stop!
I'm assuming you've done the Pre-instruction drawings? Good! If not, I highly recommend you go back and do them. Go on, they won't be that bad. You need to applaud yourself for trying to learn a new skill! This is a time you can suspend criticism.
You're a beginner! So it's time to pat yourself on the back, not criticize.
You're a beginner, and like the old Zen saying, the only way to learn anything new, is to adopt the beginners playful, open attitude. All that critical talk going on in your head, that's the judgmental, reasoning left hemisphere exercising it's dominance in yet one more area of your life.
So go now, if you haven't, and finish the pre-instruction drawings. That'll only take an hour or so of your time, we won't look at them again until you're done with the foundation lessons. And when you go back to these pre-instruction drawings in 10 or 12 weeks, you'll be amazed at the progress you'll have made in such a short time! We're not going anywhere, we'll be here when you come back.
See your drawings on the World Wide Web!
Of course, if you don't have a record, you might miss out on seeing your leap in skills. Besides, I think when you see the progress you've made, you'll be inspired to keep right on going. AND, if you're willing to send them to me (or a decent copy of them), I'll publish them on the internet for the whole world to see!
Introduction: Getting your foot in the door; Shifting from Left brain to Right brain. |
This is an exciting first step: learning to recognize the shift from the dominant verbal, linear, time-aware left brain, to the intuitive, global, non-linear, artistic right brain. In this exercise you'll experience first hand what it feels like to make the shift from "L"-mode to "R"-mode. Bit by bit you'll become familiar with what if feels like and you'll learn to make that shift at will: shifting to see as an artist sees.
So, the benefits of this lesson are:
1) Going out of your mind...your thinking mind that is, and learning to access your spatial, direct sense oriented right mind. In a word, you'll be taking the first steps at seeing as an artist.
You'll find yourself describing the experience of drawing like this: "I felt so close to the work and got so into it I had no idea an hour had passed"..."I knew people were talking, but it was like I didn't hear them, they just kind of faded out"..."calm intensity"..."When I finished I just stared at my creation the way a mother looks at her child". These are all ways artists and students describe the state of mind they felt in when they were drawing.
2) Getting familiar with "shifting" to R-mode. And you'll accomplish that shift by doing simple tasks that allow you to shift and experience the shift to "r-mode". No one can really say when or how you make that shift, but in retrospect you will know. (Much like the way you never know the exact moment you fall asleep, but afterwards, you know you were asleep.)
3) Getting good at "shifting" to R-mode. You'll build an awareness of those shifts and learn to set things up so you can learn to access R-mode at will. Your brain won't have to be "tricked" into accessing R-mode. (Don't worry about this today)
Research has proven beyond a doubt that drawing something you see out there in the world is a right hemisphere function. (Or at least a mostly right hemisphere function.) What artist's have done is stumbled upon or learned to access that hemisphere on their own.
So in learning to draw, we just need things set up so we can bypass the domineering, critical, rational, language-centered left brain: the one we're using 90 to 95 % of our waking days. It's a simple but effective general approach:
present the dominant left hemisphere of the brain with a task it finds either too complicated or boring, and so it "shuts down", thus allowing the non-dominant right hemisphere to take over. |
The right brain has evolved to perform theses kinds of tasks - drawing, spatial reckoning, musical appreciation - even if our decades of education and most of our communication skills have all but exiled its unique perspective. Since the left brain has become so dominant and "all-knowing", we've got to find ways to get around it to allow the r-mode a chance to do what it's good at.
Note about terminology: There's a "location controversy" in neurophysiology. Since the exact locations of specific brain functions vary from person to person, and parts of the language faculty can reside in one or both or parts of both hemispheres, it becomes a little confusing calling the intuitive brain functions (what I've been calling "right brained" previously, ) just Right-Brained stuff. So, for simplicities sake, I'm adopting Dr Betty Edwards convention of using "L"-mode when we refer to the dominant side - for the functions of the brain centered around language, rationality, linear thinking, time awareness; and "R"-mode for the intuitive, perceptual brain we're learning to access here in these lessons. language and "R"-mode.
Ok, on with Lesson 1 |
An Exercise for Both Sides of Your Brain.
In this lesson: my goal is to get you aware of the shift between left and right brains. (Or as Dr. Betty Edwards would prefer to have it called, L-mode and R-mode.)
materials: paper, pencil, 40 -50 minutes.
When you draw something as an artist would, you are drawing it as you perceive it, as it exists there in the world without you or I making any judgments about what it ought to look like.
So here we go.
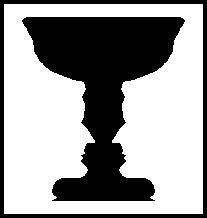
First, I'm sure you've seen the "vase-face" illusion before? We're going to do this first drawing doing your version of it. Look at the vase-face animation for an overview of the entire lesson. Then come back and read your way through the lesson. You might want to re-visit the animation more than once: it'll make more sense to you after you've tried it yourself.
Click for overview of Lesson I Animation
Before you draw, read all the
directions
for the whole exercise first
Step 1
Draw a profile of a human face on the left side of your paper. (If you're left handed, draw it on the right side of the page.) Draw the profile so the face points towards the middle of the paper. (That is so the nose is in the middle or close to the middle of the paper and the forehead and neck are heading towards the edges.) If you're right- handed this illustration is for you.( If you're left-handed click for a left-handed example.)
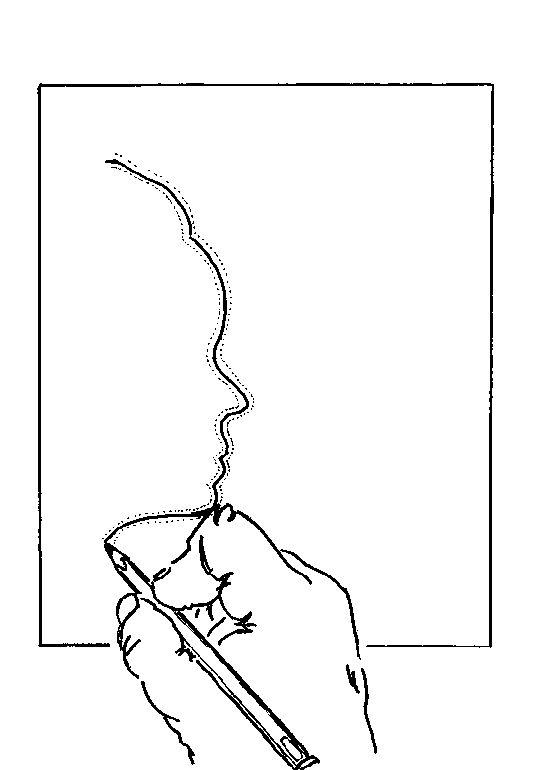
Draw a
profile of a face from memory
(Right hand example)
These are here to make the exercise clear, but you'll get the full effect of the exercise if you draw a face from memory. Why? Because it gets you to tap your own stored version of a face, that is, your symbol for a face. And that's an L-mode function. (It's alright if you want to print the half-done examples if you want to. You'll still experience the shift.)
Step 2
Draw the top and bottom of the vase by drawing horizontal lines at the top and bottom of the face. (From the forehead at the top, and from the neck at the bottom. See illustration.)
Draw
horizontal lines at the top and bottom of
the face (Left
hand example).
(Click For right hand version) (Go back to step 2 in lesson 2 - the monster face. Ignore this prompt if you're doing Lesson 1.) |
Step 3
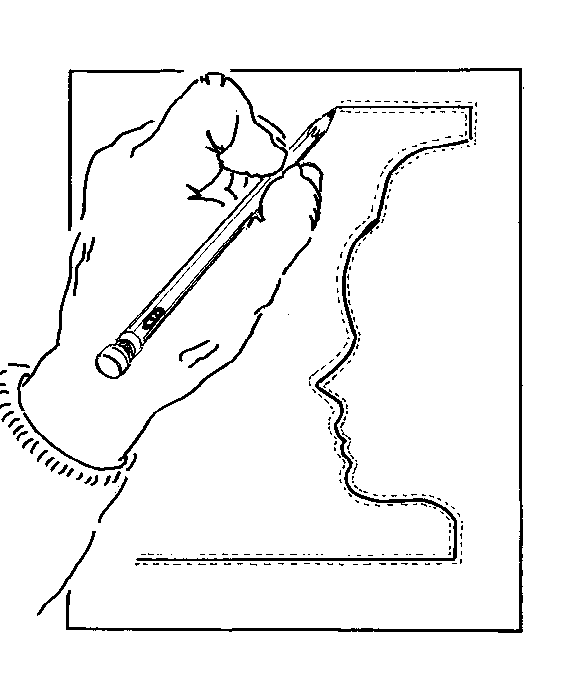
Using your voice, name all the parts of the face you've just drawn. Use your pencil as a pointer and point to the different features of the profile you've just drawn and name them out loud. Point to the forehead and say "forehead", point to the bridge of the nose and say "this is the bridge of the nose", do exactly the same for the nose, the upper lip, the lower lip, the chin, and the neck. Go back and do this step again and this time trace over the line as you name the parts. (No need to write the words on the picture as I've done - they're written to help make a point...but they won't hurt if do write them.)
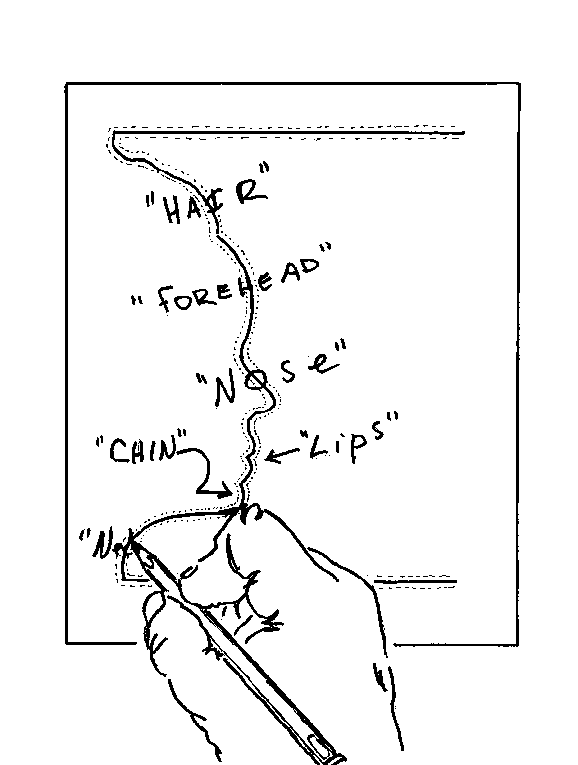
As you
trace the profile with your pencil, name the
features out
loud, that is use your voice
Go back and do this naming/tracing at least one more time. (You might start wearing the paper a little thin. That's ok - just make sure you're not drawing on any expensive furniture.)
Step 4
Here's the fun part. Draw the mirror image of the face. That is, copy the face you've just completed but do it in reverse. Start at the top of the drawing and work your way down. When you're done, you'll have a completed vase. Remember, a vase is symmetrical. (A clue)
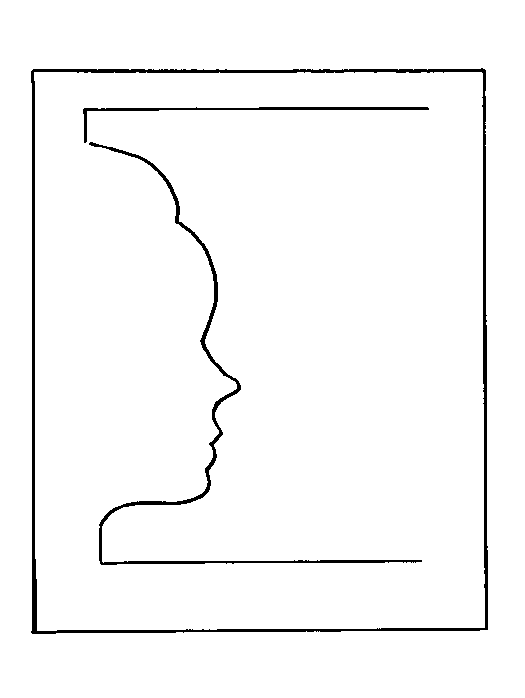
Now draw the mirror image of the face you've drawn
If You're pressed for time...
If you're really pressed for time and have a printer, download this picture (for right handers) and print it. If you're left handed, you want this version)
Little signals and hints from your brain
Be aware of little hints from your brain that it's doing some juggling: that it's shifting modes. It needs to get into it's visual, spatial processing state. Don't worry about how it does it, just be aware that it does. And it will.
When you began drawing the mirror image part of the profile, you might feel conflicted, maybe uneasy for a second. Again, just be aware that it's going on. This exercise is meant to get you aware of how it feels when your very own brain jumps into the artists mode of seeing. Observe how you figure out how to solve the drawing.
Drawing the mirror image profile will be different from the first profile you did. Why? Because you'll be drawing it from the R-mode of the brain. In Betty Edwards words "this is right-hemisphere mode drawing".
When you're done:
Now that
you're done with lesson one, take a moment to review what
you've done. At the start, did you draw the first face fairly rapidly without giving it much
thought? ("At the start" means that part of the exercise where
you traced the part of the vase-face that was already drawn -
which you named as you went - the same
as you traced and named the parts of the first profile in
step 3? That's fine. That's exactly how I wanted you to
do it.)
Why do that?
These
first three steps were designed to let the dominant left
hemisphere do what it does well: name and access symbols
from memory. This was the left hemisphere way of
processing. The act of naming called up that part of your brain that
uses language. Just the part we want to avoid when we draw. Why do
that? I'll explain below.
Did you feel any conflict or confusion?
In drawing the second profile, the mirror-image profile, (the one that made a vase out of the two faces) did you experience any of the conflict I predicted you might feel? Any confusion? You may have hit a wall somewhere around the first curves, like right around here:

Where did you start feeling a conflict? confused?
a
momentary paralysis? How'd you get past it?
How'd you get past it?
To get past this, what did you do? Did you find yourself scrambling for another way to approach the task? Some students say they had to picture the completed vase in their heads before they could "see" how to take the next step. Did you find yourself looking back and forth between the different parts of the face? Comparing, measuring sizes and distances, reckoning angles? If you finished the picture and it looked something like a symmetric vase, then you were doing it! You found a way to get past your thinking, language-driven brain and allowed your visual, in - the - moment, artist's brain to take over. Job well done!
The
point of this:
That your drawing looks like a vase, symmetric and all, is not the point here. If you found yourself making measurements and estimations, if you found yourself making statements like "this curve goes out like this, and the other one goes in the opposite direction over here like this, this line angles away in relation to that one going in", then you were in R-mode. Lots of students comment they entirely forgot they were drawing two faces. They were just caught up in going back and forth, comparing one section of line to its opposite section on the other side of the drawing.
If your picture did end
up looking like a vase, or the two halves resembled each other, then
you were there. You found it - you found your "R-mode". The
trick over the 9 lessons is to build that switching muscle so you can
access your "drawing brain" at will. Go through
the steps mentally how you drew it. What's the best way to do that?
Do more vase-face drawings :-) So make sure you do the homework below
before you move on. Now go for it!
Review the animation again: |
Homework
After you've taken your time drawing your first "vase-face", here's twenty something more for you to draw. Not to worry, you don't have to do them all right now - do four or five. Come back tomorrow and do four or five more. Fifteen to twenty five minutes four or five days a week is much more productive in the long run than trying to do all your drawing in 1 two-hour session. Small frequent sessions will take you to your goal.
The following pictures are arranged randomly for both left and right handed artists. It's great practice to learn to do these from both directions.
Three fourths done for you :-)
By the way, these have been drawn three-fourths finished. All you have to is print the copy and draw the mirror image face. Just make sure you've done at least one from start to finish the way the directions above instruct you to do them. Be aware of how you "resolve" the picture. That is, be aware of how you how you figure out to draw the mirror image.
Just click on the links and print them out - use the "back" button in the control bar above to get back to this page. Now have fun.
Twenty four practice pictures:
For more reinforcement, see this page: February 28th, 2003 and scroll down to "Lessons One and Two"
|
Preview of lesson 2 |
In lesson 2, we're going to do an extension of lesson number one, except we're going to make the object we're drawing, different enough from anything you're used to looking at. This will allow a deeper shift into R-mode, and that is the point of these lessons: learning to access the artist's point of view at will.
Kasbohm & Company's
YouCanDraw.com
© Copyright, All rights reserved 1997
e-mail: jeffkaz@YouCanDraw