
The Supply Store
Back to YouCan Draw.Com
Lesson 7 Introduction: Getting Acquainted with the Viewfinder and using it to recognize negative space. |
 |
In this lesson - really just an extension of Lesson 6 - you're going to learn about a great drawing aid: the viewfinder. You'll learn to make one yourself, and how to incorporate it in your drawings. And make sure you see the Flash Lessons in the Archives, the ones about the Picture Plane, Modified Contour and Negative Space |
What's a "viewfinder"?
| A viewfinder is anything that you use to limit and define what you're looking at. It allows you to "frame" your subjects the same way you "frame" objects and people when you look into a camera or a telescope or a video camera. You could even stretch the definition of "viewfinder" to a window in your home, it'll work if what you're drawing is the view out your window. It imposes a shape, a boundary around whatever you're viewing. |
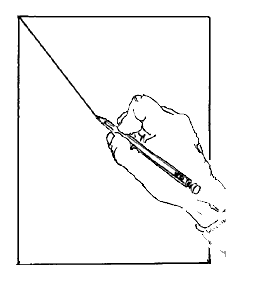
A magnifying glass imposes a round frame or format around anything you view through it |

Click here for an overview of Lesson 7: |
In this lesson, a "viewfinder" will just be a piece of cardboard or stiff paper with a rectangular opening cut in the middle. You'll look through that opening to "format" or frame what you'll be drawing (a chair for starters). You'll find that using the viewfinder will be a huge aid in narrowing down what you draw. It'll help you create - and thus recognize - negative space around your drawing subjects and in arranging your compositions. You'll be formatting and "picturing" anything you want to draw.
Back to formats
Why a viewfinder? In lesson 6 we talked about the necessity of a format: the shape of the area bounding the composition. Formats, you recall, are any shape. Most often they're rectangular in shape but can be triangular or round, etc. By learning to use a viewfinder, you'll learn to experiment with composition, finding many pleasing ways to view anything you desire drawing.
Can't remember what a "format" is?
In the first part of lesson 6, I had you looking at a chair and focusing on and recognizing its negative spaces. You may want to review that to make sure it's fresh in your mind. (See lesson 6, beginning with "How the Road runner...". If you go there, there'll be a link to come right back here.)
Part A: How to make your own viewfinder
Materials. You'll need:
An 8 &1/2" x 11" sheet of light cardboard, or heavy paper,
A ruler or something that you can use for a straight edge,
A scissors or X-acto knife,
and a pencil.
Since most of your drawings will be on rectangular paper, an 8 & 1/2" by 11" construction paper or cardboard will work fine for this.
An important point before you start
This next note is important. The viewfinder must mimic closely, hopefully exactly, the shape of the format. If they're not the same shape, you're drawing is going to get distorted. Why is this important? Here's an extreme example. Picture yourself looking through your rolled-up newspaper. You're looking at a plain old square through it. The format you've pre-drawn on your drawing paper is a perfect square. The shape around the square as you view it through the newspaper - the negative space - is bounded by a circle.
If you're trying to reproduce the negative space's shape inside the square format you've drawn, you'll be drawing a whole other shape - it'll entirely change your picture. I know, it's a "dah" example but it makes the point. Here's a more realistic example. If your format is square, and you're looking at your subject through a rectangular viewfinder, then the negative shape will be easier to reproduce here than in the circle example above - but it won't be nearly as accurate as the drawing you could draw if you drew it through a square viewfinder - one that matches your format.
I'll say it one more time. If you're going to be doing your drawing within a square format, your viewfinder should mimic that square: it should be square. If your format is rectangular, then the viewfinder ought to be rectangular also. If your format is a circle, the viewfinder's a circle. The viewfinder doesn't have to be the same dimensions as your format, just the same proportions. I'll be showing you a very simple way shortly to assure your formats and viewfinder remain proportional. (And you'll be learning a lot about proportion in Lesson 8.)
Note: Your viewfinder in this exercise will be an 81/2" x 11" cardboard with a rectangular opening in it which both serves as - and mimics - a format. I recommend an 8 & 1/2 x 11" format because its easy to find, (typing paper or writing paper) and most drawings are done in a rectangular format.
I mentioned above you need to keep your viewfinder proportionate. If you're going to make your viewfinder from an 8 and 1/2" by 11" piece of cardboard, then all sides must be a ratio of 8 and 1/2 by 11 - regardless if we're talking millimeters, inches, or feet. I know I'm making this complicated, but here's a super simple way to reproduce your own viewfinder and keep it proportionate:
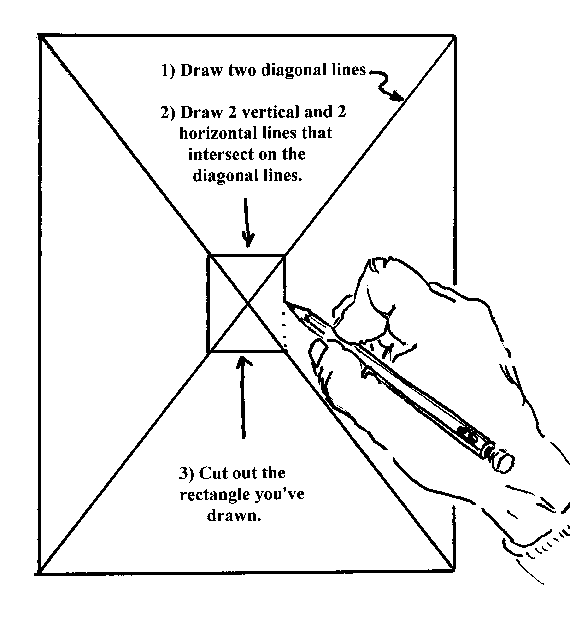
1) Tear the gray cardboard back off an 8 & 1/2" x 11" paper pad. (Typewriter paper pads have those really nice squared corners.)
2) Grab your ruler and draw a big "X" on the cardboard by drawing 2 diagonal lines from the top corners down to the opposite side's lower corner (that is, from the upper left corner, down to the lower right corner, then from the right upper corner diagonally to the lower left corner.)
Draw one diagonal line on your cardboard, |
 |
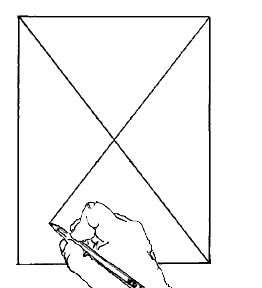 |
Then draw a second diagonal line: you've made an "X" |
(You've drawn an "X". See pre-formed format)
Draw two horizontal lines and two vertical lines parallel to the horizontal and vertical edges of the cardboard. Draw them end to end making sure the lines, i.e. the corners of rectangle intersect on the diagonal lines. (The corners of the rectangle should lie right on the "X" - you're just drawing a smaller rectangle on top of the "X".) And now you've made an exact scaled down replica of the original rectangle. See this:
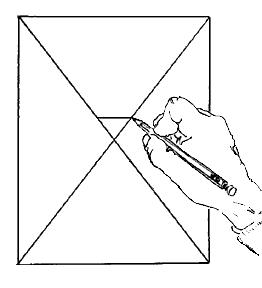
Now draw a a horizontal line...
...and a vertical line on the "X"
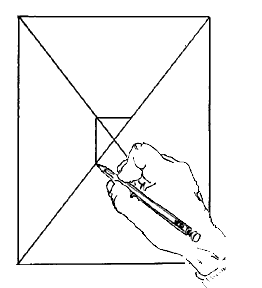
Draw one more vertical line and another horizontal line, so you have a rectangle. Cut out the little rectangle you've just made and you've made yourself a viewfinder.
Here's everything in one picture: now cut out the little square
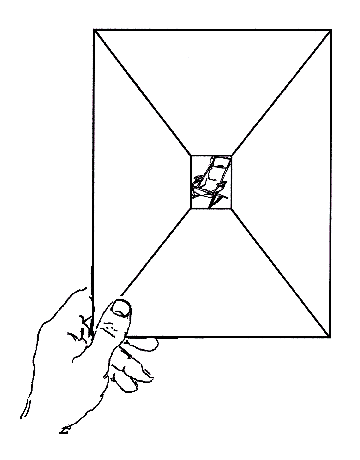
Cut out the little square. Cut out the scaled down rectangle you've drawn with the scissors or the X-acto knife. And there you have it: your very own viewfinder.
How long to make your lines? You don't even have to worry about it! But as a ball park figure for this exercise shoot for about 1" x 1 1/4" tall. (If you're one of those people who needs to know the exact dimensions here they are: if the vertical lines, the long lines are 1.25 inches long, the horizontal lines will be just a hair more than 0.969 inches long. That's the same "8.5 by 11" ratio. But as long as you draw the lines intersecting on the diagonal lines, you don't have to worry about exact dimensions.)
Make more than one viewfinder. I recommend making 3 different sized viewfinders with openings of about 1" by 1 1/4"; 5 and 1/2" by 4 1/4"; and 7" by just a little less than 51/2".
You now have your very own viewfinder. Notice this: The shape of the viewfinder, the opening (like the aperture in photography) is exactly the same shape as the overall piece of cardboard you made it from - only its scaled down. This seems so simple, but you can extend from this and make ANY size format from one original rectangular shape.
(To make a larger viewfinder or format just place the smaller cardboard viewfinder on a large piece of paper and extend the diagonal lines as far as you like, or until you're out of room. When would you use this? If you wanted to transpose a smaller drawing up to a larger scale.)
Part B.
An "Imaging" Exercise:
Putting your Viewfinder
to work.
Find a chair. (I have some chairs on file you can look at if you don't have a chair with good spaces.) Look at it through your viewfinder the way you'd look through a camera viewfinder.
Experiment moving the viewfinder different distances from your eye - until you can fit the entire chair within the boundaries of the opening. In fact, adjust your view so that the chair appears to contact the edges of the viewfinder in two places. (Not by literally touching the edges but filling the opening in your viewfinder with your view of the chair.)
Now, since you've chosen a chair with lots of open spaces like a beach chair or a coffee table chair, with perhaps hardwood arms and legs, maybe a slatted arm or backrest, you should have at least a few areas of negative space - enclosed negative space - within the image of the chair. You'll also have areas of negative space surrounding the chair.
Focus your attention on those spaces. Like you did in the Lesson 6 exercise, stare at it until it you perceive it as a shape. This may take a few moments. It'll happen.
With your attention on the negative spaces, imagine that the chair now disappears, and Voila! like the impression left in the canyon floor where Wiley coyote went careening into it, there's nothing left but the negative shapes that surrounded the chair. And these are going to be what you draw: the negative spaces that remain after the chair has disappeared. (You'll be drawing a chair in the Lesson 7 exercises.)
Why does this work so good?
It's puzzling, it's a paradox - that drawing the negative spaces around an object will reproduce the object itself. How is that? Students shake their heads at the ease with which they've drawn a likeness of something by drawing the "non-object" negative spaces in and around their subjects - drawings that were so much more accurate and realistic and pleasing to look at.
The Answer's in the shared edge
The answer lies in part in the jigsaw puzzle you looked at in an earlier lesson. You're learning to shift your focus to the unknown, unnamable parts of the composition. Since these unnamable shapes share edges with the object, then by drawing those odd shapes, by default, you draw the object. And that's the beauty of this method. (Just like the different pieces of the jigsaw puzzle fit together by sharing edges.)
An Ongoing battle: Left v. Right
Knowing too much
As a beginner, when you tried (or try) drawing something you were familiar with, you knew too much about it! Everything you knew about the object was and is invoked, asserted, and insisted on by your left brain. If you were told to draw an elephant, your brain would announce what it knew: four round legs, a trunk, two ivory tusks, a little flyswatter of a tail, peanuts, maybe a little mouse scaring the dickens out of it, maybe a circus scene would come to mind with an elephant balancing on a riser. Even if you had an elephant in front of you, the temptation to draw the "stored" version of the elephant, the symbolic L-brain elephant, would be strong.
Before your R-mode training, L-mode made it it's job to raise a fuss about what it knew to be"right". In allowing R-mode a crack at what nature built it to do, L-mode has got to be trained to keep quiet or tricked into idling on the sidelines.
However, while you're mastering these techniques - and even after you master them, the two ways of knowing things -
directly ( by R-mode) and
abstractly or symbolically (L-mode),
- will be in constant competition. But don't fret! You're learning how to evoke R-mode at your beck and call.
Here's a less complicated illustration than the elephant example. (And it's actually an introduction to what you'll be learning in lesson 8: proportion and perspective.) You're looking at an office desk. Try to describe it in words. What can you say about it? You might say "this table is made of stained pine, has square corners, it plywood legs that are really enclosing sides, which rest flat on the horizontal floor, the top is a rectangular plane, and it has two drawers".
The problem is, if you're not looking at a technical drawing of the table where you see an exact side view, or exact top view, then you're probably not seeing perfect square corners. You're looking down at it from a distance, or you're looking at it obliquely in a three-quarter view.
In fact, there are few things if anything we ever see from a pure vertical or pure horizontal "technical drawing" perspective - there's always some degree of distortion. Plato said it's easy to imagine the concept of a perfect circle, we might even believe we're looking at a perfect circle, but making or drawing or cutting a perfect circle is probably impossible. There'll always be some tiny imperfection. In the same way, we can imagine we're seeing in our mind a perfect coffee table. In getting to the task of drawing it, that idea or concept of "coffee table" will conflict with the real coffee table in front of us with all it's crumbs, and scrapes and dents and lemon fresh Pledge build-up. |
(Return to link in Lesson 8)
The Rub
And this is the rub: you know the table has these features (square corners, four legs flat on the floor) but that's not how they appear in the real world from the average person's perspective.
Literally Two Sides to Everything: the Battle in Your Brain
There's this dual nature to everything: what we think we know about the an object, and what our senses tell us about the object. We think logically (L-mode) the table has square corners, so we think we must draw it with square corners and it comes out looking strange. Right? Yet when we look at a picture of a table drawn this way, we know immediately something's gone wrong. Our senses, our eyes tell us something is wrong. That's R-mode silently asserting itself.
Letting Go
In the real world corners appear to our eyes as angles of varying degrees, circles appear as ovals and ellipses, etc. We have to learn to see them this way. So again, in learning to draw negative spaces, you learn to trick L-mode to take a rest and let R-mode come out. You learn to let go, to allow yourself to submit to your senses.
Kasbohm & Company's
YouCanDraw.com
© Copyright, All rights reserved 1997
e-mail: jeffkaz@YouCanDraw