
The Supply Store
Back to YouCanDraw .Com
 The basic problem in painting and
drawing is projecting the three dimensional
world on to a two dimensional space: the world
"as it is" onto paper or matting. And that's an
essential paradox. Try this. Look
out the nearest window. Close one eye. Notice how the
farther away things are, the smaller they appear. I know
that's no great revelation, but when it comes time to
draw these relationships, these size differences, we need
a way to think about them, or at least an approach to
make sense of them.
The basic problem in painting and
drawing is projecting the three dimensional
world on to a two dimensional space: the world
"as it is" onto paper or matting. And that's an
essential paradox. Try this. Look
out the nearest window. Close one eye. Notice how the
farther away things are, the smaller they appear. I know
that's no great revelation, but when it comes time to
draw these relationships, these size differences, we need
a way to think about them, or at least an approach to
make sense of them.
At this moment, I'm looking at a house one block away. I know it's bigger than the window. I'm looking at it through the 3' x 4' foot picture window to my left - and I can see the whole house. It's a brown beach rambler with a white roof.
The Malibu Mountains and My Window
It's a 40 foot house and it "fits" into my 3 x 4 foot window. By "fits" I mean I can see everything: the lawn, the orange tree, the Glastron boat, the driveway- the works. That doesn't strike me as anything profound: distance accounts for it's perceived small size. Beyond that, on the horizon (about 15 miles away) are the Malibu and Santa Monica Mountains. A few of the peaks rise to close to 4000 feet right out of sea level. Again my window is about three feet tall and I can see all this. (I know, you're saying "big deal".) But again, how would you draw it? That is, how do you account for the size? That's the big question.
Linear Perspective
In the west, we use linear perspective: the relationship of distance and proportion to explain the discrepancy in size and distances.
We use lines that rise out of a vanishing point on the horizon to depict distances. The closer an object is to the "vanishing point" (which is on the horizon at your eye level) the smaller it must be. So the 4000 foot tall Malibu Mountains, as tall as they are, are too close to the vanishing point to be of any significance in the view out my window. (I know, that's ridiculously obvious, right?)
Linear perspective is "linear" because we make objects conform to lines we construct that rise out of different vanishing points. This works great when you're working with larger objects, and big distances. And works especially well when all your objects are buildings or cubes or fit neatly within the prescribed lines. But what about with people and faces? Or bodies? Yes, it gets tougher but a few resourceful artists in the west resolved this problem ingeniously. (And I don't mean California when I say the "West".) Lets look briefly at how sveral cultrues dealt with the problem of depth and perspective.
Other Cultural Approaches to Perspective
In Oriental (44kb) and Egyptian (27kb) art, distance was expressed by vertical placement of the object within the composition: i.e., the higher it was vertically, the farther it was a way. Mountains are usually farther off than a person or a bird so they get placed higher, the sun more distant than the mountains so higher still. Children tend to use this system in their compositions.
The Renaissance Approach
Consciously or unconsciously, artists of the Renaissance were aware of the discrepancies in their drawings. And they went about developing some helpful devices.
During the renaissance, a great deal of time and energy was expended constructing a systematic approach to perspective. It involved the first use of vanishing points, horizons, and eventually abstract formulas (which they memorized) for dealing with drawing certain kinds of objects. That much was fine. In it's further evolution, good old left brain and rationality started stepping in: linear perspective became cumbersome. It became unnatural. Artists lost touch with the information before their eyes. As with all "theories" people fall in love with, people tried to make reality match the theory rather than the theory match reality. Over rationalizing made the whole thing ridiculously complicated (again) and that's precisely the problem with too much of the linear perspective system: you stop looking at the picture in front of you. But it has it's place.
But what about Drawing People or Faces?
Like I mentioned above, linear perspective works great on big distances, on cube-shaped, rectangular or square objects. But what do you use when you draw people? How do you approach drawing something as complex as a human face? Did you notice how much logic I used - a left brain function - when I tried to explain why you don't see the 4000 foot Malibu Mountains towering over the neighbors house? Didn't that seem a little unnatural? They're fifteen miles away. Why explain the obvious?
You can learn about linear perspective - it can greatly simplify how you understand spatial relations - but you don't have to get mired in it. Get a taste of it, let it go, and continue to learn to use your eyes!
Back to a Sound Approach to Perspective: Piggybacking on an ingenious Renaissance Invention .
To simplify the scene in front of the artist, and make manageable proportion and perspective, a gentleman named Albrecht Durer put on his thinking beanie and came up with this great idea:
"I can draw little pictures without a problem. So why can't I draw big pictures? It's no problem to draw little pictures formatted inside little rectangles. If I can break down big pictures into little rectangles, then all I 'd have to do is draw a bunch of little pictures. And that I can do!"
And voila! The drawing grid was born. So what's a drawing grid? Well it's just a glorified viewfinder - like the one you've already used. Durer used a big frame (maybe 2 feet tall, 3 feet wide) and divided it up with horizontal and vertical wires. They were all evenly spaced so each intersecting pair of horizontal and vertical wires formed a square - each a little square viewfinder. It formed a grid of small squares. And what was seen through each square of the grid could be considered a small composition in of itself. Managing proportion and perspective in a large, detailed composition the size of your living room picture window can make the project very frustrating.

The
grid allows the artist to break up the larger picture
into
many smaller pictures - that he can easily reproduce
on the grid drawn on his paper
Breaking Down the large into the small and manageable
By drawing the content of each square one at a time, the task of maintaining proportional integrity was minimized. L-modes intrusive character was minimized. So to recap, the wood-framed wire grid contraption in effect, broke up the larger composition into lots of smaller, more manageable pieces. You just drew one square, then the next, then the one after that. Of course, you had to keep your head perfectly still: if you moved, so did the contents of each square and the whole picture changed.
Keeping in Line
But clever as he was, Durer built in a device for maintaining the exact same viewing position. He marked the very center of the grid with a piece of wax and constructed a small, vertical aiming device that by sighting at the "cross hair" on the grid (the wax at the center) over the pointing device, that is, by lining up the two, you could always find a reference you could call home. With this 3-point reference system, (the small wax ball at the center of the grid, the pointing device, and your eye), you could instantly find the center just like you'd aim with a gun. You could correctly re-align yourself any instant.
Putting the Grid to Work
With this grid contraption in place, Durer placed a sheet of drawing paper on his drawing table. On it he had drawn the exact same grid pattern that was in the wood and wire frame "viewfinder". What he saw through the gridded viewfinder he could now match exactly in the grid on the paper. So his whole system consisted of a subject, the gridded viewfinder, a fixed viewpoint, and gridded paper. (See example [41kb] of an old grid-lined drawing - you can easily envision the artist viewing his subjects through the gridded screen.)
In the Negative space exercise you viewed the chair or subject through a viewfinder. The viewfinder was your format. The boundaries of the format framed the subject and created negative spaces in and around the object unique to each composition. Each grid square in Durer's device accomplished the same thing: making the familiar unfamiliar.
And that's the cardinal rule of these foundation exercises: presenting your brain with a task the Left side will reject allowing the right, visual, spatially aware right brain an opportunity to apply itself.
The grid can really help in solving the phenomena of foreshortening. Recall Webster's definition: "to shorten some lines of an object to give the illusion of proper relative size."
Foreshortening is perceived proportional distortion or proportional exaggeration. Let me illustrate. Pick up any object by you. Literally anything: a scissors, a coffee cup, a magazine. Put one corner or end of it right up to your eye. I have a black Swingline stapler. I have the hinge end next to my eye. The stapling end is pointed straight away down my axis of vision - it's sticking away from me like a unicorn horn. The hinge end dominates my field of vision: it's huge, and the stapling end appears small in comparison. None of these parts change size, they just look that way - perceived distortion.
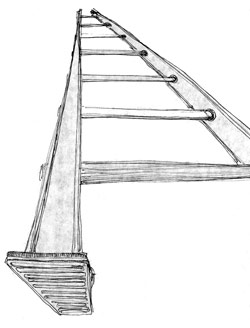
Using a Ladder
If you did this with a ten-foot ladder, the rubber skidpad end next to your eye would be monstrous, it could almost fill your visual field, while the far end would appear tiny - even though it's as wide or almost as wide as the end close to you.
If you stand at the base of a tall building and look up, the first few floors dominate your field of vision. The top floor looks tiny. Yet, we know that the top floor is the same width as the bottom floor (with most buildings anyway). This is foreshortening: the unnatural appearing scale changes. Why all this attention on foreshortening? Because your brain wants to discount these "exaggerations" when it comes time to draw.
Now you might say "Jeff, that seems obvious enough, what's close up looks bigger", and you're right. And I guarantee you if you went to draw any of these scenes, e.g., the building, you'd probably draw it with a wide base and an "almost" proportionately smaller top. But I have no doubt, when you were finished, you'd say, "something looks wrong here". Ninety-nine times out of one hundred the problem will be your "exaggeration" won't come close to reality - it won't be exaggerated enough!
It is just this kind of discrepancy Durer's' Device helped him work through. And we can benefit the same way.
Two
Arms of Perspective:
Recognizing Angles
and Proportion
Part of the difficulty in learning perspective is that there's so much going on both in inside our skulls and out there in the physical world we've never paid attention to before. The major feature of perspective you'll be learning here is this: learning to sight relationships. And that breaks down into two skills:
sighting, or reckoning the relationship of the object you're drawing to vertical and horizontal, that is, how do they diverge towards or away from vertical or horizontal;
And secondly, calculating how objects compare in size to other objects: how big or small e.g. an apple is compared to a watermelon, or reckoning how large an ear is in comparison to a forehead. Any relationship can be put in terms of "how many or what fraction of item A can be fit into or be divided up onto item B?"
Again, the two arms of perspective are figuring (or "sighting") angles and relating size. When you talk about perspective you'll be using verbs like comparison, ratio, relation, relationship, figuring, reckoning. You "compare" this angle to the vertical or horizontal, which is relationships and ratios. There will be lots of examples and exercises coming up to demonstrate this.
The First Arm of
Perspective:
Using the Paper as a helpful Friend in
Judging Angles
Having made such a big deal out of perspective, I feel like I've tricked you. Why? Because if you can grasp the idea there, you can ignore all the complications of a perspective system. They don't have to muddy up your brain. You don't have to overcomplicate every step of your drawing with vanishing points, cumbersome grids, etc.. In fact you can let it all go. As long as you have a feel for why vanishing points make sense (things get smaller as they move farther away) and you can continue to slip into R-mode, you'll have no problem!
Reliance on what you see is the only skill you have to be true to. What you see, is what's there. And you're learning to rely on what your senses tell you - this puts you directly in touch with the now. As in all of these exercises, keeping the critical, know-it-all L-mode quiet is the goal of these exercises. (I'm not a meditator, but it just struck me how much this is the goal of people who do make a practice of meditation. And people will argue that drawing is meditation - or for that matter, that any artistic discipline can be a form of meditation.)
"Sighting": how Artists deal with Perspective
Back to perspective. You don't need a big, over rationalized system to draw correct proportion. Most artists these days don't. They do it without sextants or compasses or French curves or protractors. They do it by "sight". And by sight, or by "sighting" I'm referring to the method of "using what's in front of you" to reckon and report accurately what you want to draw.
So what's in front of you? The important things you have at your disposal - beside your own visual acuity - are your arms, your hands, your pencil, the object you want to draw, and the paper in front of you. We're going to zoom in on what the paper has to offer as an aid to drawing.
How the Shape of Your Paper offers a wonderful Drawing Aid
The paper is useful because it's rectangular. It's sides can be used as guides or references referring to the horizontal and vertical dimensions. Think back to your geometry class in school. You dealt with the X,Y, and Z axis. "X" for horizontal distance, "Y" for vertical, and "Z" for distance towards or away from you into or from the paper: it's depth. (In simple perspective, going away from you the z-axis is the mathematical equivalent for a vanishing point; coming towards you, it's the stationary point.)
In the same way, drawing perspective deals with the exact same 3 planes. The drawing paper hands us directly 2 out of the three dimensions: the sides can serve as vertical references, the top and bottom as horizontal references. I'll say this just a little differently: let the four sides of the paper - the edges - stand for horizontal and vertical. Let them represent horizontal and vertical.
All lines and angles you need to draw can be compared to, related to, gauged, or judged against the edges of the paper: the surrogates for real world vertical and horizontal. And that's what you'll be doing in this next exercise: learning to use the edges of the paper.
Go to today's exercise in "Sighting"
Kasbohm & Company's
YouCanDraw.com
© Copyright, All rights reserved 1997
e-mail: jeffkaz@YouCanDraw