The Supply Store
Back to YouCanDraw .Com
Case Study
#1: |
In this final section of our first case study, you're going to analyze the vertical alignment our subject's features comparing them to guess who? Mr. Average of course. Then we'll do a super short overview of what we've done and apply what we've discovered in order to caricature the caricature.
Click here for Part I
Click
here for Part II
Click
here for Part III

Web picture references:
Directions (if not already highlighted):
|
Seeing it all come together
Vertical markers that suggest exaggeration
The grid we use here focuses on the vertical landmarks. (You can still easily see the horizontal landmarks through it.) Now I'd like to look at vertical markers on Mr. Richards - and I'll do this quickly.

The vertical regions of the face
(Note: There's one thing missing from this illustration: and that's the vertical lines that align the center of the eye with the corners of the mouth. If you can imagine you see the corners of the mouth, (right there in the middle of the pastel yellow zone), you can easily visualize a line running from the center of the pupil straight down to the corner of the mouth. Another thing worth re-mentioning about Mr. Average is this: the eyes are used as a unit of measure of width on the face. So Mr. Average's face is about 5 eye widths wide. Review this in the Mr. Average section if you need to.)
As a review:
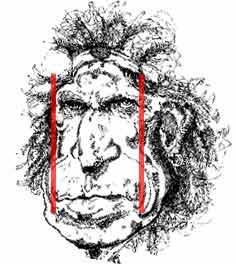
1) The inner corners of Mr. Average's eyes generally line up with the outside borders of the nose - whereas Keith's' are narrower:

Comparing width of nose to
eyes:
generally nose aligns with inner
corner of the eyes
2) The middle of the eyes (center at the pupil) line up with the lateral corners of the mouth in the Mr. Average model. Not so with Mr. Richards - they pass well to the outside:
Corners of Mr.
Richards' mouth pass
outside middle of eyes
3) The inner corner of Mr Averages' eyes are an eyewidth apart. This still applies to Keith:

Eyes still an eye-length apart
Lastly the overall head shape:

Deciding where to to push and pull the overall head shape
Decisions to pull ( s t r e t c h ), push (shrink), were all made by comparing the basic head shape to, guess who? Right - Mr. Average! I decided to leave the proportion alone, in the areas where the proportion in comparison to "average", was also "average", (like around the eyes for instance). These didn't need any stretching or shrinking. Of course, those areas will shrink in comparison to the way we'll blow up the mouth and shrink the forehead.
Things like the distance from the outside margin of the eye - also called the lateral canthus (canthus means "corner') - to the outside edge of the bony orbit, (generally one of the wider or widest parts of the head), will stay like that since they were of "average proportion" to begin with . You'll still be able to fit an eye-width between the outside margin of the eye and the outside edge of the bony orbit. This all corresponds to what you learned in the Mr. Average Face section of Lesson 14. In fact, here's another link to that exact page: Click here.
[We'll look closer at generalized head shapes in a future case study. Still, compare this view above with the Mr. Average specifications: the head is usually widest at the cheek bones and at the part of the cranium just above the level of the eyes, and tapers as you go towards the top of the head or down towards the jaw. ]
Very lastly, the hair:
Mr. Richards hair is in real life a mess more often than it's groomed. In fact, from the pictures I have of him, he often looks like he's just rolled out of bed. Maybe that's part of his schtick, I don't know. General things to note, (when drawing anyone's hair):
Hair is usually darkest or most shadowed closest to the skull and in shorter hair, there's another dark area around the edges - farthest from the skull. darkest by the skull, the more detail;
The more detail you offer in the hair, the more realistic it'll be. (I once emptied an entire pen on the hair of one commission.)
Look for the general shape. Keith's hair is easy: it's pulled up behind a head band. In an example like this, follow the basic rules you used to exaggerate the face: since this specific example we're shrinking the forehead, shrink the hair at that juncture as well.
(Look also for upcoming section on hair.)
I cropped the hair from the rest of the face in the following illustration. You can get a pretty good idea how it's darkest around the most inner edge of the hair (where it seems to butt up against the face):

Looking at the hair
Reviewing what we did:
First we tried to understand the person behind the face;
Then we looked at individual features - the nose the eyes the ears, the mouth, the lips, etc., - we looked at their shapes, how they compared to the "average", and at what made them unique;
We looked next at how the shapes - the blockhead shapes - gave the face and head volume. We also explored their shape compared to Mr. Average. We pushed and pulled our sketch until the different volumes started resembling the volumes in the Mr. Richards sketch at the top of the page;
Then we looked at the horizontal landmarks, (the middle of the eye line, the base or bottom of the nose line, the middle of the mouth line), on a rough sketch and compared them to the Mr. Average Grid;
Next to last we looked at a few of the vertical landmarks and compared these with those of Mr. Average. You saw for example that the most lateral border of the mouth lined up far outside their Mr. Average alignment - the center of the pupils;
And lastly, we took quick snapshot of the hair;
Subconsciously, if you've read your way carefully through the explanations and all the steps, you've been acquiring a data pool that will contribute to the Fifth skill of drawing: the "Gestalt" step where you look at a picture and size it up without even thinking. This will happen automatically in time.
That's a lot of steps! The only thing we haven't really looked at is shadowing. (You'll see the use of light and dark in later case studies.)
Your assignment
Your assignment, Part I: trace the Keith Richards caricature from the top of the page. You can use your computer screen as a light box - (tape a thin sheet of paper right over your computer screen). Go for the overall shapes. Don't get caught up drawing all the cross hatching - just outline it's shape. Copy lines as lines and contours.
Part II: Next, tape a piece of tracing paper over your sketch. Identify the horizontal landmarks: the middle of the eye line, the bottom of the nose line, the middle of the mouth line. Draw a rectangle around the head like you see in the illustrations above and place - that is, draw in - those horizontal dividers. Then draw in the vertical lines we've talked about. (You're concerned with where the the inside corners of the eyes line up with the nose, the corners of the mouth line up with the pupils, etc.)
Part III: Go back to the section on volumes, ( Part III), and draw at least three of the volume pictures using what you know about negative space, (lesson 6) , and contour drawing, (lesson 4). This will help you look past the drawing you're doing and into the "in the moment" perceptive state you need to be in to draw.
Part IV: Caricature the caricature, and caricature your own drawings from parts I and II.
Caricaturing the caricature
We've explored each feature and roughly know the shape of each. We know the volumes of the various parts of the head and face. We've analyzed the vertical and horizontal placement of the features by comparing our model, Mr. Richards, with Mr. Average.
Now, knowing what you know, look at a few of these more exaggerated and re-exaggerated sketches of Mr. Richards. There are two questions to ask:
Are they exaggerated where we predicted they should be exaggerated? (We figured that out in the comparisons above.)
And the most important question: do they look like Mr. Richards?
(Quick review of our findings: So, proportionately speaking, we can say that the distance from the top of the head to the eye line is proportionately small when compared to the Mr. Average Face. The distance from eyes to nose is almost normal (nothing to exaggerate too much there size wise - maybe shape wise); the distance from bottom of the nose to the lip line is very large proportionately - so we'll really exaggerate to the max; and lastly the distance from the lip line to the bottom of the chin line is somewhat smaller than in the Average face.

All summed up, proportionate distances between the features in just the front plane of the face gives us lots to exaggerate, but specifically, (in my opinion), the forehead and nose-to mouth area gives us the most to work with. So that's what I tried to exploit in the above quick sketch caricatures.)
Here they are:
|
|


|
 |
|
|
Kasbohm & Company's
YouCanDraw.com
© Copyright, All rights reserved 1997
e-mail: jeffkaz@YouCanDraw