![]()
The Supply Store
Back to YouCanDraw .Com
Teeth |
Teeth: the pearly whites, the ivories, the choppers, fangs, canines... Most all of us at some point in our lives had incisors, cuspids, bicuspids, pre-molars, molars and wisdom teeth. If you were that lucky and all your teeth came in (including your wisdom teeth) you would have 32 all together: 16 on top, 16 on the bottom.
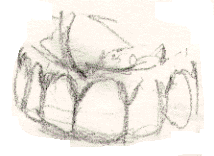
The "16 on top" are anchored in the maxilla. The "16 on the bottom" root in the mandible. (You should know which bone is the maxilla. If you don't, click Back to Lips . The "mandible" is the jaw bone.) Here's what the top row of teeth would look like if you lined them up side by side.

#1. Lining up the upper set of teeth, (16) side by side
(Note: the dotted line represents the teeth most often visible during conversation. The goalpost looking thing at the bottom center points out the 2 maxillary incisors: the most prominent pair of teeth in any "normal" mouth. These are the teeth that grow so big in rabbits and beavers and David Letterman to name a few. And Whoopi Goldberg has sure taken her share of shots on account if her incisors.)
The hinge-like action of the temporomandibular joint (TMJ) allows the teeth to line up cusp-to-cusp within the closed mouth. In the illustration below, the TMJ is the little donut-shaped object at the middle left. "TMJ syndrome" is pain and discomfort brought on by overuse of this joint. Things like stress and tooth-grinding only make it worse). If you have an underbite or an overbite, this alignment isn't so great.
Schematic of maxilla and mandible:
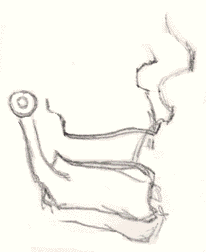
#2. Maxilla and Mandible
The teeth come in pairs. The most prominent teeth, the incisors, are front and center. The next pair out are the cuspids. Then come the bicuspids. Generally, the bicuspids, (the pre-historic remnants of the meat-cutting and flesh-stabbing canines) line up with the lateral margin of the nostrils. In the illustration below, I've drawn dotted lines to show how they're lined up (roughly of course):
#3. Alignment of teeth
beneath
the nose.
The Gingiva or "Gums"
You've all seen those toothpaste commercials with the "prevent gingivitis and tooth disease", right? So here's a pop quiz: What surrounds the teeth as they erupt out of the bone and into your mouth, and borders the top of the upper row of teeth in this next drawing? Did you say the gingiva, or "gums"? You're absolutely right. ("-itis" just means "inflamed". Gingiv-itis = inflamed gingiva or gums.)
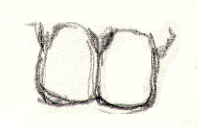
#4. The Incisors
Why is this important? (i.e. recognizing the gums.) Because, in drawing terms, the gingiva and teeth share an edge. (See Lesson 4 if you have any confusion about lines and shared edges). And if you drop into "r-mode" for a moment and draw the negative space of the gums and add the line between the teeth, you've drawn over half the tooth without even trying! Just like in 4a:

4a.
If you erase the teeth lines altogether, what's left? Just the gums like you see here in 4b:

4b.
Here I've superimposed an outline of the upper lip as it overlays the teeth in a neutral position. Of course you can imagine this outline over any portion of the teeth or mouth. Compare the tooth exposure here with illustration #1 and #3 above.

#5. Outline of lower border
of
lip on teeth
In this next illustration I want you to find 7 pieces of anatomy and pay close attention to what borders each part in every direction (that is above, below and on each side). Those 7 parts are 1) upper lip, 2) upper row of teeth, 3) the tongue, 4) lower lip, 5) the nose, 6) the outline of the maxilla, and 7) the philtrum. If you're having trouble, all the answers can be found in the 2 previous lessons.
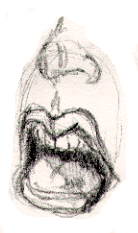
#6.
The lower row of teeth
Drawing the teeth and gingiva of the lower lip is almost the same as drawing the upper teeth - just slightly different shapes. Whereas the most visible upper teeth have a variety of shapes the most visible lower teeth are relatively uniform in shape.
#7. The most visible lower
teeth
I think what's important in drawing the teeth - like any other feature - is to get a feel for their shapes and their relations to other teeth, the gums, and other parts of the mouth and face. You know now they're lined up in a circular format, (within the bony structure of the maxilla and mandible); that generally you only see so many of a persons' 32 teeth at one time. And for now that's all the teeth you really have to learn to make representations for a quick sketch.
As goes for anything else you draw, you could just as easily make an in depth study of teeth. You could raise the level of your tooth drawings to actual artwork of your detailed recorded observations.
Your Assignments |
1) Draw the maxillary incisors. With tracing paper, trace illus. #1 right off the screen or click here, (for a printable illustration). Print out the teeth and hold them against a window and trace over them on to ordinary paper.
Draw a line between the middle of the incisors or cut your tracing paper in half and and re-draw each set of 8 teeth (half set of teeth). So now you have a left side and a right side, like these two illustrations:
Right side maxillary teeth |
Left side maxillary teeth |
- After making a drawing of each set of teeth (the left and right halves) draw 5 more drawings of each.
- Then do 5 drawings of the completed teeth, that is the whole "kit and caboodle", all 16 upper teeth just like in illustration #1 above.
2) Now, do the lower teeth like you see in illustration #7 above. Do ten drawings.
3) Next do five drawings of illustration #3 above
4) As a final drawing for this section, do five drawings of illustration #6 above. But, as a warm-up for this last part, do an upside-down drawing of #6 to get you into r-mode.
After you've done the drawings above, you should have a pretty good feel for what teeth look like and how it feels to draw them.
For
Your Reference |
To review anything for getting into your Artistic frame of mind? Here's the list of links from the previous page just in case.
Do you recall the different methods you've been using to access "R-mode" (the artistic mode of the brain)? If you need to look anything up here's a very quick listing:
1. Pure Contour
2. Modified Pure Contour
3. Upside-Down Drawing
5. Negative Space Drawing
6. Vase/face drawings
A note on the links in this section. All of the links here (blue underlined text) are links to a previous section you've probably seen several times - especially if you've been doing all the exercises one by one. A quick glance will probably be enough to refresh your memory.
Fantastic! By now you should have the teeth - if not memorized - almost memorized.
Take a break. Pat yourself on the back and when you feel re-energized, go to the next section on shapes of the head. If you've been doing each section progressively, you'll have built a great anatomical library of facial features and a well-worn path to the artistic mode of your own brain.
Ready for a
quantum leap?
Click here for:
Lesson 14: Shaping the Head
 |
|
Kasbohm & Company's
YouCanDraw.com
© Copyright, All rights reserved 1997
e-mail: jeffkaz@YouCanDraw
