
The Supply Store
Back to YouCanDraw .Com
A
Quick Review of Negative Space and |
More Repetition on Negative space
What's Negative space? It's the space, the nothing around and within the objects you're drawing. In this exercise you're going to get more practice looking for and recognizing negative space while drawing the ear and it's parts. If you've done the Pure and Modified Contour exercises this exercise will be a breeze for you. These different sections build on each other, so you're getting more practice than just drawing ears: you're solidifying skills that will allow you to draw anything.
So lets dive in
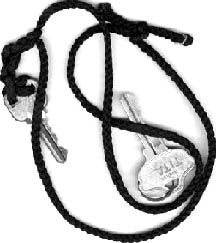
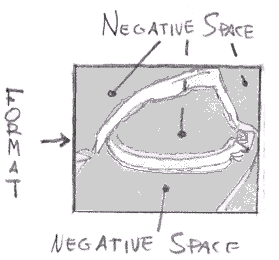
This illustration should be looking really familiar by now! (Just below.) It's from way back in Foundation Lesson 6 on Negative space. It's here to refresh your memory. (Click here to get to the newest stuff.) In the illustration, the key and black string are "hard objects". Hard objects, or "positive forms" are real things, that is you can pick them up, hold them in your hand and you can name them. The spaces around the objects - and we tend to ignore these - are what we call "negative spaces".
Pick out the "Negative space"
In this first illustration, the "positive forms" are obvious enough - they're the keys and the black string. But now I want you to put your focus on the shapes surrounding the keys and string - this includes the shapes between the keys and string and the format. (The format is the rectangular frame that contains the picture.)
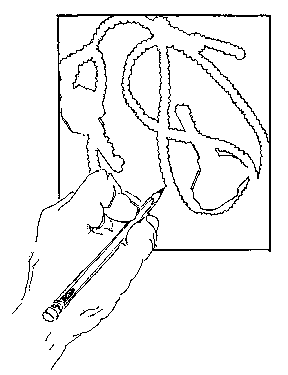
There's something subtle going on in this picture
What's going on here? Just a picture of someone drawing keys and a string inside a rectangular format, right? Wrong! (Sorry, I set you up for that..) Of course if you said it was somebody drawing the spaces around the keys and string - then I apologize - you were absolutely right.
The difference is subtle, but powerfully different. Put yourself in the body of the person doing the drawing. Now, how would it feel? Your attention is on those strange shapes created between the random lay of the string, the keys and the format. You're only indirectly observing the objects. The edges of these strange shapes you're drawing share their edges with the objects. These are drawable, definable shapes that are as real to the composition as the keys and string.
Making something of the nothing
The point of the exercises in Lesson 6 was to get you building an awareness of drawing things that aren't there, making something of the nothing. Like the holes in the Swiss cheese, or a middle of the donut, these "nothings" aren't anything physical you can put your hands on, but they do have a describable shape: that is you can draw them. They are "stand alone" shapes (albeit strange shapes) all by themselves and they help define indirectly the object you're drawing. In a drawing, they're as real as any other part of the composition. Think of a jigsaw puzzle: you can toss in your hand any piece of the puzzle regardless of what it has printed on it. This isn't how we normally approach drawing things in the world...

Here the Negative spaces are pointed out for you.
When you pay attention to negative space, when you acknowledge their shape as being as important to the composition as the actual object, well then you're in for an artistic breakthrough. In fact, you'll see if you just draw the negative space, you'll draw the positive form by default.
By drawing just the negative space, you learn to pay attention to the whole picture. |
New: Drawing the Eyelid as Negative Space
Approaching this as a negative space drawing.
These lessons are based on the idea that every one can learn to draw: we all have the capacity to see as an artist, we just have to step by step recover our innate ability to use the artistic mode of our brains. Like all the other exercise you've done, this one is designed to gently prod you into R-mode: your own real time, inborn artist-in-residence.
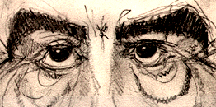
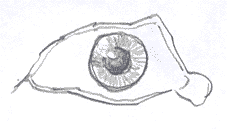
Here's an Eyelid. You've seen it in the two exercises before this, so I'm sure it's looking pretty familiar by now. (And that's kind of exciting: you're recognizing and feeling familiar with the anatomy. Great job!! Pat yourself on the back.) I've got it surrounded by a rectangular format. Before you scroll down the page to the answer, try and identify the negative spaces in this illustration:
Can you identify the Negative Spaces?
Think of the negative space around the lid as all the parts that are "not eyelid". That is, anything else: the brow, the actual eyeball, the nose, the cheekbone, the space between the lid and the format - all are negative space. Look at the next picture. It'll make it pretty obvious where those negative spaces are....
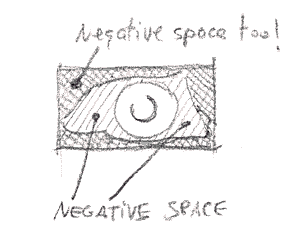
The Negative Spaces around and in Eyelid
There's some shading in this picture that's a little distracting - it'll be clear below which is which. You still ought to be able to demarcate "eyelid" from "not-eyelid".
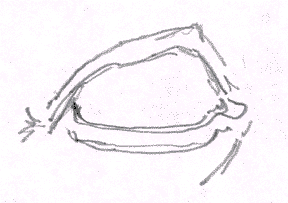
Next we'll do this with the pupil and iris. But first I want you to pick up a pencil or pen and pick out right here on the screen the negative spaces surrounding and within this part of eye anatomy:
Point out the Negative spaces with a pen or pencil
Now that you've done that, take a look at the next illustration and see that you've correctly identified these areas.
Negative spaces around the Iris and Pupil
Did you pick the right spaces? Piece of cake wasn't it? I want you to notice something here. See the single cross-hatched areas immediately around the pupil? That's the "main" negative space in relation to the iris and pupil.
Recall in the Nose: Negative Space exercise I touched on the notion that anything could be treated as negative space? Well the double-crosshatched area around the almond/triangle shaped part of the eyelid margins is a negative space in relation to the almond/triangle shaped opening of the lids. Does this make sense?
Let me say that a little differently. If the pupil/iris is your focus, then the "non-pupil/iris" space around it is all negative space in relation to the pupil/iris. If you consider that space, the "non-pupil/iris" space as the main object, then the space around that (around the "non-pupil/iris") becomes the negative space (as does the pupil/iris). It will be a great advantage for you to get good at shifting your focus.
Why is this a good skill to have under your belt? When you can shift back and forth like that, any troublesome spot becomes easy to draw - because you can now draw the troublesome area indirectly by drawing the spaces around it..
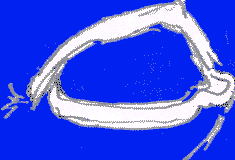
We're going to draw the eyelid again: this time by drawing nothing but the spaces around it
Step 1:
Draw yourself a format or download/print the formats for each part of the ear. It doesn't have to be perfect - just rectangular, taller than it is wide. You can reference or print the formats below if you like.(Note: recall the format is the shape, the frame around your drawing, within which you'll do your drawing. Any questions, review the illustrations in the Formats section of lesson 6.)
Step 2
Center your attention on the negative spaces. They may be within the object, between objects, or they'll exist between the object and the boundary of the format. (Refer to the picture if necessary.)
Imagine that the space between the eyelid and the format is another piece of the jigsaw puzzle - just like the blue water was a unique jigsaw puzzle piece against the orange sail in the jigsaw puzzle example in lesson 4. (In a jigsaw puzzle, the "not-object" negative spaces are as real as the object. Think of the negative spaces as being that substantial - like you could almost cut them out of a plywood plank and hold it them your hand.)
Imagine that the space is as much a real element of what is before your eyes as is the actual anatomy. Keep looking at it until you perceive the space meeting the eyelid in a shared edge - that the edge of the eyelid and the edge of the space are two different things but together they form a single edge.
Step 3
Draw the "Negative Spaces" around the Eyelid
Now begin drawing the eyelid but do so by draw the spaces. Concentrate on the spaces as if they were real objects. Sometimes you need to stare at the spaces for a moment or two and the magically, your mind accepts them as real - if unnamable - forms.
Allow yourself to look through the forms - you want to arrive at a mental vantage point where you perceive the negative spaces as shapes every bit as real as the objects.
Step 4: Optional step
Just for fun, and if you want to really drive home the concept of negative space, you can do this: color in those negative spaces with a colored pencil or a marker like they're shown in the example. Coloring these in makes them more real, gives them more weight, convinces your mind of their realness. Work your way around each shape- around it's edge, much the same way you did when you did the contour exercises. This will give you an appreciation for the uniqueness of "different" shapes.
Negative space colored blue
Color the negative spaces with a marker or pencil. Now do the same for the space around the pupil/iris:

Negative space here is shown in yellow
Here, the
pupil is blacked out because we're interested in the
shape of the space around it: the yellow area.
Run your eyes slowly around the entire outside edge of
the yellow until you get that "gestalt"
sensation of "Yes, I see it, it's a stand alone
shape all by itself". Squint and stare at it until
it pops into being.
Again, by refocusing your attention to a different shape within the composition, the areas around it can become "negative space". Focus on the shape between the format and the pencil line (representing the margins of the eyelid) until you appreciate it as a separate shape.
Step 5
Now, stare at one of the shapes. Keep looking at it. Gaze at it until you feel it to be real shape - as substantial as any object on the page. Gaze at it the way you looked at the vase-face, (lesson 2) in the earliest lessons. Remember how it shifted back and forth from vase to face? And when it "popped" into either the vase or the face, recall how it suddenly was one or the other? Remember how that felt? You're working for that same effect here.
Be patient, it may not happen instantly. It'll take L-mode a second to realize it's got no name or category for this thing - so it'll want to scan it's banks for some kind of association. Let it do what it has to. Eventually it'll get frustrated and allow R-mode to take over. And that's exactly what we want.
Step 6
In this last step, repeat steps 1 - 3, and step 5 (4 is optional) for the pupil and iris. Then take a break!
Draw this for step 6
Go to the next section on applying the technique from "Vase/Face" to the eyes. It's not nearly as long as these first sections and it sets you up for a really fun exercise: cartooning the eyes.
In this next section, you'll be concentrating on doing both left and right eyes. Up to the is point, all you've been drawing is right eyes.
"Vase/Face" for eyes: Drawing left and right eyes
Kasbohm & Company's
YouCanDraw.com
© Copyright, All rights reserved 1997
e-mail: jeffkaz@YouCanDraw