
The Supply Store
Back to YouCanDraw .Com
"Vase/Face" for Eyes |
Whether you just jumped into eyes as your first exercises, or you're going sequentially one exercise to the next, you'll see some repetition here in the methods. I'm trying to teach you skills that are going to serve your artwork way beyond just drawing caricatures. So even if it seems like "old hat", you're gaining depth in the 5 skills of of drawing.
Using
the "Vase/Face" exercise to
draw left and right
features
In the first three sections of drawing eyes, all the illustrations you drew were of the right eye. That was for a reason. I wanted you to get one eye pretty well memorized. Yes that runs counter to "seeing as an artist", but the thinking here is this: there's so much to see when you draw a human face, I think you need to be able to sift out what are the things common to everybody. So memorizing isn't all bad - as long as you combine it with R-mode observation: i.e., drawing what you see. (Your powers of observation are growing constantly. By drawing anything you're reinforcing them.)
Quick review
I know you've seen the "vase-face" illusion before. (Sure you do, it was way back in lesson one.) So like in the all the previous lessons, we're going to springboard off this lesson, so a rapid review is in order.
The essence of lesson one was to get you familiarized feeling the shift into R-mode - the artistic mode. One way of tricking your brain into doing this is by presenting it with something that can be interpreted in more than one way. This picture can be seen as either two faces going "chin-to-chin", or you may have seen it as a vase. R-mode is invoked when you start switching back and forth between the two interpretations.
Now go ahead. Look at the illustration. Get it switching back and forth between the vase and the faces. You'll feel the switch of perception.
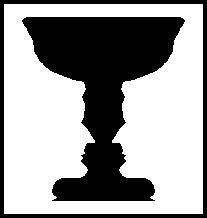
The famous Vase/Face drawing
Did it? Good! That's a simple warm up and a nice segue into this next exercise. And don't worry, this is a pretty short one - a grand total of three steps. In this exercise, you're going to be drawing the left eye - by "facing it off" with the right eye.
Step 1 |
Time: 15-20 minutes for each part.
Materials: 1 Pencil; Several sheets of 8 and 1/2 x 11" paper: cut in half, into top and bottom half's (so you're cutting through it's horizontal center.)
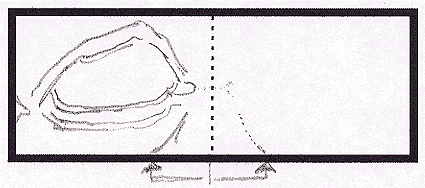
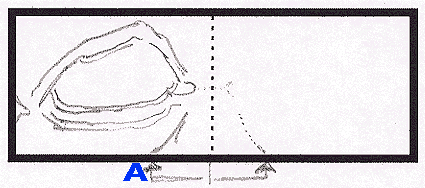
Draw a format - a wide rectangle like you see in the picture below. With your pencil, draw a dotted line down the middle, again, just like you see in the illustration below.
Draw
a right eye - from memory if possible -
to one side of
your paper
It doesn't matter which way the eye points, it doesn't matter what hand you draw with. It will be a little easier if you draw the right eye on the left side of the paper if you're right -handed, on the left side if you're left - handed. That's only for convenience - so you don't have to look through or lift your hand every time you make an observation. You might want to draw this exercise on a half sheet of 8 1/2" by 11" paper.
Draw a right eyelid from memory (right hand example).
Add Pupils after you draw the eyelids. I'll explain in step 2 what those arrows are for.
Step 2 |
Here's the fun part. Draw the mirror image of the eyes. That is, copy the eye you've just completed but do it in reverse. Start at the top of the drawing and work your way down. When you're done, you'll have a completed pair of eyes.
Note: You've been practicing right eyes and eyelids in the earlier exercises, so you're going to build right on top of that. Here's how I want you to approach doing the "vase/face" reproduction:
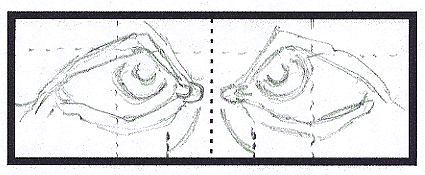
Start with one line or contour. I've chosen the eye groove. (I know it's at the bottom of the picture and I said start at the top. This works because it intersects the format) Note where that line touches the horizontal line of the format. (See the arrow at the bottom to the left of the dotted line (A).)
Here's the same picture to make this clear.
Now measure the distance to where that line touches the format to left of the dotted vertical line that divides the format in half. (On my screen that measures out to 4/5 ths of an inch. I put a ruler right up to the screen.)
On the other side of the dotted line approximate that same distance to the right of the dotted line. And make a little mark (The arrow to the right of the dotted line marks approximately where that intersection will take place in the mirror copy - again it's to the right.)
Remember to use what you've learned about negative space and proportion/sighting.
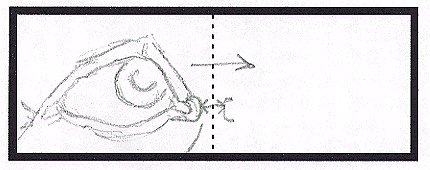
Here
I've added a pupil and marked where the canthus will
begin on the mirror-image side (the "<->"
sign).
With or without pupils the idea's the same: measure your way piece by piece, section by section. "Sight" your way back and forth across the dotted middle line and make a mark on your paper to the right of the dotted line - the same distance the original is to the left of the dotted line. You're making horizontal measurements. Also note the distance the original line or section is from the top and bottom - these are vertical measurements. I'm gong to add a few more dotted lines to show you what I mean.
Two Siamese fighting fish?
All the extra dotted lines you see drawn into this picture are little measuring lines - "sighting" lines. They're there to help make this drawing easier and more accurate.
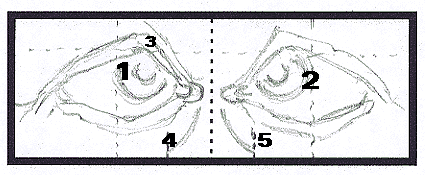
Try and follow me here. Look at the pupil in the left eye. It's left edge (1) is almost at the center of the rectangle it's drawn in. So I make another vertical line (2) the same distance but on the right side (the mirror image side) to mark where that edge of the pupil will be drawn over there.
Next, I draw a mark, (3) where the top of the eye is (actually the iris's upper border) in the original. I make a horizontal line across the paper. Why? Because in a mirror, the top of that eye and that line will be the same distance down from the top horizontal line. (The line I drew in this picture dips down a little as we go left to right. They say optimists write or draw upward as they go left to right. I must have been a pessimist this day.)
Lastly, you can see where I drew a short vertical line (4) at the bottom margin of the format: I was placing a marker for the edge of the "nasal groove". And I make another mirror image mark on the right (5). Is this becoming clear? Like any other "landmark" in the drawing, it's a measurable distance from the middle dotted line. (For that matter, it's a measurable distance from the top and bottom of the format - or from any mark on the page - you just want to make measurements from easy to spot features.)
As you get more practice, you can visualize these lines without actually needing to draw them in.
If you started with a right eye in the left side of the format two things are going to happen as you do this drawing :
1) The eyes you've drawn will be cross-eyed, and,
2) They'll be closer together than eyes naturally are. Not to worry, in coming sections we'll get proportions down pretty good. Right now I want you to concentrate on getting the features drawn accurately. But I'll let you in on a secret: eyes, are pretty much one eyewidth apart. The eyewidth is measured from canthus to canthus (i.e. corner to corner).
Step 3: repetition, repetition, repetition... |
In Step three, just repeat the first two steps at least a half dozen times. You don't have to do them all today - but I bet you can. With the firm foundation you've built doing the previous exercises, you've got the depth to run right through this. Don't be afraid of drawing less than perfect eyes! Perfection is not the point. The point in this exercise is to get back into left-to-right brain shifting and getting a feel for the main parts of the eyes. (But I bet your eye drawings are really shaping up. ) The repetition will burn the basic shape into your memory.
Reviewing
R-Mode: Little signals and hints |
Drawing the mirror image profile will be different from the first profile you did. Why? Because you'll be drawing it from the R-mode of the brain. In Betty Edwards words this is"right-hemisphere / R-mode drawing".
When you're done: |
Did you feel any conflict or confusion?
(Note: This is copied directly from the first lesson - everybody, even seasoned artists who've taken a break from drawing - go through this adjustment. I'm putting it here for you as a reminder that it's perfectly normal to go through these phases while drawing. Don't despair!)
In drawing the second profile, the mirror-image profile, did you experience any of the conflict I predicted you might feel? Any confusion?
How'd you get past it?
To get past this, what did you do? Did you find yourself scrambling for another way to approach the task? Some students say they had to picture the completed composition in their heads before they could "see" how to take the next step. Did you find yourself looking back and forth between the different parts of the ear? Comparing, measuring sizes and distances, reckoning angles? If you finished the picture and it look something like a symmetric pair of eyes, then you were doing it!
The point of this:
That your drawing looks like two eyes, symmetric and all, is not the point here. If you found yourself making measurements and estimations, if you found yourself making statements like "this curve goes out like this, and the other one goes in the opposite direction over here like this, this line angles away in relation to that one going in", then you were in R-mode. Correct representation will come.
Lots of students comment they entirely forgot they were drawing 2 eyes. They were just caught up in going back and forth, comparing one section of line to its opposite section on the other side of the drawing.
Putting the finishing touches on Eyes, Part I
Kasbohm & Company's
YouCanDraw.com
© Copyright, All rights reserved 1997
e-mail: jeffkaz@YouCanDraw