
The Supply Store
Back to YouCanDraw .Com
As in the ears lesson before this, I'm going to re-introduce you to the basic idea of Negative Space. If you've jumped in here without benefit of doing the foundation lessons section on negative space, that's no problem. ( I know how I just want to jump in the middle of a program when I see something I'm just dying to learn.)
If the terminology is just too strange sounding and it seems like there's big gaps in what you're learning in this lesson, then it maybe the best move would be to go to the main section on Negative Space and get a firmer foundation. Believe me - learn it well once and it'll carry you through not just these lessons but in all your drawings - forever!
A Quick Review of Negative Space and applying it to Drawing the Nose (to get to the new stuff, click here) |
What's Negative space? It's the space, the nothing around and within the objects you're drawing. In this exercise you're going to get more practice looking for and recognizing negative space while drawing the nose and it's parts. If you've done the Pure and Modified Contour exercises this exercise will be a breeze for you. These different sections build on each other, so you're getting more practice than just drawing noses: you're solidifying skills that will allow you to draw anything.
So lets dive in
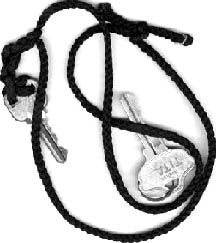
Recall this illustration? (Just below.) It's from way back in Foundation Lesson 6 on Negative space. It's here to refresh your memory. In the illustration, the key and black string are "hard objects". Hard objects, or "positive forms" are real things, that is you can pick them up, hold them in your hand and you can name them. The spaces around the objects - and we tend to ignore these - are what we call "negative spaces".
Pick out the "Negative space"
In this first illustration, the "positive forms" are obvious enough - they're the keys and the black string. But now I want you to put your focus on the shapes surrounding the keys and string - this includes the shapes between the keys and string and the format. (The format is the rectangular frame that contains the picture.)
There's
something subtle going
on in this picture
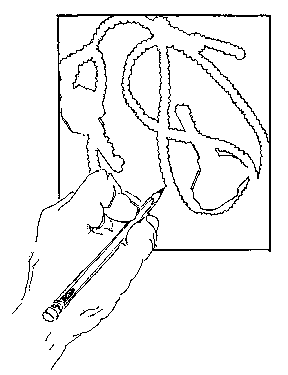
What's going on here? Just a picture of someone drawing keys and a string inside a rectangular format, right? Wrong! (Sorry, I set you up for that..) Of course if you said it was somebody drawing the spaces around the keys and string - I apologize - you were absolutely right.
The difference is subtle, but powerfully different. Put yourself in the body of the person doing the drawing. Now, how would it feel? Your attention is on those strange shapes created between the random lay of the string, the keys and the format. You're only indirectly observing the objects. The edges of these strange shapes you're drawing share their edges with the objects. These are drawable, definable shapes that are as real to the composition as the keys and string.
Making something of the nothing
The point of the exercises in Lesson 6 was to get you building an awareness of drawing things that aren't there, making something of the nothing. Like the holes in the Swiss cheese, or a middle of the donut, these "nothings" aren't anything physical you can put your hands on, but they do have a describable shape: that is you can draw them. They are "stand alone" shapes (albeit strange shapes) all by themselves and they help define indirectly the object you're drawing. In a drawing, they're as real as any other part of the composition. Think of a jigsaw puzzle: you can toss in your hand any piece of the puzzle regardless of what it has printed on it. This isn't how we normally approach drawing things in the world...

Here the Negative spaces are pointed out for you.
When you pay attention to negative space, when you acknowledge their shape as being as important to the composition as the actual object, well then you're in for an artistic breakthrough. In fact, you'll see if you just draw the negative space, you'll draw the positive form by default.
By drawing just
the negative space,
you learn to |
Drawing the Nose as Negative Space
Approaching this as a negative
space drawing
These lessons are based on the idea that every one can learn to draw: we all have the capacity to see as an artist, we just have to step by step recover our innate ability to use the artistic mode of our brains. Like all the other exercise you've done, this one is designed to gently prod you into R-mode: your own real time, inborn artist-in-residence.
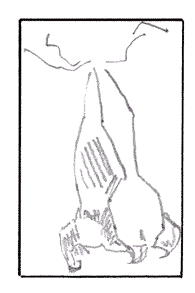
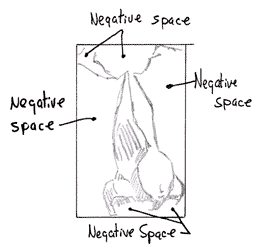
Here's a nose. You've seen it in the two exercises before this, so I'm sure it's looking pretty familiar by now. (And that's kind of exciting: you're recognizing and feeling familiar with the anatomy. Great job!! Pat yourself on the back.) I've got it surrounded by a rectangular format. Before you scroll down the page to the answer, try and identify the negative spaces in this illustration.
Can you identify the
Negative
Spaces?
Point out the Negative spaces
with a pen or pencil
Now that you've done that, take a look at the next illustration and see that you've correctly identified these areas.
(Note: imposing a format around the nose illustration isolates it and so makes it easier to draw. When you're doing an actual caricature of a person, you don't have this advantage - the negative spaces will be different. By getting used to identifying the anatomy now and getting in the habit of looking for negative space - wherever it is - you'll be ready for anything.)
The Negative Spaces around the nose
If you drew just the negative spaces around the nose in the above picture your drawing would look something like this:
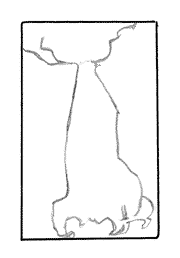
The "Negative space" nose
Something Missing?
It seems like there's something missing though, doesn't it? There's enough detail lost here by drawing just the outside negative shapes (bordering the format) that the nose becomes only partially recognizable. It's still accurate - and that's the part your critical mind must get past and accept (that it's accurate) or it'll interfere and try to draw a nose by how it "ought " to look. And that's exactly what we don't want.
The way (or one very effective way) you can fill-in the inside detail of the nose illustration is by expanding your use and understanding of negative space.
A New Twist on Negative Space
Up until now, I taught you that negative space is the area around the object, or holes in the object. That is, it was the non-object. "Non" standing for an area of nothing - where there wasn't anything at all, where there was nothing - no thing - you could name.
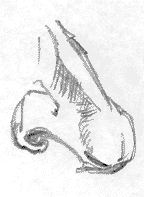
Today we're going to expand on that idea - with a switch. In the picture above, note the areas that are shaded. Areas of light and dark have shapes too - and can be considered negative space. Generally these shadowed areas represent a different face or plane of the nose - and light strikes it differently, i.e. it lights it up differently. If you squint your eyes while you look at any magazine photograph of a nose you can tell the shadowed areas apart from the highlighted areas.
In this illustration the side of the nose is artificially divided from the front plane of the nose by a shared line. It's also divided at it's sides by another shared line - where the nose would meet the cheek. In the illustration below this area is bound within the dotted line. (For convenience I'll call this the "flank" of the nose.)
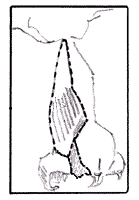
Perceiving
different areas in the
nose as negative space
So what's the point?
You'll see that you can switch your sense, your perception of negative space to just about anything you want to. This allows you to see the shape you're drawing (in this case the "flank" of the nose) as a separate, unique and until now an area you probably paid no attention to.
Like you'll do at the end of this exercise, like you did in the ear exercises, and like you did and in the foundation exercises, if you stare long enough at each separate space and shape within a picture you suddenly "feel" it to be an entity all by itself. (That feeling or shift is the R-mode "gestalt".)
Stare at this
until you see the negative
spaces as separate shapes
It requires the same shift into R-mode
just like everything you've done so far. And you're
getting that shift down like second nature by now.
When would you use this?
You'd use this as part of your arsenal of
drawing skills - one of the 5 basic skills of drawing. If
you were stuck because a shape was too complex, you'd
jump into "negative space mode" and put your
concentration on the area around what you were
stuck on - drawing the shapes that bound the one you
really wanted to draw and thus you draw the part you
originally intended to draw by default. Is this making
sense?
Point out the Negative spaces with a pen or pencil
Any shape can be considered "negative space". In fact, any shape becomes negative space when it's the space adjacent to the shape you're drawing.
So look again at this illustration. In fact I'm going to flip it upside-down and color in the areas that aren't "flank". This will make it easier for you to see the "flank" part of the nose as a separate shape. The point here isn't to make up new names for different parts of anatomy. It's to get you fluent at shifting into R-mode and jumping at will to different ways of viewing an object - whether it's real or not.
Now I want you to pick up a pencil or pen and pick out right here on the screen the negative spaces within the format and around the "flank" of the nose. "What are you talking about Jeff, within the format?" Recall the format is the rectangular shape surrounding the entire composition. I hear you protesting. In this illustration all the red, blue, and black areas are negative space in relation to the part we're singling out (the flank).
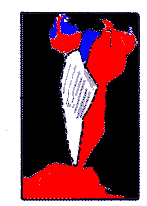
Upside-down and color distorted
See how the "flank" takes on a shape of it's own? And how the other surrounding shapes help define it's shape? Look at it again viewed right side up:
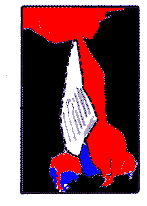
Right-side up this time
Even here, right-side up and colored like this, it's much easier to see it's unique shape. If you make it a practice of looking at the shapes within and around the main shape you're drawing, you'll get great at spotting them, at creating them right there in your imagination, and your drawing will improve dramatically.
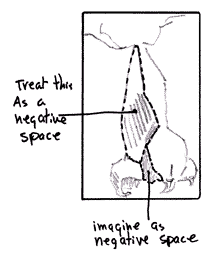
Back to treating the
"flank" as
a negative space
Whichever direction you approach drawing the nose, the result is the same. In this illustration (above) you can draw the front part of the nose (the highlighted area) and the actual negative space at the left side of the format by treating the flank as the main negative space. There's no right or wrong way to do this - the only thing that matters is that you trick your critical L-mode into hiding and allow your spatially-aware artistic R-mode to accurately report what it sees.
I hope I haven't over-complicated this
Hopefully I haven't needlessly over-complicated all this. If you stuck with me through this lesson doesn't it seem you've come to realize the nose is made of some pretty simple shapes? And if at first it didn't seem simple, do you feel like you have a new tool to expand on? If not, a little practice will drive the point home
Your turn to draw
Step 1:
Draw yourself a format or download/print the formats for each part of the nose. It doesn't have to be perfect - just rectangular, taller than it is wide. You can reference or print the formats below if you like.(Note: recall the format is the shape, the frame around your drawing, within which you'll do your drawing. Any questions, review the illustrations in the Formats section of lesson 6.)
Read through the exercise first.
Format for nose Here's some formats you can practice drawing your noses in.
Step 2
Center your attention on the negative spaces. They may be within the nose, between sections of the nose, or they'll exist between the nose and the boundary of the format. Here I want you to draw the negative spaces around the nose as they're pointed out here.
Imagine that the space between the nose and the format is another piece of a jigsaw puzzle - just like the blue water was a unique jigsaw puzzle piece against the orange sail in the jigsaw puzzle example in lesson 4. (In a jigsaw puzzle, the "not-object" negative spaces are as real as the object. Think of the negative spaces as being that substantial - like you could almost cut them out of a plywood plank and hold it them your hand.)
Imagine that the space is as much a real element of what is before your eyes as is the actual anatomy. Keep looking at it until you perceive the space meeting the nose in a shared edge - that the edge of the nose and the edge of the space are two different things but together they form a single edge.
Step 3
Draw the "negative spaces" around the nose.
Now begin drawing but draw the spaces, (just as they're pointed out in the illustration directly above). Concentrate on the spaces as if they were real objects. Sometimes you need to stare at the spaces for a moment or two and then magically, your mind accepts them as real - if unnamable - forms. (When you're done it'll look like this.)
Allow yourself to look through the forms - you want to arrive at a mental vantage point where you perceive the negative spaces as shapes every bit as real as the objects.
Step 4: Optional step
Just for fun, and if you want to really drive home the concept of negative space, you can do this: color in those spaces with a colored pencil or a marker like they're shown in the example. Coloring these in makes them more real, gives them more weight, convinces your mind of their realness.

Negative
space colored
blue and black.
Color the negative spaces with a marker or pencil. In this illustration I colored the top wedge of the nose blue - it's both part of the nose and part of the forehead. Since it can be viewed both ways, I decided to color it. It makes it a more recognizable shape. You can leave it white or color it - whichever seems to nail the point of negative space home better.
Step 5
Now, stare at one of the shapes. Keep looking at it. Gaze at it until you feel it to be real shape - as substantial as any object on the page. Gaze at it the way you looked at the vase-face, (lesson 2) in the earliest lessons. Remember how it shifted back and forth from vase to face? And when it "popped" into either the vase or the face, recall how it suddenly was one or the other? You're working for that same effect here.
Be patient, it may not happen instantly. It'll take L-mode a second to realize it's got no name or category for this thing - so it'll want to scan it's banks for some kind of association. Let it do what it has to. Eventually it'll get frustrated and allow R-mode to take over. And that's exactly what we want.
Step 6
1) Do 5 more drawings of the negative spaces surrounding the nose, just like in the first 4 steps above. You'll be doing it almost from memory by the time you get to the fifth drawing.
2) Repeat steps 1 - 5 for the "Twist on Negative Space" pictures. And they are these:
"Twist" picture 1:
Draw the
colored areas first
Draw this with colored pens or pencils if you have them. Draw the central white space by concentrating on the red, black and blue shapes around it i.e. draw the colored spaces and shapes first.
Do 5 drawings.
and finally, 3)
"Twist" Picture #2
Draw this 5 times concentrating on the "flank" area within the dotted line.
Draw this area first (the flank). Measure it's placement within the format by judging how far down it's uppermost point is from the top of the format. Then judge the distance from its lateral sides to the the edges of the format. When you're all done with that...
Draw the remainder of the shapes around the flank.
Do five of these. Pay special attention to the hook-like shapes that form the nares of the nose - right there at the bottom of the picture.
Take a break!
Then take a break! You deserve it. If you're still hungry for more drawing today do the "One Last Negative Space" assignment. Otherwise, do this last assignment tomorrow or the next day when you're fresh. It'll tie the whole nose together for you!
The Nose: last negative space assignments
Draw the different cartilages of the nose (Don't worry, this is a small download!)
Do 10 nose drawings just like the picture at the very top from memory!
Lastly: Draw a whole gang of formats freehand - make them different sizes and shapes, from 1 inch to 10 inches tall. Vary their widths. Now, within each format, draw an entire nose - do it form memory, but be aware of how the parts come together, how they share lines, how they fit. It's ok to reference the other pictures.
If you've done all the exercises in this lesson you can draw noses from memory - and they don't have to be perfect! That's the whole idea of caricature: realism with distortion. This should be fun. Let your hair down and go to it. You can do it!
Congratulations!
Go to the next section on applying the technique from "Vase/Face" to the nose. It's not nearly as long as these first three sections and it sets you up for a really fun exercise: cartooning the nose.
In this section, you'll be concentrating on doing both left and right noses. Up to this point, all you've been drawing is noses viewed from the left.
Vase/Face: left and right views
Do you think something needs more explanation? More Pictures?...Please send me your comments! If you think something is confusing in this lesson (or any lesson for that matter), and you can recommend a specific drawing or section that needs more explanation (or if an additional drawing would help you), email your suggestion to me. This is cyberspace and web pages can be edited and added to endlessly!) -Jeff |
Kasbohm & Company's
YouCanDraw.com
© Copyright, All rights reserved 1997
e-mail: jeffkaz@YouCanDraw