 The Supply Store Back to YouCanDraw .Com |
This is it folks. If you've been working through the lessons one at a time, you've arrived at another landmark. In this last and final section of the foundation lessons, you're going to pull together everything you've learned so far. If it's taken you three months to get this far, fantastic! You've been progressing all along. Now I'm going to tell you something - it might shock you, but it's true. People have gone through live, (i.e. with a teacher), sessions of the same lessons and having no background drawing talent whatsoever, (in their minds), have learned how draw likenesses in as little as 5 days. Yes, 5 days. The Betty Edwards group does it all the time. These are an intense five days with 7-8 hours a day of immersion. I tell you this not to make you feel bad but instead to impress upon you that people with no apparent drawing skill could learn to draw. And they're no different than you. You can do exactly the same. You have it in you. (Dr. Edwards classes are 1000 to 1500 dollars for five days - I know - I took her instructor's certification course in 1998.) It doesn't happen by force, but by letting go, by getting into R-mode: the think-free, language free, real-time space where you are consciously in direct contact with moment-to-moment observations streaming in from your senses. Go back and do a quick 5-minute pure contour picture. (See lesson 4 if you're having trouble with this. Pure contour drawing is the best technique I know for getting fast into R-mode.) Highlighting
on highlights In this drawing you'll be stringing together what you've learned about lines, contours and shared edges, perceiving angles, formats, negative space, and shadowing. You'll see that highlights can be interpreted as just another shape and value. Like all the other exercises, this one is geared to pull you into the artist's mind: the R-mode of the brain.
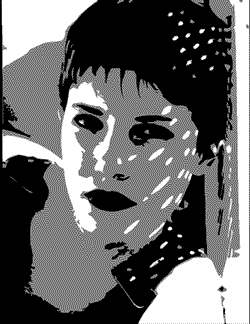
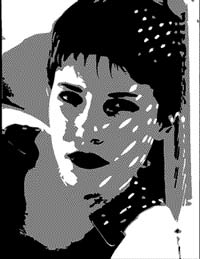
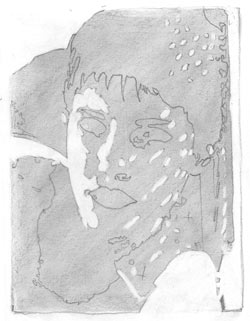
This women is our subject,
(squint I'll present with you a picture above, below, and scattered throughout this lesson. It's a computer enhanced copy of the pretty girl you see just above. You can use it for your assignment, but I recommend that you eventually do a live drawing - a "live" drawing is one where you draw a person or object from the real world. The full three-dimensional world. Photos and pictures are already reduced to 2-dimensions. (And this the real trick of drawing: recording a likeness from the three dimensions of the real world on to the two dimensions of your paper.) Back to top
Our "three-tone"
computer enhanced model: Drawing
from life Many caricaturists and portrait artists will tell you this: drawing from real life, though a little more intimidating at first, is actually easier, more pleasurable, and more likely to produce a likeness than drawing from a photo. So eventually I'd like you to draw a live person - you'd like to draw and caricature a live model: and isn't that why you signed up for this program to eventually do? Start with a friend, even a stuffed animal (or a person holding a stuffed animal), and ease your way in. This can be a little intimidating at first but don't dodge it! Use a mirror and try drawing yourself. When you're working with live models you're working in three true dimensions. Working from a photo or from art on a computer screen saves you from a significant - and very satisfying step: moving from three dimensions to two. It's already done for you in a picture. For the warm-up part of this exercise, you'll be using the somewhat contrived - but very realistic - photo "derivative" of the young model you saw in the introduction section section of this lesson. Supplies
you'll need for this assignment
The "Woodless Pencil"
Chamois cloth
Getting
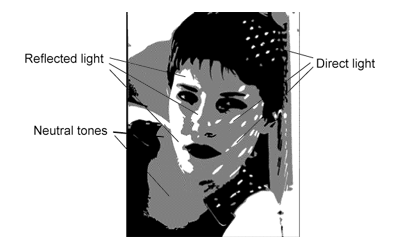
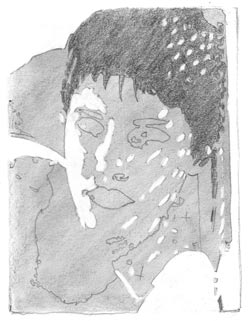
started In this exercise you'll be drawing the three-tone model you first saw at the beginning of this section. Here're some things to note. Picture this scene in your mind: she's sitting in front of you, well slumping in front of you. Your drawing paper is in front of you. You have a strong light source. Ask yourself this "What direction is the light coming from?" A strong light source as coming in from the right of the picture - through a screen window. It's little beams of light are landing on her cheek and shoulder. There's a white wall to your left - you can't see it but it's casting light back on to her cheek. This is reflected light and in this enhanced picture it's as strong as the sun rays coming in through the blinds. (Go back and look at the color picture at the top - squint and see if you can't see the reflected light on her right cheek (for us that's the cheek on the left side of the illustration.) Try picturing this arrangement as you prepare to do your drawing.
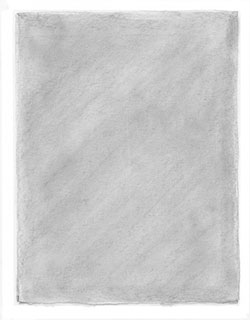
There's three tones in this picture Preparing
the format Remember, the format is a shape you draw on your drawing paper. It acts as the "container" for your drawing. Grab a ruler or straight edge and draw it in. It's just a simple bounding rectangle in this case. Below I've listed the proportionately sized formats for each of the three paper sizes. If you need to reference the section on drawing formats and the function of the format - lesson 6 - click here. 1) Draw your format this size:
Building
your own "ground" 2) Now that you've drawn a format on your paper, we're going to fill it in. By filling it in, I mean "coloring" it in with a medium tone of gray or pencil-tone. This is what a ground is: a background of color. When you erase this - the ground - you'll be left with the white of your pape, (or beige, or yellow, or manila...whatever color your paper is). This serves as a highlight. In this drawing, you'll be drawing with your eraser, carving out the whitest whites of the picture, seeing them for the shapes they are. To fill in the ground:
Filling in the format
Sharpen your pencil over your paper
Use the chamois for a really smooth blend
Getting a fairly uniform ground
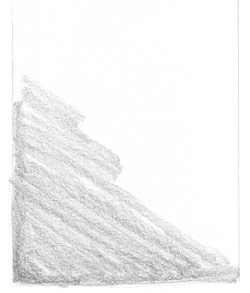
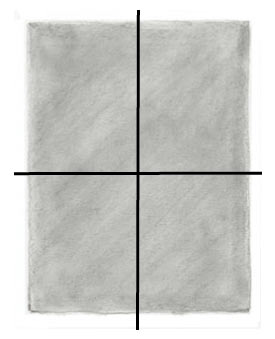
Option: adding "cross-hairs" Options for doing this assignment You have three options for proceeding: first, you can draw all your shapes ahead of time like I did here, or second, you can erase "ground" to reveal highlights while shading-in the darker shapes with your pencil. Or thirdly, combine both - jumping in at any point. We want to concentrate on the lightest areas of the page first - on the highlights. If you're feeling at all unsure about your drawing skills, start by drawing in shapes nearest to the intersecting cross-hairs and draw your way out. Then go back and erase out the highlights. The core of this exercise: you'll be drawing with your eraser. Just like you've been making marks and drawing shadows with your pencil, in this exercise you'll be making marks with your eraser. It's the same as using a white pencil or white paint except you're taking lead off. In effect it's like a wide-point reverse Etch-a-Sketch. If you use the eraser pencil (like you see in the picture just below), it really is like using White-out.
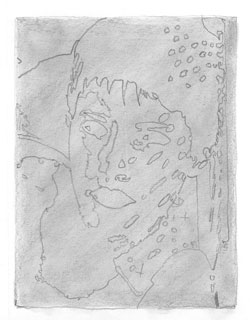
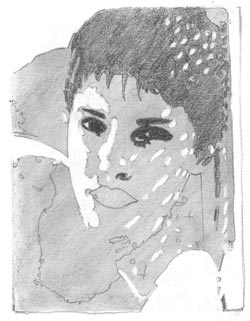
The eraser pencil Click here for upside-down version A primer In the next picture I've lightly drawn in all the different shapes: the negative spaces, shadows, and positive forms. A word of caution: don't trace the original picture - like I did - in this assignment. If you do, promise yourself that you'll do a second drawing doing all the shapes, shadows and highlights "longhand". That is draw it by incorporating sighting, contrasting, and reckoning - with nothing other than the tools you've learned in these first nine lessons. By doing this assignment "longhand", you'll really be incorporating all you've learned about drawing - which is really about reaching the artist's state of mind.
A "cheaters" view of all the shapes :-) Getting
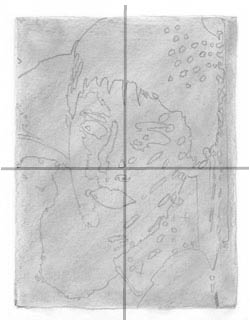
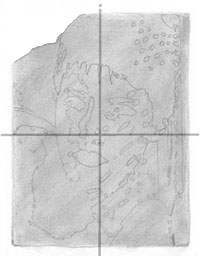
your drawing started Making the first marks. To get you started, I want to give you something to aim for: I want you to find the center of the picture. I'm going to assume you've imposed crosshairs over the ground. If we add cross-hairs to this contoured sketch we end up making four "sub-formats" and it'll look like this:
Contour sketch with crosshairs The cross hairs come really close to intersecting on this one small little shape of light. It's couched in the "lower right corner of the upper left sub-format" of the overall format. Look at the illustration both above and below until this makes sense.
Pointing out the shape closest to the center You can see there's a pretty specific shape we can pinpoint as being very close to dead center of our format and picture. This is a great landmark. When you actually get going on your drawing this'll be a great place to start. But let's
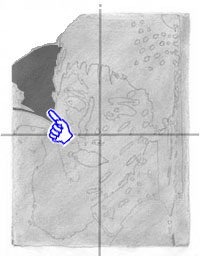
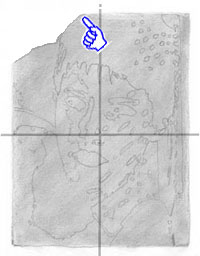
get oriented to the whole page The center is only one place to start - but you're not limited to that by any means. Gaze at the drawing subject. Squint your eyes. Pick out for example, the large area of highlighted negative space in the upper left corner to rest your eyes on, (it's triangular in shape). While looking at this section (that is, with your eyes pasted to the middle of this space), while still squinting, move your awareness around the rest of the illustration.
Now go through this same "awareness" procedure with the picture you're about to draw. While looking at the middle of the large highlight, become aware of the other surrounding shapes: light, dark, and mid-tone, (the mid-tone is the ground). Just like you saw in lesson 4, the different shapes all come together like a jigsaw puzzle, (you'll find the jigsaw puzzle at the bottom of this link if you go there - it's a sizable page). Then move yur eyes around the page, doing the "awareness" exercsie at each stop. If this is difficult at first, try looking at the upside-down version. Scan over it. Pick out the different tones. Pick one shape and gaze at it long enough so that you see it as a distinct and unique shape. Then try to become aware of the other shapes around it. Move to the next shape and do the same. You'll see how all these shapes now have a unique and distinct form. Consider next just the lightest spots in the picture - they're all highlights whether they exist on the subject - the positive form - or in the background - the negative space. Also notice there's very little detail in any of the shapes beyond just the shape of it's own outlining contour. (This is why squinting is such a great tool when you're drawing - it helps you focus on the most prominent shapes and allows you to forget about all the overwhelming detail.) Come back when you're done. Alright, I know - I'm running you all over the place. These are R-mode warm-up exercises. Let's go back to that left upper corner highlighted negative space we started talking about above. I've singled it out in the right half of the following pair of pictures.
Like you've done before try to see this shape as it's own, unique, unnamable shape. Go to your formatted paper and either erase the shape out, or draw the contour line first - then erase the ground away from the rest of the shape. The arrow in the picture on the left below points out again the the contour of that shape. The picture on the right is the completed, drawn-by-erasing shape.
"Draw" the shape by erasing it out of the ground Moving on now. The shape just below this first highlighted negative space is a "ground-tone", or a "mid-tone". Since it's already the color of the ground, we don't have to do anything to it except reckon where the next shape is in relation to it. By drawing in the contour of the next highlight, or erasing the highlight out, this mid-tone shape is created by default. Here I've darkened it to emphasize it's shape:
Visualizing the next shape This makes sense doesn't it? If you add cross hairs you can see how the overall picture can be thought of as being four smaller pictures contained within the larger one. As you work your way out systematically from any starting point, each shape becomes another referance - you build your own references as you go. Back to using the crosshairs If you use cross-hairs, you've added four more major references. You can askfor example "where does the shadow of the eye go in relation to the middle vertical line? In relation to the shape I just drew? In relation to the middle horizontal line? What proportion of the sub-format* does this first erased shape occupy? In what direction or by what angle does it's contours move off in?" You can ask these kinds of questions for every shape you draw. (These questions should be very familiar by now - you've been using all of them throughout the first eight lessons.) (*By sub-format I just mean one of the four smaller divisions of the main format made by adding cross-hairs.)
Erasing the shape from the ground Look at how our picture looks now after erasing this first highlight into existence. Look at it now in relation to the cross-hairs. If you've got cross hairs on your format ask your self these kinds of specific questions, (squinting your eyes helps):
Ans: goes to right about there
-
Ans: goes to right about there
- Go through this process for every shape always relating, comparing, contrasting, sighting it's proportions, squinting and recording what you've observed on your paper. Moving to the next highlighted shape Moving on to the next major highlighted shape we move into the territory of our first positive form: the highlight of our model's right shoulder and it's blend into her right cheek. (Remember: when I'm talking about the subject - the girl - left and right mean her left and right. This is known as anatomic left and right.) Here's the basic shape. It's pointed out in the picture on the left - you'll have to look pretty close to see the edges of this shape - and drawn by erasing it from the ground in the picture on the right:
Go through the same series of questions we went through just above to analyze where this shape ought to go in relation to all the different landmarks and references around it. Keep moving... As you draw - and especially if you're drawing in the shape first before erasing it from the ground as I've done here - remember to use what you've learned: each line, contour and edge runs it's course. It angles here, it angles there - always in relation to the other surrounding lines and shapes. Lines converge to form shapes. Each shape is bordered again by a line, a shared edge, a contour. Each shape can be identified by it's relation to other shapes and it's value of tone. Compare the relative volumes of the shapes. What portion of the differnt sub-formats do they occupy? (It's easier to figure this out than trying to figure out how much a shape occupies of the whole "big daddy" picture.) ...And keep on moving By design, the illustration you're drawing here has been made with a finite number of shapes and colors. In fact, there's really just three colors. That's all you have to worry about. When you do your drawing remember to only draw/erase what you see. Don't worry about adding every detail - nor manufacturing detail. Trust that the shape and distribution of all it's component parts will be easily interpreted by your viewers. If you choose to draw all the shapes first, i.e. if you pencil them in like I did before you do any erasing or shadowing you'll come to a point where you're ready to start adding tones. If that's what you do, remember to begin by erasing the highlights first. Let's move on. Finishing
the highlights Whether you're using cross-hairs or not, you'll eventually get all the highlights erased from the ground. But how to proceed in the meantime? I generally recommend starting in one area and moving in a progression from one adjacent shape to another. You're at the point now where you could - and can - jump around, adjusting a little here, a little there. If you feel need a more conservative approach, that's fine too. Here's how this picture progressed as I made scans of each step:
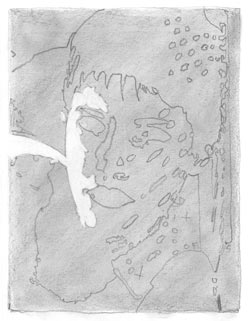
Erasing the cheek and right shoulder highlight
Starting on the direct sunrays
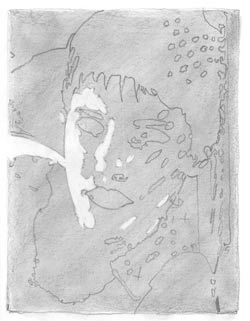
Erasing the rest of the
sunrays, the left shoulder Finishing
the picture: adding shadow with pencil Lastly, to finish off your picture, you'll be penciling in the shadow and dark areas by using layers of pencil. You can cross-hatch like you saw in Part three of this lesson or you can use marker. It's up to you. All you need to do is follow the same shape recognition techniques you've been using except instead of erasing, you'll be penciling. I'm getting redundant here. Look at the following series and it'll be obvious:
Penciling in the hair
Shadowing in the eyes and eyebrows
Shading nares, lips, dress and everything else Feeling stuck? get away
- back up, get real physical distance from your drawing -
we're incorporating proportion, line and edge
recognition, negative shape and positive form. That's a
lot if you think about it - but
don't think about it, this will all have been naturally
incorporated if you've been doing the lessons and the
homework. Comparing
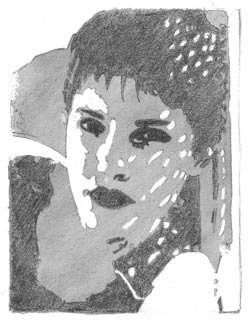
Finally, lets compare to the original. Comparing to original - flip your picture and compare to the upside-down version. find each of the individual shapes in both your picture and in the original. Like you did in the shading/shadow exercise, look for small changes or inaccuracies and look to see how it subtly changes the expression and feel of the drawing. See the following links for your drawing. So go for it! Go back to the top, grab your paper, draw your format, fill in the ground, line up the cross hairs, start your timers and start drawing the full size picture you see here - the full size picture! You can do it! One
last comparison Hopefully you've got your initial pre-instruction drawings somewhere. (Remember those? Go back to the Lessons Library - you'll see what I'm talking about.) This would be a great time to pull them out and compare your first drawings to the ones you've just completed.
It's pretty obvious I've traced the example above. I did that because it was faster than doing a scan after each and every step. The idea is the same though: squint, identify the major areas of light, dark and middle tone on all of your subjects. Get the shapes and proportion right and your admirers will instantly make sense of your drawings.
The original
Kasbohm & Company's YouCanDraw.com © Copyright, All rights reserved 1997 e-mail: jeffkaz@YouCanDraw |