
The Supply Store
Back to YouCan Draw.Com
Lesson 6: putting these ideas to work - your exercise |
More Negative Space |
As mentioned in the first part of lesson Six, L-mode is great at naming familiar objects, at categorizing them, and doing both tasks rapidly. If L-mode encounters an object or space that is both unfamiliar and unnamable, it'll either ignore it, get irritated, bored or it'll pass the job on. And that's exactly what we want it to do.
Exploiting the Gap
We'll take advantage of that gap again to recognize negative space: exploring and recording the areas around nameable objects. Since these areas are unfamiliar, and they're like complex little puzzle pieces, R-mode will find what falls on the retina of your eye will be "different" from the norm and you'll find it interesting to draw.
The Strategy
In previous exercises you've presented your brain with unfamiliar shapes and objects. We're applying that same strategy again: setting up the conditions for R-mode to take over.
Step 1
Draw a rectangle - that is, a format - on sheet of paper. You can draw any shaped format you like, but I recommend drawing a rectangle. The rectangle is the accepted convention in art any ways. You're never limited to it, they're just more prevalent. They're easy to reproduce too, and that's important when you're dealing with scale and proportion.
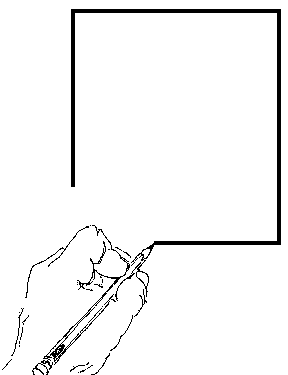
Draw a square format
Now draw a second format exactly the same size and dimensions as the first. Trace it if you need to. (Suggestion: draw the format with a black magic marker so you're able to see the line and trace it through another piece of paper.)
(Note: recall the format is the shape, the frame around your drawing, within which you'll do your drawing. Any questions, review the illustrations in the Formats section of lesson 6.)
Step 2
Go and find three household objects: a light bulb, a couple of stray keys, a scissors, a vice grip, any other tools you might have handy will do just fine. These will all be nameable objects. Nameable objects, things we can attach a name to, generally will be positive forms. Remember, positive forms are concrete objects.
(If you don't have anything close at hand, or you'd rather work directly from the computer using the examples in this lesson, go right ahead. You could also use any of these: Clips, Compasses, Trombone.)
I know it seems almost absurd to refer to a key or a scissors as a "nameable object", but I'd like you to build an awareness of how language can influence what you see and consider real. If someone tells you to grab the key to your new Porsche Carrera, you're not going to be too concerned or observant of the white table top you scooped it off of. It's as if the table top doesn't exist. "Nameable objects" can be represented by nouns. When you come to understand the meaning of "negative space" (and you will shortly if you don't already) you'll learn to see these spaces as real as the objects you're drawing. In fact you'll be describing them by names such as "the triangular space above the key on the left that reminds me of the state of Maine". In drawing what's understood as real can take on different meanings.) |
Step 3
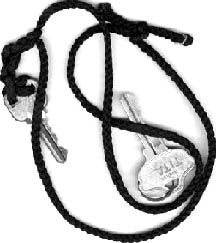
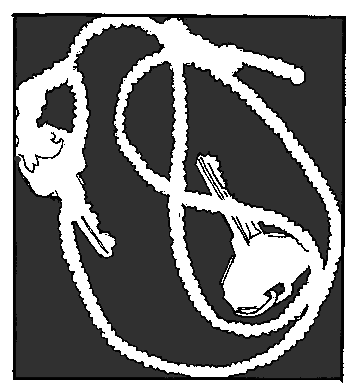
Look at the first illustration. (Scroll down 4 inches.) I've dropped a couple keys and a black braided string on to a sheet of paper within a square format.
Place your objects, that is physically pick up your objects and place them on your drawing paper - within your drawn format like the objects in the first illustration. Your objects should be touching the edges of the format, with spaces and gaps between them, etc.. Arrange your objects so you have a least two or three fully enclosed spaces.
Arrange them in ways that are interesting to you. This is actually a simple act of composing - that's not our focus right now but paying attention to what's pleasing to your own eye will help you develop and respect your own perspective.
(I've cropped this picture in PhotoShop. Pretend the black frame around the objects is the just like the format you've drawn on your piece of paper.)
First
Illustration. Place your household objects
within a
format drawn on a sheet of paper
Step 4
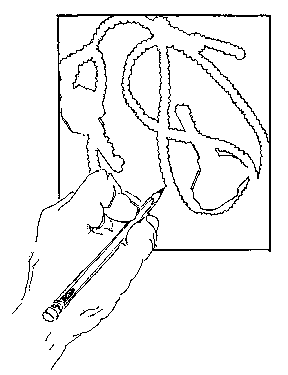
In the first illustration the format touches the edge of the string forming some interesting negative spaces. Now with your objects arranged within you format...
Center your attention on the negative spaces. (they may be within the object, between objects, or they'll exist between the object and the boundary of the format). Look at illustration two.

Illustration Two. Focus on the negative spaces.
Step 5
Now begin drawing your first object but draw the spaces. Concentrate on the spaces as if they were real objects. Sometimes you need to stare at the spaces for a moment or two and magically, your mind accepts them as real - if unnamable - objects.
(If you printed the examples, you can do these two ways: draw them as you did in the modified contour drawing, looking back and forth between the object and your drawing paper; or you can go ahead and trace them first, then draw them. You could also draw them directly from the screen.)
Draw or trace those spaces just like you drew over the line in the face-vase drawings. Allow yourself to look through the forms - you want to arrive at a mental vantage point where you perceive the negative spaces as shapes every bit as real as the objects.
Draw the "negative spaces" around the objects.
(For reinforcement: see the jigsaw puzzle example where the sky was as real as the sail of the boat. In a jigsaw puzzle, the not-object spaces are as real as the object. Think of the negative spaces as being that substantial - like you could almost cut them out of a plywood plank and hold it them your hand.)
A finished negative drawing of the keys and braid in the first illustration looked like this (there's a little extra detail on the keys):
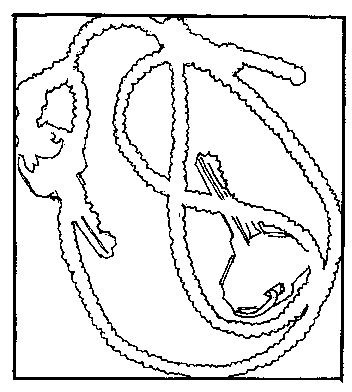
A negative space drawing of the first illustration
Step 6
Now color in those spaces with a colored pencil or a marker like they're shown in these examples. Coloring these in, makes them more real, gives them more weight, convinces your mind of they're realness.
Color the negative spaces with a marker or pencil
Enclosed Spaces
Here's a distinction I'd like you to notice. There's spaces between the objects, within objects, and between the objects and the format.
I want you to concentrate on the spaces between objects and within objects. The spaces within the objects (like the "eye" in the key where you loop the key ring or chain through) and between objects might be open or enclosed. The "eye" of the key is enclosed. Most of the spaces between loops of string are enclosed. The areas colored blue in the illustration below represents enclosed negative spaces.
Recognizing the enclosed spaces will help you visualize negative space on more "complicated" objects like in faces or caricatures.
(If you came here from lesson 7, and want to return.)

The enclosed negative spaces are colored blue.
Step 7
Now, stare at one of the shapes. Keep looking at it. Gaze at it until you feel it to be real shape - as substantial as any object on the page. Gaze at it the way you looked at the vase-face, (lesson 2) in the earliest lessons. Remember how it shifted back and forth from vase to face? And when it "popped" into either the vase or the face, recall how it suddenly was one or the other? You're working for that same effect here.
Be patient, it may not happen instantly. It'll take L-mode a second to realize it's got no name or category for this thing - so it'll want to scan it's banks for some kind of association. Let it do what it has to. Eventually it'll get frustrated and allow R-mode to take over. And that's exactly what we want.
How Play-Doh and the Road Runner can help You visualize Negative Space.
Remember the old cartoons where Wiley Coyote would chase the Road runner at breakneck speeds around cliffs, over cliffs, and off cliffs? And remember the impression the coyote would leave in rock walls and in the canyon floor as he would rocket in to them? Remember the cookie cutter-like outline of his body left in stone? It's that outline, the outline of the coyote that's formed in the rock - that's analogous to the negative spaces you're learning to recognize here.
Shared Edges
Think of the outline of the coyote one more way: the outline of the hole left by the coyote shares an edge with the inside of the rock. If you now draw the rock, you draw by default, the coyote.
One last analogy: Play-doh. Picture in your mind the old Play-doh "cookie cutters" where you forced Play-doh through a cookie cutter shape squeezing out heart or moon shaped pretend cookies. The edge of the Play-doh shared the edge with the cookie cutter. If you traced the cookie-cutter form, you end up drawing the star or moon or heart shape by default - like a stenciling form and a stenciled drawing.
Two more drawings
When you're finished with your first object, go right to the next one. Follow the same steps as you did above:
Draw a rectangular format, then duplicate it as exactly as you can on second sheet
Place your object within one format. (you might want to size the format so the household object you're' drawing fits snugly within it - so the objects' edges touch the edges of the format. This makes for more defined negative shapes.)
concentrate on the spaces around the object, within the object, and between the object(s) and the format.
Try to draw those spaces - not the object. And by default, you'll draw the object.
When you're finished drawing all the negative spaces, color them with a pencil or a marker. This will make them seem more real.
Stare at these colored shapes until you feel they real bona fide objects.
If you're hard pressed for objects to draw, or you'd like some extra work, draw these objects by drawing the negative space within or around them: Clips, Compasses, Trombone. Concentrate on negative space, enclosed negative space, and format. If you draw these, It will be easier if you draw the format in the same dimensions as the format around the objects. For example, the format around the trombone is a long narrow rectangle. For one more abbreviated run through this exercise, click Ram example. |
You can also print out the pre-formed format right from the program (this will be used more in lesson 7). You'll be doing three drawings.
Turning your attention to your furniture
With the "coyote" and "Play-doh" examples fresh in your mind, focus on a piece of furniture in your house, or office, or wherever you are. Choose any piece. If there's a chair handy, focus on it. Stare at it for a moment, picturing it's outline. Now on the count of three you're going to imagine it disappears completely from sight leaving only a white space where it used to be - an outline just like the coyote outline in the rocks. One, two, three...Voila! It's gone. See the outline of the chair?
Chair / format / negative space / animation
Now, look at the ram just below. Single out one of the negative spaces, (anything black in this picture is negative space). For sinplicit's sake, zero in on the shape between the rams two front legs. Look at it until you see this area as a distinct shape. Just as you did this above, it may take a moment or two for it to "pop" into "shape-hood". Since L-mode can't find a name for this shape, it's going to pass the job off to R-mode. (By now L-mode will doing this more and more graciously.) Give it a little time.

Everything in black is negative space
Go to an adjacent area marked as negative space (try the area between the one hind leg and and the most posterior front leg). Gaze at it until it too appears as a distinct shape. Remember to take a little time, allowing the shift to occur. Go right on to the next areas in the illustration until you've gotten half a dozen shifts under your belt. (back to lesson7)
Congratulations!
You're halfway through the foundation lessons and well on your way gaining the skills to drawing hilarious, popular and profitable caricatures.
In lesson 7 you'll be introduced to a very helpful tool in your drawing repertoire: incorporating the viewfinder. It's a direct extension of lesson number 6, so try to do this lesson within a week after you did lesson 6.
Kasbohm & Company's
YouCanDraw.com
© Copyright, All rights reserved 1997
e-mail: jeffkaz@YouCanDraw