The Supply Store Back to YouCan Draw.Com |
Pure contour of a small section of my palm Ok, time to get some real hands-on with all this stuff. Don't worry about the definitions you just learned - you'll understand them just fine as you see them in use. When you do this exercise, hopefully you'll have carved out a good 20 minutes of time. If you don't have that much, work with what you got. If you can put aside 45 minutes or more, all the better because once you get into this exercise, you won't want to stop. It really is that involving and relaxing. Not so relaxing you'll fall asleep, no quite the contrary. You'll be more alert and aware and observant than you've probably ever chosen to be while drawing. So lets get started. Get your drawing materials, find a comfy place to draw, as usual read through the directions first and watch the animation. Then do your drawing. Have fun! Lesson 4 animation: Pure Contour Preliminaries:
Find a quiet place where you won't be disturbed and set your timers for 20 minutes, (30 if possible). As mentioned before, a timer relieves you of the burden of worrying about a time: an L-mode function. If time isn't an issue, great!
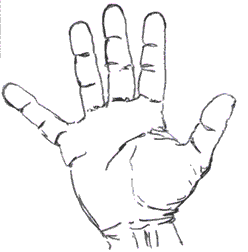
Get a piece of paper and tape it down to the table or desk or any hard surface you're drawing on. Preferably, get a big piece of paper - 18 x 24 inch paper is not too big. It's not important what direction it's in, just place it so you feel comfortable. You don't want it slipping around under your drawing hand. That gets irritating. In this exercise, your own hand is going to be the object of study. That is, you get to draw your own hand! You'll be amazed how interesting it is.
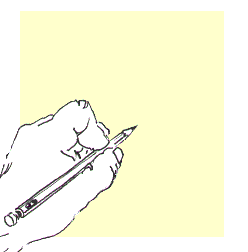
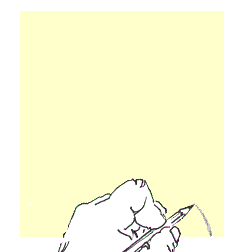
Get yourself seated so that your drawing hand, the one holding the pencil, is lined up and ready to draw on the paper. That is, it's on the paper ready to go.
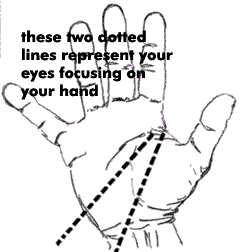
Your drawing hand at the ready Now, with your drawing hand on the paper, turn the rest of yourself around, away from the paper as far as you comfortably can. Look at the your hand - the other one, the one you're NOT drawing with. Find some support for it, because you'll be holding this position for at least the next 20 minutes. (Some people rest their elbow on their knee, or on another chair, etc.)
Turn yourself away from the paper: Don't look at it! You'll be drawing this hand without seeing what you're drawing. (Because you're turned away from the drawing. I know, seems obvious, but some things need to be really clear.)
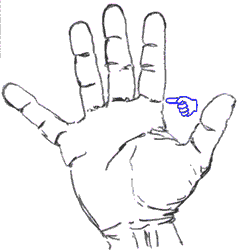
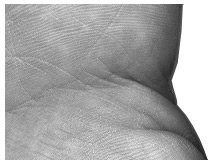
This is all your eyes should be on There's two reasons you're doing this:
Why? If you look, you start judging. If you start judging your drawing, if you start saying "that's not how hands are drawn!", you get pulled right back into L-mode. You'll reference your symbolic hands, not your own real-time, whorled, intricate, incredibly unique god-given hands. And we're not after a likeness of your hands! We're after something much richer here. You need only draw what you see. Nothing else. It's a pretty simple idea, but there's lots of old learning to let go of here. Relax. If you draw what you see, there's no way to do this lesson wrong. Many have commented that this was the most fascinating step in their drawing lessons. Ok. Let me throw something out: don't think of the color blue. What's the first thing you do? See blue. Now don't even think about looking at your drawing. You had to look, right? Now that you have that out of your system, really try to heed this: keep your eyes on the hand you're drawing. The urge to sneak a look at what you're doing is going to be very strong at first, until you settle deep into R-mode. Just let go... Focus your attention on the Hand You're Drawing:
Reminder: eyes stay on your hand Stay focused on your hand. Keep your attention nailed to the hand you're drawing. Picture yourself facing away from the drawing paper. If you have to look, you're forgiven ahead of time. Now get back to your hand. Every time you look at the drawing, you get tugged into L-mode. I'm getting redundant. I know you're going to be great at just observing your hand and drawing it. Expect to fall deep into R-mode. (And again, that is the goal of these foundation lessons.) Two things to do in this step. First. In this position, turned away from the drawing paper, pick a spot on your hand, any place, and pick an edge. "Perceive" an edge. You're using your eyes only at this stage.
Pick a spot to start at - any spot Remember, an edge is any shared line: in this case, pick an edge of your hand. You'll be be perceiving the skin that forms the surface of your hand and the air around it. The two, the air and the skin of your hand, form an edge. Wrinkles, skin folds, nails, and open spaces, like the "O" between your thumb and index finger when you make the "OK" sign, all form edges. I tell people to start with the tip of their thumb if they're finding it hard to start. And if you do start with your thumb, and get stuck at the nail edge, try to draw the edge around the nail. Your brain doesn't have any name for this, so it'll be easier to keep L-mode out and thus easier to draw.) All the shapes and edges of your hand have a unity. Like the jigsaw example above, all the edges, contours, and folds, all the "topography" of your hand fits together. It has a unity to it. Second. Simultaneously, put your pencil tip on the drawing paper. Put it well within the border of the paper - you want lots of room to move around in once you get started, and you'll avoid writing on your desk. Keep a Snails Pace. Ever watch a snail move? I guess you can say they take their time. Ask yourself "how would it feel to move that slow?" With that picture in mind, move your eyes along the edge of your hand. Creep along like a snail, millimeter by millimeter. Zoom in on the edge you've started with.
Recording every little move your eye makes At the same time, start recording everything you see, as you see it, with the pencil on the drawing paper. Record every tiny variation, fold, and ripple you observe. You'll find that as you get more and more into this, you'll see more and more. You'll be amazed how deep you can go, how the layers of detail reveal themselves to your eye - from skin folds to fingerprints and much more.
Details start to jump out at you You are the reporter and your job is to record everything you see as you see it. Every variation and detail - gently record it. If you only complete 1 inch of your actual hand in 20 minutes, that's perfectly ok. Move your pencil in time with your eyes: if your eyes move a nanometer, your pencil moves a nanometer. If your eye zags 43 degrees to the left, so does your pencil. Eyes and pencil move the same distances together. Imagine they are linked directly and everything that's registered by your eyes is instantaneously registered in your hand at the drawing paper. It's as if they were the same recording apparatus. In your mind, picture an imaginary finger touching the actual edges you're seeing. Feel that edge. Eyes see and fingers touch together. Draw them as you "feel" and see them. Everything is moving in sync: eyes, imaginary finger, and pencil. Everything that needs to be seen is right there in front of you. No need to reference anything. Again, avoid the urge to turn around and look at the drawing. Just keep plugging, tiny variation by tiny variation, what you see being recorded as you see it. You might find yourself sensing you're drawing from the outside going in for some things, and from the inside going out for other things. This is fine. Be aware of it. As focused as you are on tiny swells, sweeps, waves and crinkles, you'll be aware at some level of the hand as a whole. Keep marching. Don't be concerned with how your drawing will turn out. That's not what we're concerned with. In the coming lessons, there will be lots of practice to do that. Right now the task is to just let your eyes track and your pencil record the complex contours in front of your eyes. By going one little piece at a time, you'll master seeing things just as they are. What you'll learn to do in this exercise is at the core of seeing as an artist. You are seeing as an artist. You are becoming an artist. You might feel conflict, anger, even a panic. This will pass. What you're feeling is your left brain protesting, old beliefs that say you can't do this start popping back, "I'm not an artist" you might hear from somewhere. Old L-mode, an old part of you might be threatened by this new ability. L-mode has to give up some control, it's dominance. That can be scary. Keep moving. Persist. You'll work right through this chatter advancing tiny bit by tiny bit. The negativity will dissipate, the volume will disappear. Just keep recording everything as you see as you see it. You'll drop deep into R-mode without even knowing it. You'll find yourself deeply involved with what you're seeing. Words and sentences, thinking will disappear. A certain contentment will take the place of the conflict you were feeling. It might start feeling as if you can see deeper and deeper into your hand, that you've scanning detail like an electron microscope. Just let it happen. You won't be aware of sound or music. There is nothing to fear. You're just relearning how to use a natural part of your brain that's been dormant for years if not decades. Look at it like this: you're recording a visual account of your perceptions. After you've finished
For many, this exercise places them deeper into R-mode than any of the exercises. Something I read years ago (In Betty Edwards book) - but didn't start practicing until recently is doing a warm up with pure contour drawing. It gets you right into the mood. The combination of prolonged observation and facing away from the actual drawing seems to allow the brains' perceptual machinery to really activate. And since this exercise is so involved and S L O W, the L-brain goes to sleep. It may fuss a little first - as you may have experienced - but it eventually passes it on to the right hemisphere. If you feel you didn't get the profound R-mode experience, no problem. Take a break, (minutes to days) and try it again. Be patient, it will come.
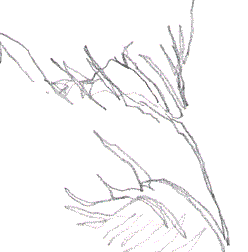
A portion of the finished pure contour One last point When you turn to look at your drawings, do not allow yourself to get critical of what you've drawn. The assignment was not to draw a likeness of your hand. it was to shift you profoundly into the R-mode. You don't criticize an infant because it can only walk 2 steps before it falls, right? So give yourself the same room. I applaud you for making the effort. You will get this! Look at the examples of pure contour drawing: very few if any of what you see more than occasionally resembles a hand. What I think is so fascinating is that what you do see are marks that are rich, that even have soul - they look like fine art even if they're unrecognizable, like an artist working out a complex scene. See examples | Your homework for this week | Back to top Kasbohm & Company's YouCanDraw.com © Copyright, All rights reserved 1997 e-mail: jeffkaz@YouCanDraw |