
The Supply Store
Back to YouCanDraw .Com
Lesson 8, Part V: Extending what you know about angles: another Drill |
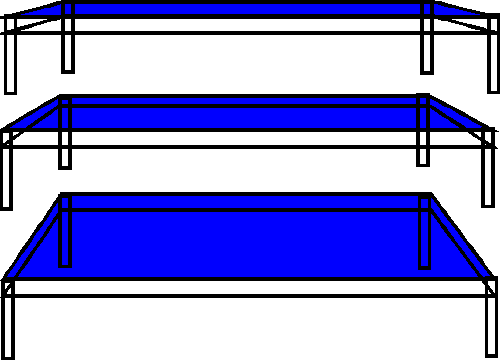
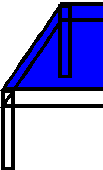
Three tables - all the same - but all different
When you look at these tables, from what angle are you viewing them? Would you say you're looking down on them from above like in a bird's eye view? Probably not. You know you're observing them obliquely - from across the room somewhere. Further, is it it difficult to imagine that this might the same table viewed from three different heights? Or three different views of three very similar tables? That's probably not too tough either. But what makes them different?
At first, when you try to put it into words, it might be hard to say exactly what's different about them. But as soon as I say what's different, you'll say "well dah, that's obvious". Before I say what's different about them, let me also say that if I told a class to draw these tables on their first day of class, 95 % of the class without R-mode training would draw the tables like this:
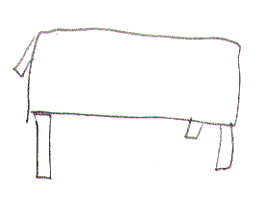
A "non R-mode" table drawing
Which actually looks more like a sheep than a table. (I drew this a long time ago.) What's the major flaw? It's this: the table top is still drawn rectangular - it still has relatively square corners.
So what's different about the blue tables above? Right, the table tops. Everything else - the legs, and edges are slightly different - but not nearly as different as the table tops. And even knowing that, many people still would draw an oblique view as a bird's eye view - that is looking down on it with fully square corners.
The problem with drawing corners
Why is that, and how do you get around this? The reason why is the artist, in his L-mode dominated stage of observation, is still ignoring the information coming in through his senses and referencing his preloaded, stockpiled, stereotypical version of a "table". You saw hints of this in the office desk example.
How do you get around this? In this section you've been exposed to sighting, and in lesson 7, the viewfinder. Let's use just those two tools to "reckon" this table and get it drawn a little more accurately.
Hauling in the viewfinder
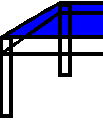
We'll just lop off a corner of each of the three tables and toss a format around each:
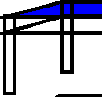 low angle table |
 medium angle table |
 high angle table |
The leg length and the horizontal level where the blue top begins is roughly the same in all three pictures. But look how tall the table top is in the far right picture - and how short it is in the far left illustration. Same table supposedly. Only difference? The height at which you viewed it from. The left picture could be a view from on your stomach with your head on your elbows. The middle shot, maybe from your knees. The far right shot from standing slightly bent over forward.
Now that they're formatted, it's obvious the left upper corner negative space (the white triangular shape) in each picture gets progressively larger. How can you describe the size of each negative space - and thus draw a more accurate table top? What applying that to the table top?
Without using a protractor it's fairly simple to judge the angle between the format and the table top. Using just our pencils, our hands and our eyes, we can estimate the angle the space makes.
- Like you did in the earlier sighting exercise in Lesson 8, close one eye, keep your arm and elbow straight, keep your arm parallel to the floor and to your line of vision (your arm and line of vision are parallel as you look at the horizon - keeping this configuration with: line of vision and arm always parallel), and line up the pencil with the vertical side of the format.
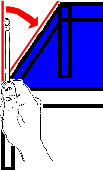
Recognize there's an angle
- Second, tilt your pencil until it's lined up with the edge of the blue tabletop.
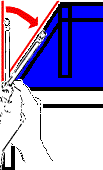
Sight the angle
- Now envision the angle:
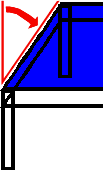
Visualize the angle
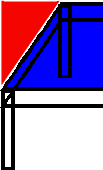
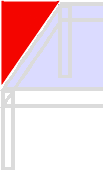
- Now see it as a "stand alone" negative space (1) , focusing your concentration on the new triangular space(2):
1. The negative space |
2. Focusing on it ( the red) |
Your next task would be to picture this angle on your drawing paper - then draw it. Then you'd go back and do the same sort of procedure for the corners of the other table tops. Not to worry, the next section has four animations that'll drive home this part of the section. By doing it over and over for yourself, you'll will eventually nail it down forever.
A little "L-mode" figuring: enter proportion
That's one way to visualize the difference between the table tops and corners: comparing negative spaces. To really appreciate numerically how the table tops relate, we're now going to take a glance in to proportion. What does "numerically relate" mean? It means we're going to find a "currency of comparison" to help us actually quantify the different dimensions of the blue table top. And that means we're going to allow what seems like a little "L-mode" analysis in the door - only to extent that you'll be making some verbalized measurements. Those verbalizations, those sentences you'll utter, they'll sound like this:
"for every one width of the tall table top, we can fit "x" of the really thin ones".
And this is still mostly an R-mode function. The actual use of language and and the quantifying - the counting - well that's enlisting L-mode under R-mode's guidance, rather than L-mode trying to take over.
So let's walk through this
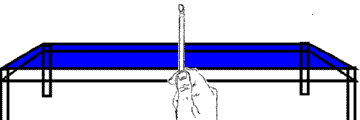
With pencil in hand, sight the high-angle blue table top. Take a measurement of it's width. close one eye, extend your arm straight out in front of you. Ask yourself "how many pencil lengths tall is this section of the table top?"
The table you'll be drawing at home will be different, but the one just below happens to be exactly one pencil length tall. Or actually, I just stuck out enough pencil to cover the distance. Either way, line-up the tip of the eraser with the top of the table or object you're sighting, and extend enough or retract enough pencil at the other end so your thumb tip lies flush against the bottom of the table. Just like this:
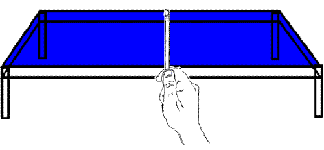
Sight the table top width
Now, here's a key point. This distance we've just sighted is now our "unit of measurement". In fact it's exactly one unit of measure. Is that written in stone? Of course not. It's just a starting point. And we're going to test it out. But just for funsies, let's label it as "one unit":
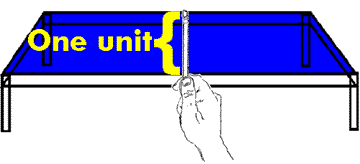
One Unit
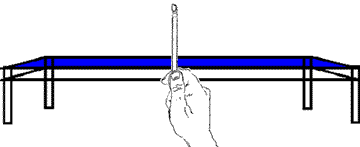
Next, using the same technique, and keeping exactly the same amount of pencil extended from out under your thumb, let's "sight" the next view, the medium-angle view of the table top. And look at this - it's exactly 1/2 the pencil length of the high angle-view table top just above. (Remember we're looking at the same table viewed from three different angles.)
Comparing the second table top with the first
And lastly, the third view of the table top is about about 1/4th the measurement as the first view of the table and so it's about half the measurement of the view just above. Same table, same table top, that when viewed straight down looks like a rectangle with perfectly square corners. None of this angled stuff!
Same table, same unit of measure, 1/4th the size
I should really quote the "1/4" - since it's only a distortion of space - the table top is always the exact same size. It's only foreshortened in these three views. The front edge is closer, the back edge farther away. The first law of perspective: "objects appear to shrink with distance". So the even though the the front and back edges of the table are the same length, distance from your eye makes them appear different and "sighting" helps you get past what you know to be true about the table and still accurately observe what's before your eye.
Did our unit of measure work out ok for us? Yes. Though a more intermediate object like, the medium angle view of the table, might have been more convenient, (you might have used less fractions). As an assignment go back and use the medium-angle view of the table top as the unit of measure. See if the high angle view of the table top isn't twice the size and the low-angle view now only 1/2 a unit.
How do you choose a unit of measure?
Pick an object or part of an object that's intermediate, even a little on the small end in size and use it as your unit of measurement. And then you're never married to that. It your measurements are accurate, you can change what you use as the unit and everything should still come out the same. The same way there's 10 dimes in a dollar or you can exchange 100 pennies for 4 quarters, units of measurement in your compositions are changeable - as long as they're consistent. Experiment.
Combining negative space and sighting, you now have the ammunition to reproduce accurately any of the tables on this page.
Four animations that really tie this whole section together:
Kasbohm & Company's
YouCanDraw.com
© Copyright, All rights reserved 1997
e-mail: jeffkaz@YouCanDraw