
The Supply Store
Back to YouCanDraw .Com
How many little squares fit height wise in the big square? |
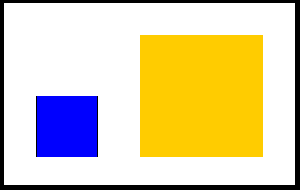
How can you relate the blocks?
Place whatever you've chosen to measure with - your thumb, a ruler, a piece of paper - and place it against the computer screen. Put your measuring instrument right on square 1 - the little blue one- or try viewing it so square 1 is between your fingers. Mark it's top edge and it's bottom edge on the piece of paper if that's what you're using to measure it. I've used a ruler here.
We'll be using the length of the side of the blue block as our "unit of measure". (We could just as easily have used the orange block to do this. Our unit of measurement would have been in fractions when we applied it to the blue block - and that would have been fine too. You'll be doing that in other pictures when your unit of measurement is larger then the object you're sighting. We'll keep it simple for now.)
In this next picture, we've placed a ruler next to the blue square. (As you'll see in a second you could've just as easily used your pencil and thumb for the measurement. Just want to show there's more than one way to skin a cat.)
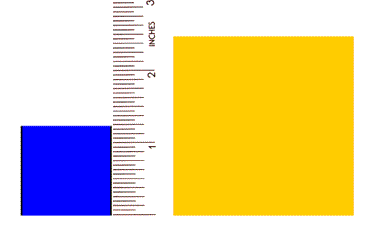
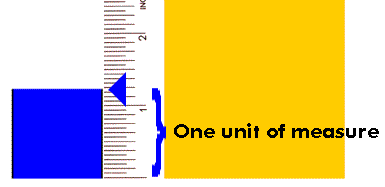
1. Getting ready to measure the blue block
It's pretty easy to see the blue block is just about one and a quarter inches tall. As you can see in this next picture, the one and a quarter inch line is the next medium width line above the blue arrow:
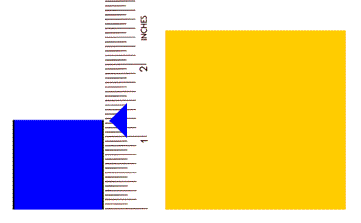
2. Marking off the length of a side of the blue block
Like I mentioned above, you could have just as easily used your pencil or thumb (at the end of your outstretched arm) to make this measurement. There's flexibility in how you can make a sighting. Just know what you're using for comparison.
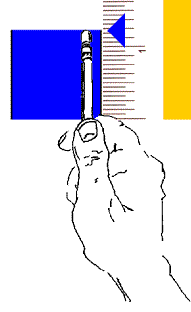
Using your pencil to sight the blue block
Since this will now be our unit of measure we're going to call it that. What do call this length we've just sighted? It's our unit of measure of course. In fact it's one unit of measure. We're just arbitrarily calling it that because it's a unit of measure that makes sense for the objects we're relating.
3. This is one unit of measure
Now move this measurement alongside square 2, the orange one. (I.e. move your fingers, or the paper, or the ruler, or your thumb and pencil - what ever you've chosen to use.) How tall is it in comparison? About twice as tall right? Simple enough. And since our unit of measure also happens to be almost one and a quarter inches tall, the orange square is two times that, or almost two and a half inches tall.
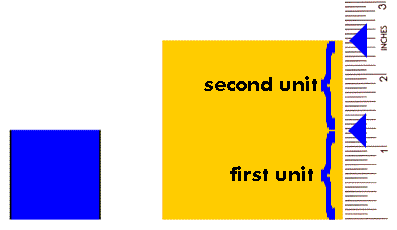
4. How many units (or blue blocks) tall is the orange block?
Now do the exact same with the width of square 1. Compare it's width to that of square 2. If the blue block had been a rectangle laying on it's long side, your measurement would have been greater than one unit. That is, you'd have had "1 and 1/4th" or "1 and 1/8", or "1 and 1/5 and a hair" blue block units. Now go back and watch the animations in Part VI and see if they don't make more sense to you. There the unit of measurement is the table width - it's left side to be exact.
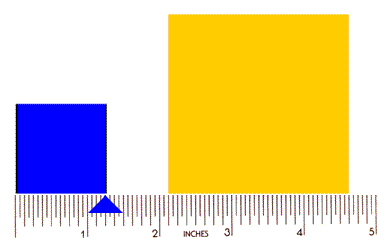
5. Doing the same for the width
Lastly, compare the width of square 1 with the diagonal of square 2. Don't get thrown here, I said diagonal. I know - small curve ball - you have to rotate your measurement, the blue block 45 degrees in order to make an accurate measurement. Would you agree it's roughly 2 and 1/2 times the width of the little square? "Sight" it. Do it for your self.
Using the little block as the "unit of measure" was an arbitrary choice, but it made sense, right? You could have easily chosen the large square and you'd be able to relate and compare everything to it. This is just a primer on proportion, but the idea is this simple: in anything you'll be drawing, this simple idea will work for you. What you choose as a basic unit of measurement will become obvious, easy, and changeable.
Let's use a little more complicated example.
So when you come to sighting a face like the following, you can see that that the little blue block was a good choice for a unit of measure.
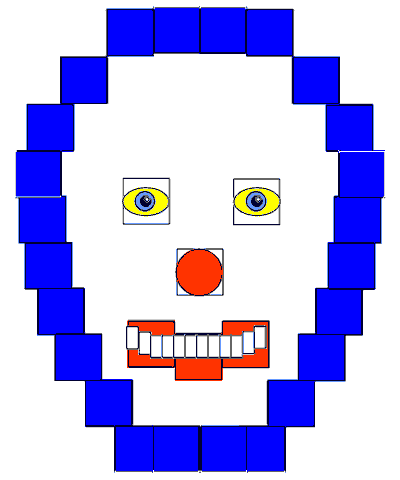
Mr. Sluggo the Blockface
This face has been constructed entirely of single unit blocks. Go ahead, count them up. He's about 10 (and a hair) blocks tall and about 7 and 1/2 wide. The width won't be quite so easy to figure - you can't just count up the stacked up blocks. Sight him. It'd be good practice. Any picture you're drawing can be broken into smaller units, so...
You can springboard off this general idea when you look at more complicated pictures. The steps will be exactly the same: pick a unit of measure and sight every feature in terms of that chosen unit. Are you limited to that? Of course not. You can use any part of the head or object you're drawing as the unit of measure. Remember also you can use the pencil at the end of your outstretched arm as the unit of comparison for sighting. Or a ruler, your viewfinder, a brick - as long as you can consistently measure the different parts of a composition against some unchanging measure.
Now go back to the first page of proportion (Part VII) and see if you can't "sight" the arrow example as well as the hydrant and cacti (plural for cactuses) in the illustrations there. Lastly...
See the following: It's the latest view out my window. I recommend using the small statue at the far right as the unit of measure. The big statue - at the far left - is about 4 small statues tall. (I didn't include the short stonewall in my measurement. You might want to click on the unfettered, full sized illustration to fully appreciate these proportions.) Is this what you discovered? So the point: use a unit of measure that's appropriate to the picture you're sighting.
I want you to get this idea because it's really important. The idea is simple, and getting you to consistently and naturally apply it is my goal.
Kasbohm & Company's
YouCanDraw.com
© Copyright, All rights reserved 1997
e-mail: jeffkaz@YouCanDraw