
Back to Pupils, Iris and Eyeballs
The Supply Store
Back to YouCanDraw .Com
Eyelids |
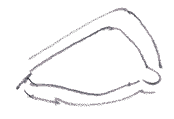
Forming the top and bottom of the aperture (opening ) over the front of the eye are the eyelids. As you saw earlier, they're roughly triangular to almond in shape. Here's a very minimalized outline of the left and right eyelids:
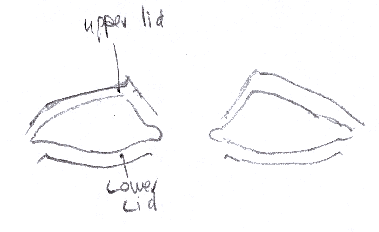
A "Minimalized" representation of the eyelids.
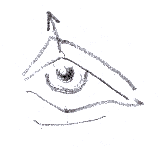
On the nose-side of each eyelid is a little cup: it's called the "medial canthus". ("Medial" means "middle" or towards the "midline" of the body. Suffice it to say "Canthus" means corner. ) There's a lateral canthus too - it forms the angle between the upper and lower lids on the ear-side of the head. I only mention those because labeling them will 1) help you look for them, 2) drawing them in a picture adds realism to your drawing and lastly 3) observing the angle or plane between the canthii (plural for canthus) is an important distinction in drawing eyes. Don't get bogged down on #3 - we'll be covering that later.
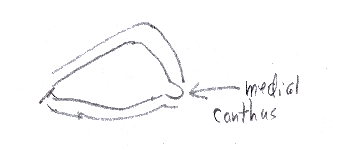
Eyelids and Medial Canthus
And this picture points out the lateral canthus:
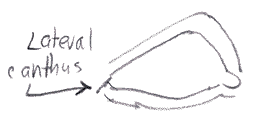
Lateral Canthus
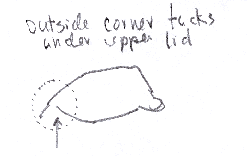
The lower lid tucks under the upper lid
Some minor details: Note in this schematic how the lower lid tucks under the upper lid at the lateral canthus. Look in the mirror and see this demonstrated with your own eye.
Time to Draw
The canthii (the two canthus) are just the two corners of the eye. Guess what? It's time to draw again. You'll need:
- 10 -15 minutes max.
- a pencil (a number 2 or softer)
- paper (lineless, typing paper is fine, newsprint is just fine too).
- Do 4 - 5 drawings of the eyelid. This will get you warmed up for the next lesson.
- Date and sign your drawings.
So we're going to dive right in and draw this shape (the illustration immediately below) using the pure contour technique as a warm up (click to review pure contour.)
Note: use the link above if you need to review pure contour. As you know pure contour technique is when you draw the object without taking your eyes off the object - that is, without ever looking at your paper. You're moving your pencil on the drawing paper in tiny increments in sync with each tiny movement of your eye along the contour. (See example of the Eyelid as a pure contour drawing.) Draw it if you're feeling adventurous.
Here's the object you're to draw. Draw it right off the screen. (This is a pretty straight ahead drawing.
Draw this as a Pure Contour
Remember, do at least 4 of these drawings - they're quick and easy. You'll see new undulations and movement within the lines as you do each consecutive drawing.
(Note: If you've done the lessons in sequence, this will be the fourth time you've seen pure contour - it's time to stretch out a little and wing this technique from memory. You can do it! And of course there's no shame in looking it up. Getting you fluid in drawing caricatures AND accessing the techniques that evoke R-mode (the artistic brain) are both my goals.)
Modified contour
Done with the pure contour exercise? Excellent. Now we're going to jump right into the next exercise. This one uses modified contour. In comparison to pure contour, modified contour gets your "accuracy quotient" climbing. (By "accuracy quotient", I just mean this method gets you drawing more realistic portrayals of the subject. I made up the name.) The utility of pure contour is to draw you into that wonderful in-the-now experience of R-mode.
Go to Modified Contour of the Eyelid
Kasbohm & Company's
YouCanDraw.com
© Copyright, All rights reserved 1997
e-mail: jeffkaz@YouCanDraw