5 February 2000
********************************************************
YouCanDraw.com's Insiders Communique
********************************************************
In this (short, well shorter) issue:
1) Two sites for photos to practice caricaturing
2) Feature by feature: the Lower Lip
3) YCD Update
--------------------------------------------------------------------------
Hi everybody!
This is a short issue today, (more of a communique than a
newsletter).
1) I've included two links here today -
both with lots of excellent
photos of actors/actresses/singers/ celebs, etc. The
first site -
"Double-Whammy" is a photography site - has
lots of excellent photo's
to caricature - some of well known people, some lesser
known.
Look your way around the grid you'll find on the left at
this site:
http://www.double-whammy.com/
The second site. This one was brought to my attention be
one Floyd
Stockwell of Marion, Iowa sometime back. The whole entire
paragraph
of numbers and letters below is the address. If it
doesn't show up all
underlined and blue, you'll need to copy and paste it
into your web
address bar and delete any extra spaces in it. (I've
emailed the
owner for the real web address but I've heard nothing
back from her.)
Floyd Stockwell is an absolutely prolific caricaturist
and cartoonist, and
one of YouCanDraw's biggest supporters. So if you can get
through to the
site you'll see it's a small gold mine of links. (Thanks
again Floyd
for everything!). Here's the site:
http://members.aol.com/bjrfamily/famous.html
---------------------------------------------------------------------------
2) Feature by Feature on-going mini-series: the
lower lip
"Feature by feature" is the result of a request
from a few members
for small, doable assignments - assignments that are
relevant and can be done
in few short sessions. The idea behind it is this: learn
a feature or part
of a feature and draw it on three to four different
occasions where you
draw nothing but this feature for a minimum of 15-20
minutes. (Hopefully
more). Your sole focus in these sessions is this one
feature - you immerse
yourself and internalize this part into your permanent
memory - not to build
a "stock" picture in your brain you just dump
out every time you think "lower
lip", but so you have an understanding of what
"lower lip" should look like
when you look at anyone's lip.
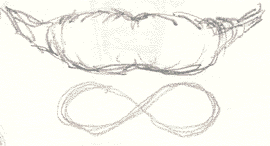
See the attached pictures to use for your drawing -
they're straight from the
section on Lips and Teeth. Draw 12-15 drawings of each
per session - at least.
(When I first started doing this I did several hundred.)
Then look for the
lower lip in photos, other drawings, other drawing books,
on people, review
the chapter on lips and teeth at the Insider's Site:
http://ycdinsiders.digitalchainsaw.com/InsidersArtistLoft/lipsandteeth.htm
Then try drawing it from memory. If you get stuck, go
back to one of the
pictures and you'll find now you're really looking at it!
You learn to ask questions like:
*what's the main shape(s)?
*what's it close to?
*how does it compare in size (to teeth, eyes, upper lip,
etc.?)
*what direction do the grooves in it go?
*where's the highlight(s)?, the shadow?
*what are the negative spaces around it?
*Make the lower lip the focus of your attention until the
next "Feature
by Feature" comes out.
You don't want to ignore or forget that the real pleasure
of drawing comes
from accessing "R-Mode" - getting into your
artistic brain - but when you
need to draw rapid fire at a "gig" it helps to
know what you're looking for.
Start slow. Know what you're looking at. Really SEE what
you're drawing.
In time your pace will pick up and you'll be
"kicking out" the pictures.
--------------------------------------------------------------------------
3) Update on the next "Light and
Shadow"
We're working hard here on the next section, Lesson 9:
Light and Shadow.
Hopefully it'll be completed in the next couple of weeks.
Learning to
differentiate light and shadow and then add it your
pictures adds so much
depth - this was the skill I admired most in other
artists when I first
got inspired by caricature. A few sweeps or rubs of a
finger into the right
part of the drawing and Voila! 3-dimensions. Just like
that. (I'll say
this muchright now: the trick to shading is learning to
see shadows as
shapes - not lines just like you did in the sections on
negative space -
(Lessons 6 and 7.)
Until next week, keep on drawing!
Warmly,
Jeff
Lips to draw. The first: just a lower lip;
the second: pick out the lower lip - then draw it.


|