|
31 August 2000
*******************************************************************
YouCanDraw.com's Insiders Communique
*******************************************************************
In this issue:
1) Capturing subtle shapes, lines and shadows
2) Foreshortening
------------------------------------------------------------------
Hi all!
Hope you're all doing well. It's a long weekend in the USA - all you
"statesiders" please have a safe and leisurely Labor Day Holiday.
Some heavy concepts today and member Suzy Voye's drawings
Let's jump right in. Today we're going to look at some common problems
encountered while drawing complex facial features - namely lips and mouth.
(Yes we talked about this a little last time.) Today we have the advantage
of having some real samples to talk about. I must thank Suzy Voye of
Tennessee for her willingness today. She agreed to let me use a couple of
her drawings so all of us may benefit.
Suzy has been absolutely courageous in her drawing efforts over the past
several months and it's really starting to show! (These copies really don't
do the originals justice - I had to shrink the files before I sent them out.
"Shrinking" or compressing causes loss of detail.)
The strength of "line" and blending to shadow
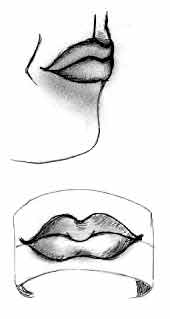
Look at the first illustration (aalips4.jpg) - it's a drawing of a 3/4 view
lips, and a front view of lips on a cylinder. Suzy's capturing the shape of
the lip wonderfully here. She's doing a very effective job shadowing (squint
and look at the lower pair of lips on the cylinder - see the depth come
out?). I think what's bothering her however - and I'm guessing at this - is
the possibly more cartoonish look than she wanted. "If we can name it, we
can conquer it!". (Ludwig von Wittgenstein or Sigmund Freud said something
like that. If they didn't, I did! :- ) And I think the problem falls in the
area of line strength. When you squint, the lines soften. Now lets go after
that effect without squinting.
Aalips4.jpg
Lips, for me - especially when caricaturing - are the hardest thing to
capture. And that's because the lighting and light/shadow shapes are so
subtle. It gets confusing! When you look at picture or photo of the mouth
(any mouth), notice how few hard lines you see: the upper margin of the lip
and the shadow that's formed between the upper and lower lips - right
there where the two touch - are the hardest, ie darkest lines of the lips.
The rest of the lips really are a mix of shapes. The lower lip is much more
definable as a group of shapes or shadows - rather than single lines.
Through thick and thin
Look at the second picture (AAfin1Voye2.jpg), - it's the larger lip picture.
With your eye, follow your way all the way around the outline of the lips.
Notice how there's not really a single line that makes up any one part of
the lip? Even the upper margin of the lip, straight as each segment is (by
"segments I'm referring to the 4 individual pieces of the flat "M" shape),
each segment is probably a combination of 3 or 4 light lines.
Second Picture: AAfin1Voye2.jpg
Take a moment and look at it. Do you agree? How do you make those thin
lines look like realistic? This is where pure contour drawing comes in
beautifully (We talked about that in the last communique). The lines are
more of an impression that when perceived as a whole by the viewer look
real. The "impression" I'm talking about is the recording in pencil of what
you, the artist observed with your eye. Shadows on curved surfaces, like the
lip, drawn as blended shapes are easily interpreted by the eye. "Blended"
just means a gradual gradation of value from light to dark.
So softening the lines and gradually working into shadows represents reality
more closely than do harsh lines. Let me say that again. You get a more
realistic picture of complicated features if you blend shadow and line.
Cross-hatching is an excellent way to pile up lines for shadow shapes.
(You'll find the section on cross-hatching in part 3 of Lesson 9. Lesson 9
covers shadows and highlights.)
http://ycdinsiders.digitalchainsaw.com/InsidersArtistLoft/lesson10.htm
(Note: this is the link to lesson 9 - even though the address above says
"lesson 10" - a carry over from the great hard drive crash of 1998.)
The famous disappearing lower lip
Another detail of the lower lip: in bright light, the "red" of the lower lip
almost disappears. It's very difficult to differentiate between the red of
the actual lip, and skin tone of the area just beyond the lip and on to the
chin. The transition between the two is very subtle - and it occurs in the
middle of what still looks like the pulp, the bulge of lip. Often a
highlight - the reflected light - obscures the border altogether. In fact,
it's actually easier to draw the lower lip by default. How do you do that?
By drawing the shadow shape of the shadow underneath the lower lip.
To summarize: to get a more natural looking lip, use several small light
lines in place of a single harsh line for the "hard" lines of the lip, and
blending of shadow shapes for the softer edges. Excellent start Suzy!
Assignments:
Thought you'd get out of here without some work? :-)
Assignment #1: Observe closely the subtle shapes and shadows of the lips on
REAL people. Look at the transition of the "red" of the lower lip back to
skin tone (it's a subtle but definite line - also called the "vermilion
border". This is outlined in more detail in the Lesson 13 on Lips and Teeth).
Assignment #2: Don't be afraid to draw lots of lips! Trace 10 or 12 of them.
Then try them freehand. Fill a whole 2,3,4 pages of a drawing pad wit
nothing but lips. They will come.
Assignment #3: shadowing. Spend an hour doodling with cross-hatching - the
little flick of the fingers (on short hatches) and the flick of the wrist
(on longer hatches), is a simple skill that comes with practice. I use it in
combination with smearing all the time. In fact, try this: make a shadow
shape. Scribble on a sheet of paper with pencil until the pencil's so thick
it shines. Now gather up some of the lead rubbing a Kleenex or your finger
right into it. Take your pencil-lead loaded finger-tip and make some kind
of spontaneous random shape on the top half of a clean sheet of paper. On
the lower half, try and re-create the shape with nothing but cross-hatching.
Use more layers of hatching where the pencil lead is thicker.
2) Foreshortening
Foreshortening is the name given to the way an object seems to change
proportion when you view it from different angles. This is different than
perspective - perspective is the way an object changes in SIZE with
distance. They're related - but they're different ideas. (In caricature in
you can get away with mixing both - still your caricatures will be much more
controllable if you understand how to use both.)
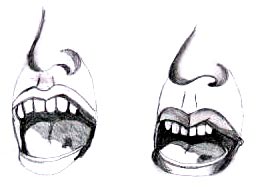
In Suzy's next pair of pictures, she advancing to drawing the mouth and
teeth. (See AAMouth.jpg). These are excellent starts - they're both very
complicated pictures. Suzy does a precise job of capturing depth (especially
over the tongue and in the back of the mouth. In the originals here I can
see all the way back into the pharynx in the picture on the right - right
down to that little tear-drop shaped thing hanging down ion the back of the
mouth (this is called the "Uvula"). That's awesome detail Suzy! And get a
load of the shadow across the tongue - it's contoured exactly how the
tongue's shaped. I certainly get the full three-d effect here.
AAMouth.jpg
Where Suzy's having a little trouble is again the lips. And I think that can
be cleared up with a few intense sessions of drawing nothing but lips. (Suzy
you really are tackling about 5 lessons in one in this drawing!) Again by
squinting I can see the shadows make sense. You've captured the three-d
effect expertly in the picture on the left - where the philtrum (also known
in stuffy academic circles as the "booger canal") curves into the upper lip.
That's very effective.
As we move north in both pictures we run into just a little problem with the
nose. Both these pictures are "three-quarter" views. The most difficult
problem in a three quarter view is keeping the proportion and the "planes"
straight.
Ok, I know I'm confusing you
now...planes...foreshortening...proportion...yea, it's a jumble - and this
is THE most difficult part of drawing: where perspective, proportion, light
and shadow - where they all meet. And they all meet right here in Suzy's
picture. Lets get down to understanding some terms here - and lets do it by
example (I know I'm getting long-winded again ;-).
Here's an example of foreshortening - you can do this right now in the
comfort of your own home.
Foreshortening Demo
-pick up a pencil in your right hand
-hold the lead end in your fingertips
-Close your left eye
-Hold the pencil about a foot and a half to two feet away
-Point the eraser end towards your eye like you were going to poke your own
eye (Of course you're not going to do that - gouge your eye that is.)
- Now, still with your right eye open, move the pencil slowly back and forth
towards your eye.
-watch the eraser get huge! Move the pencil away - it shrinks! That's
Perspective.
Now, with the pencil still about 6 inches from your eye, turn your hand,
that is slowly rotate it so the pencil turns away from your eye. Rotate it
back. Away. Back. Note how the eraser changes in size in comparison to the
shaft of the pencil. When the eraser is pointed straight at your eye, it
dominates what your field of view. When your hand is turned (and you're
viewing the pencil from more of a side view - a "three-quarter" view) you
see the less of the eraser now, and more of the shaft. While the eraser is
still close to your eye it dominates your view, as the whole pencil gets
closer to parallel to your line of vision, you see the pencil as you
normally picture it - long and skinny with one pointed end. This range, from
seeing nothing but eraser to seeing the whole stereotypical pencil is
foreshortening. Play with this for awhile - it's a really important concept
to get a grasp of.
Pencils and planes
The pencil example is a an example of foreshortening along an axis.( the
pencil is the axis) Foreshortening occurs along planes as well. Now lets
apply this idea to the placement and the rotation of the nose on the a face
in a three-quarter view.
Look at the next picture. (aafin1voye31composite.gif). Pretend the cube is a
stand-in for a head:
Illustration 1 shows a "sagittal" plane. It divides up the cube from north
to south going from the front to the back. The nose from it's root to it's
base lies in alignment with the sagittal plane.
Illustration 2 shows a horizontal plane - it intersects the sagittal plane
right where the base of the nose would rest.
Illustration 3 shows roughly how the nose might fit at this intersection of
planes. Half the nose is on one side of the sagittal plane, the other half
on the other side (the dotted line suggests that far half).
Illustration 4 combines the idea of planes and the nose's placement on the
face within those planes.
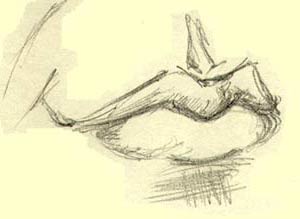
The very last picture (aafin1Voye411.jpg) shows the nose and the different
volumes of the head. (And if you look close, you can see I even tilted the
nose just a tad towards the viewer - toward you, I should be flogged!
Alignment takes practice and close observation!)

Last picture: aafin1Voye411.jpg
Lots going on!
All of these elements are at work in Suzy's picture - foreshortening,
perspective, shadowing, three-dimensional volumes of mass - whew! that's a
lot! And that's why she's feeling frustrated with her drawing (even though
I think it's very, very good).
And here's the good news: you don't have to understand these complicated
ideas with any kind of depth - If for a moment they make sense, that's all
you have to know. What really matters is how you observe what's under your
nose. Trusting your senses - recording what you see and not what you think
you OUGHT to be seeing - that is the great and simple trick to drawing.
Little by little building the right brain muscle
The fact that Suzy has done such a fabulous with this picture says to me she
absolutely is getting into her "right brain". I think when she added the
nose, that's where she may have referenced "noses" in her brain and less of
the complex of shapes and lines and shadows in front of her. (We all do
this! Even the greatest artists in the world do it - you just have to see
their sketch books to see this.)
Staying in the your "right brain" is the trick when just starting out. Doing
that is like building a muscle - you don't want to start out by trying to
lift your max for 3, 4 hours straight. Short and frequent sessions - or a
longer session with lots of breaks. In time, staying in your right brain,
(r-mode) will be as natural as holding a pencil.
Well, I've gone way overboard here today - there were two other things I
wanted to talk about here - shadowing and ellipses but they'll have to wait
for the next communique. Suzy - again I thank you for your willingness and
courage - you're a true sport and real trooper. Keep up the fantastic work!
Until next time - take care and keep on drawing!
Warmly,
Jeff k.
Addendum:
Hi all,
Me again - Quick note. The attached picture is the illustration I'm referring to in 31 August 2000 Communique when I'm talking about contour of the shadows over the inside of the mouth, the tongue, alignment and foreshortening. I hope it males sense!
Warmly,
Jeff
Kasbohm & Company's
YouCanDraw.com
© Copyright, All rights reserved 1997
e-mail: jeffkaz@YouCanDraw
|