|
20 August 2000
*******************************************************************
YouCanDraw.com's Insiders Communique
*******************************************************************
In this issue:
1) Re-introducing an age old technique: The drawing grid - using the
lips and teeth as an example.
--------------------------------------------------------------------
Hi Everybody!
A member recently hinted to me that she might be having a hard time drawing
lips and teeth. Lips and teeth can be complicated and "motion" is the key
word here. More so than any other part of the face the mouth moves. It's
constantly changing when we talk, change expression, or even have a tiny
mood change. The musculature around it, the teeth that you see, all the
different lines and creases that come from all that moving around, they
change and it gets complicated! So it's easy to get bogged down in the detail.
Anatomy: very briefly - because we've covered this before
The first thing to remember about the mouth is it's built on a
cylinder: the lower set of teeth are set in a semi-circular pattern that
match the shape of the upper row of teeth - which are set in the maxilla in
a - guess what? semi-circular fashion. (Actually, both upper and lower teeth
have horseshoe shape but the part that influences what you see and draw,
i.e. the teeth at front of the mouth, they're arranged in a semi circle.)
The lips wrap right over this understructure.
The Campbell's Soup Can
One way to think of the lips and teeth is if they were pasted up against
a can of Campbell's soup the same way the red and white Campbell's wrapper
is glued to the can. And this is probably another reason why they get so
hard to draw: you have to deal with three full dimensions.
There's a lot of curving on that cylinder too so you need to pay special
attention to the subtle changes in perspective, proportion, and contouring.
And just when you think you're getting that, you start noticing all the
constantly changing shadows and highlights over the ever-changing lips. Now
you got yourself a real headache! And this is the great trick of drawing:
observing and capturing a resemblance of all that change, collapsing the
three dimensions of real objects on to the two dimensions of drawing paper.
So I don't think this member wanted another anatomy lesson*, or anything too
long winded on what drawing is. But what I'd like to give her and you is a
mini-refresher on a technique that helps make the complicated LESS
complicated.
The Drawing Grid
Here's a technique you can utilize for managing complicated shapes.
Allow me to re-introduce the drawing grid here. What's a drawing grid? It's
just what it sounds like. It's a grid - a pattern of squares that you both
view your subject through, and draw on. You have the exact same proportioned
grid pattern duplicated on your drawing paper - the same pattern, square for
square that's covering your original picture.
This in effect breaks the larger, more complicated picture into smaller more
manageable parts. You begin with one square, employ what you know about
positive forms (i.e. the shape you're drawing), negative space (i.e. the
shape of the area around the positive from), with what you know about shared
edges and contours, you judge all the angle relationships within that
square, and you squint at the areas of complicated shadows until you see a
shape arise out of the mess of smaller, more subtle shapes and contours.
Let me demonstrate. There's a series of 5 pictures below. (If you have one
of the free email services, it's possible the pictures might get removed -
not to worry, they'll soon be uploaded to the Insider's artist Loft.) Look
at the pictures in the order they've arrived.
Picture 1:
This a close up of lips and teeth. It's a fairly complicated picture at
first glance. Lets do two things to it. First we'll add a grid overlay to it
and second we'll collapse some of that detail into more abstract shapes. But
go ahead, look at the first picture.
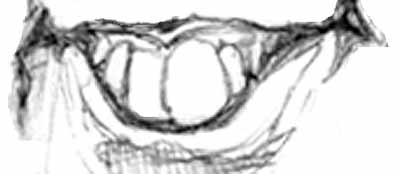
Picture 1
Picture 2: lip teeth and grid
OK, back? Now look at picture two - the gridded picture. Run your eye around
the inside of each of the smaller boxes. Look at the middle box on the top
row. Notice how the horizontal line coursed right through the big front
tooth? Ask yourself how much of that square does that rounded shape of
the tooth occupy? Look at the "negative space" of the gums. (They're
considered "negative space" in this instance since they're "non-tooth" shapes.
Thinking of them as "non-teeth" forges a little opening in your brain to
think of the gums as a whole separate shape different from the teeth. You
can do this perceptual switching around with any shape.)

Picture 2
Look at shape of the tooth just to left of the BIG tooth - how wide is the
little tooth in comparison to the big tooth? At what angle does the top line
of the little tooth intersect the big tooth? It kind of arches right into it,
doesn't it? Now ask these same kinds of questions about all the rest of the
shapes within that one small square. After that, work your way around the rest
of the squares. Tedious? Yes, but much more manageable than attacking the
whole shape at once. (Remember the upside-down cowboy in lesson 3? He was
broken up into nine smaller pictures. It's the exact same principle here.)
Your assignment
Print out all the pictures. Picture number three is a grid of the exact same
proportion as the grid you see over picture 2. If you choose to accept your
mission, you're to redraw the lips and teeth inside the grid just as you see
it in picture number two. Do this 4 or five times - you'll start seeing tooth
and lip relationships as familiar and as less complicated. This happens any
time you do lots of repetitious ground work - you start to recognize the
patterns.
Picture Three
Picture number four
In this picture, you'll see a version of the lips and teeth with all the
extra shadow shapes collapsed into one color. This will be pretty close to
what the very first picture of lips and teeth (picture 1), will look like if
you squint. Try it - you'll see all that confusing detail disappear. In
time, as you want to draw more detail, you just squint less and the detail
remains.

Picture Four
Picture five - a lesson from skiing
Picture number five is just a grid with less square - by using less squares,
you're managing larger and larger areas of the picture at one time
employing, building on all the skills you've been rehearsing, enlarging the
"Gestalt" muscle (the fifth skill of drawing), in your brain where you
almost look through the picture as you draw. You can eliminate the grid
altogether in time.
The "Graduated" Grid
This makes me recall a method ski instructors used some
25 years ago - called the "Graduated Length Method" (or GLM). You started
off on very short, easily controlled skis on very easy slopes and in period
of a day or two, after you felt very confident on the shorties, you stepped
up - i.e. graduated - to the next longer size. You did this 5 or 6 times
until you worked your way up to full size skis. You'll know when you're
ready to graduate. So go ahead and try drawing the same lips and teeth in
the grid with the larger(and fewer), squares.
No printer? No problem :-)
What, no printer? Here's a possibility: put some saran wrap right over your
screen. Copy the grid pattern with a black magic marker. Now place or tape
the saran wrap to a picture window in your house where there's lots of light
coming through. Grab some thin paper (typing paper is usually just fine).
Place that over the saran wrap and you'll instantly see you can trace the grid
pattern with no problem. Even if your hand's a little shaky drawing the
squares, the grid you draw will be close enough. Go back to your computer
and draw the pictures as you see them.
Going bonkers with grids
Take any of the grids you've made or printed. Enlarge them 10%, 50%, 200%
(at Kinko's or some place like that). They have the same proportions, so the
final picture will look the same. You can use this approach on any problem
shape you might be having. Blow up a picture of the problem part on a Xerox
machine and draw on your own grid - just remember to make sure the grid you
draw into matches the grid you have over the picture you're drawing. Of
course, that's if you want to keep it realistic. You can distort the drawing
grid any you want - and come up with some really crazy distortions.
Have fun with this!
Note* Remember, you can go for all the detail you want later, but shoot for
gleaning the overall shape. One way you can learn to recognize the "overall
shape" is by drawing a whole gang of lips and teeth. Just pull out any
anatomy book or see lesson 13 on lips and teeth and just start
drawing them - over and over again.
Warmly,
Jeff K.
Kasbohm & Company's
YouCanDraw.com
© Copyright, All rights reserved 1997
e-mail: jeffkaz@YouCanDraw
|